Import Media Files for SaaS

One of the standard ‘Problems’ when you’re in an AL workspace in VSCode is a warning that you are no longer allowed to use BLOB as a datatype for images. This has been at the bottom of my priorities list until I had a request to create a new image for a standard field. With this post I’ll show you how easy it is.

Media Field

The first element that you need is a field in the table. Instead of a BLOB field with subtype Bitmap, you now need a field of type ‘Media’. There is also a data type called ‘MediaSet’ but that’s not what we are going to use. Go to Docs to read about the difference between Media and MediaSets. The field is not editable directly because we will be importing the image through a function.

In addition to the field itself, you need a function to import an image file into the field. In the object below I have a simple table called ‘Book’ with a number, a title and a cover. We use the ImportCover function to do the import, and implement that as an internal procedure, so it can only be used internal to the app. You can of course set the scope as you see fit.

table 50100 BookDnStr
{
    Caption = 'Book';
    DataClassification = CustomerContent;

    fields
    {
        field(10; "No."; Code[20])
        {
            Caption = 'No.';
            DataClassification = CustomerContent;
        }
        field(20; "Title"; Text[100])
        {
            Caption = 'Title';
            DataClassification = CustomerContent;
        }
        field(30; Cover; Media)
        {
            Caption = 'Cover';
            Editable = false;
        }
    }

    keys
    {
        key(PK; "No.")
        {
            Clustered = true;
        }
    }

    internal procedure ImportCover()
    var
        CoverInStream: InStream;
        FileName: Text;
        ReplaceCoverQst: Label 'The existing Cover will be replaced. Do you want to continue?';
    begin
        Rec.TestField("No.");
        if Rec.Cover.HasValue then
            if not Confirm(ReplaceCoverQst, true) then exit;
        if UploadIntoStream('Import', '', 'All Files (*.*)|*.*', FileName, CoverInStream) then begin
            Rec.Cover.ImportStream(CoverInStream, FileName);
            Rec.Modify(true);
        end;
    end;
}

Factbox for the image

Similar to how Item images have been implemented, you can create a factbox to show the book cover and add that to the Book Card. Using a factbox also makes it easy to keep the related actions close to the control.

page 50100 BookCoverDnStr
{
    Caption = 'Book Cover';
    DeleteAllowed = false;
    InsertAllowed = false;
    LinksAllowed = false;
    PageType = CardPart;
    SourceTable = BookDnStr;

    layout
    {
        area(content)
        {
            field(Cover; Rec.Cover)
            {
                ApplicationArea = All;
                ShowCaption = false;
                ToolTip = 'Specifies the cover art for the current book';
            }
        }
    }
    actions
    {
        area(processing)
        {
            action(ImportCoverDnStr)
            {
                ApplicationArea = All;
                Caption = 'Import';
                Image = Import;
                ToolTip = 'Import a picture file for the Book''s cover art.';

                trigger OnAction()
                begin
                    Rec.ImportCover();
                end;
            }
            action(DeleteCoverDnStr)
            {
                ApplicationArea = All;
                Caption = 'Delete';
                Enabled = DeleteEnabled;
                Image = Delete;
                ToolTip = 'Delete the cover.';

                trigger OnAction()
                begin
                    if not Confirm(DeleteImageQst) then
                        exit;
                    Clear(Rec.Cover);
                    Rec.Modify(true);
                end;
            }
        }
    }
    trigger OnAfterGetCurrRecord()
    begin
        SetEditableOnPictureActions();
    end;

    var
        DeleteImageQst: Label 'Are you sure you want to delete the cover art?';
        DeleteEnabled: Boolean;

    local procedure SetEditableOnPictureActions()
    begin
        DeleteEnabled := Rec.Cover.HasValue;
    end;
}

Add to the Page

All that is left is to add the factbox to the page where you have the import action. In this case I have a very simple Card page for the book, and the factbox is show to the side.

page 50101 BookCardDnStr
{
    Caption = 'Book Card';
    PageType = Card;
    ApplicationArea = All;
    UsageCategory = Administration;
    SourceTable = BookDnStr;

    layout
    {
        area(Content)
        {
            group(General)
            {
                field("No."; Rec."No.")
                {
                    ToolTip = 'Specifies the value of the No. field.';
                    ApplicationArea = All;
                }
                field(Title; Rec.Title)
                {
                    ToolTip = 'Specifies the value of the Title field.';
                    ApplicationArea = All;
                }
            }
        }
        area(FactBoxes)
        {
            part(BookCover; BookCoverDnStr)
            {
                ApplicationArea = All;
                SubPageLink = "No." = field("No.");
            }
        }
    }
    actions
    {
        area(Processing)
        {
            group(Book)
            {
                action(ImportCover)
                {
                    Caption = 'Import Cover Art';
                    ApplicationArea = All;
                    ToolTip = 'Executes the Import Cover action';
                    Image = Import;
                    Promoted = true;
                    PromotedCategory = Process;
                    PromotedOnly = true;

                    trigger OnAction()
                    begin
                        Rec.ImportCover();
                    end;
                }
            }
        }
    }
}

This was a fun one to figure out. Let me know in the comments if it was useful to you
Commitment Issues

So you’re evolving your source control practice. You have created a ‘dev’ branch to keep work in progress away from the ‘main’ branch, and maybe you are even using feature branches or branches per developer. As you are putting in place branch policies to prevent just anybody from committing changes, you notice a pattern of commits being created just by merging a change into ‘main’. In this post I will show you how to limit the number of commits.

The Setup

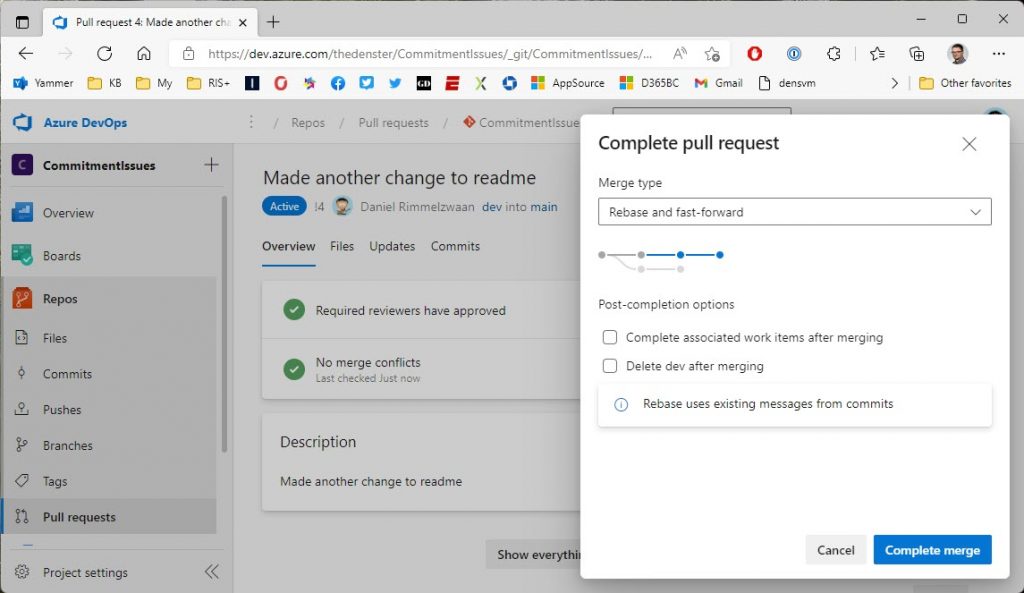
I have a simple project in Azure DevOps, with a repo that has a default branch called ‘main’ and a ‘dev’ branch. The main branch requires a reviewer, which in Azure DevOps means that changes can only be made through pull requests. I’ve committed a couple of changes in dev and I have created a pull request to move that change into the main branch to be released. The PR has been approved and I have clicked the ‘Complete’ button on the PR. The Azure DevOps default Merge Type is set to ‘Merge’ and all looks well, so then I click the ‘Complete Merge’ button.

The Issue

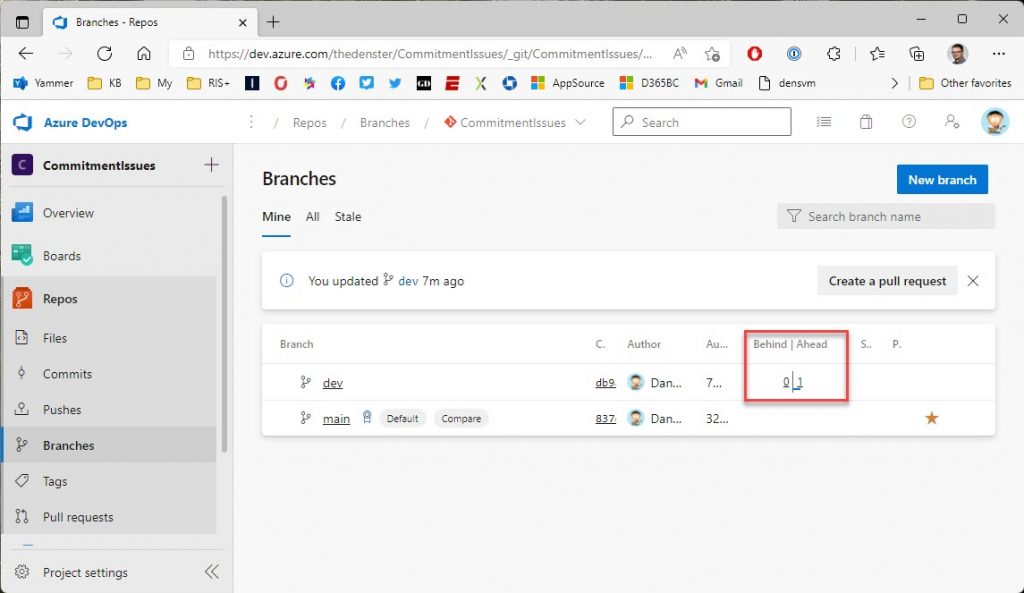
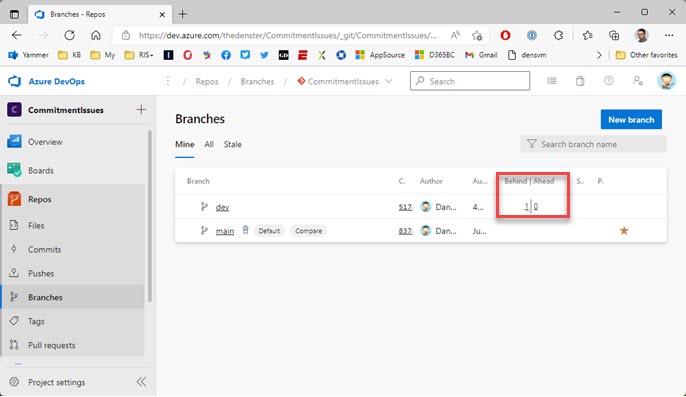
When the PR completes, you go back to the Branches view in Azure DevOps, and you notice that the dev branch is 1 commit behind on Main….

Wait, what? Didn’t I just merge 2 commits from dev into Main? The purpose of the PR was to synchronize the branches, but it appears that dev now a commit behind main. The Merge Type of ‘Merge’ created its own commit in the target branch, main in this case. When you go back to VSCode and merge main back into dev, you would notice that the source files themselves have not changed, even though Git has created two extra commits just from the Merge actions. You see, any time that you do a Merge in Git, it will generate a new commit.

If you were to do a file compare between the two branches, there would be no differences in the source files. The not so good part of using the Merge Type ‘Merge’ is that you will have to refresh your local main branch and merge that into your dev branch BEFORE you can continue developing. In itself maybe this works for many people but I prefer it if I can push out my dev work and continue developing without having to worry about being in synch with main.

A Better Way

There is another (I would argue a ‘better’) way to complete PRs. Another setup: I’ve updated my local main and merged that into my local dev branch; I have made another code change, which I have pushed that to the remote from my VSCode. The Branches view in Azure DevOps now shows dev is one commit ahead of main.

This time when you complete the PR, you select ‘Rebase and fast-forward’ as the Merge Type.

Because we are not merging, Git will not create a new commit. The result of this Merge Type is that the branches are in synch after completing the PR. There is no need for me to go back to VSCode and update my main branch.

So What is the Difference?

I’ll be totally honest here and tell you that I don’t really understand the difference between ‘Merge’ and ‘Rebase’. Something about where in the first the differences are actually merged and the changes are preserved in a new commit, and in the second the branch is rebased and the incoming changes are applied to that new base. I am sure that there is a distinct difference, and that this has an impact on the way you manage branches. I’ve looked for but could not find any posts that clearly explain the two with proper examples. I’m still looking, and I still want to know, but I have other more important things to worry about right now. Maybe a good topic to write about in the future :).

For practical purposes though, for the type of projects that I am involved in, I prefer the Rebase option. Personally, I prefer the branches to be synchronized when a PR is completed. Having to go back and pull the merge commit back into my local dev branch feels like a redundant step.

How to Populate a Test Suite

You’ve spent a bunch of time developing test codeunits, and you’ve figured out how to manually pull those into a Test Suite in the Business Central test toolkit. In this post, I will show you how you can automatically populate the test suite, which is especially useful for automatically testing your app in a build pipeline.

What Are We Talking About?

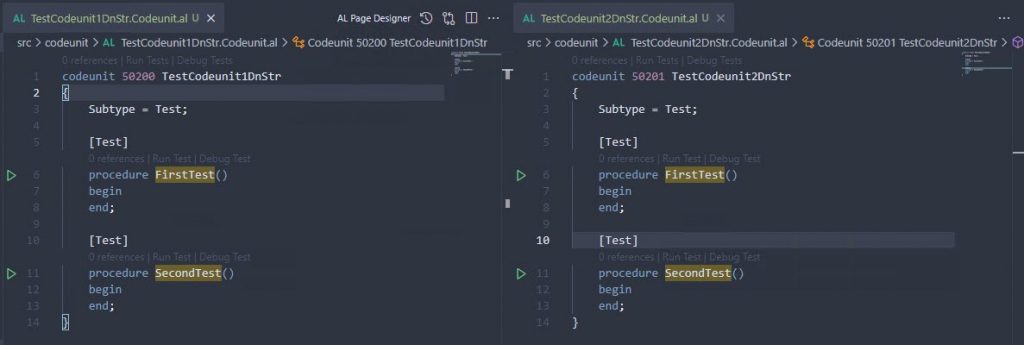
To keep the sample as simple as possible, I started with a Hello World app that I created with the “AL: Go!” command, plus a test app that has a dependency on it. In this test app, I have two test codeunits that don’t do anything. They are completely useless, just meant to show you how to get them into the test tool.

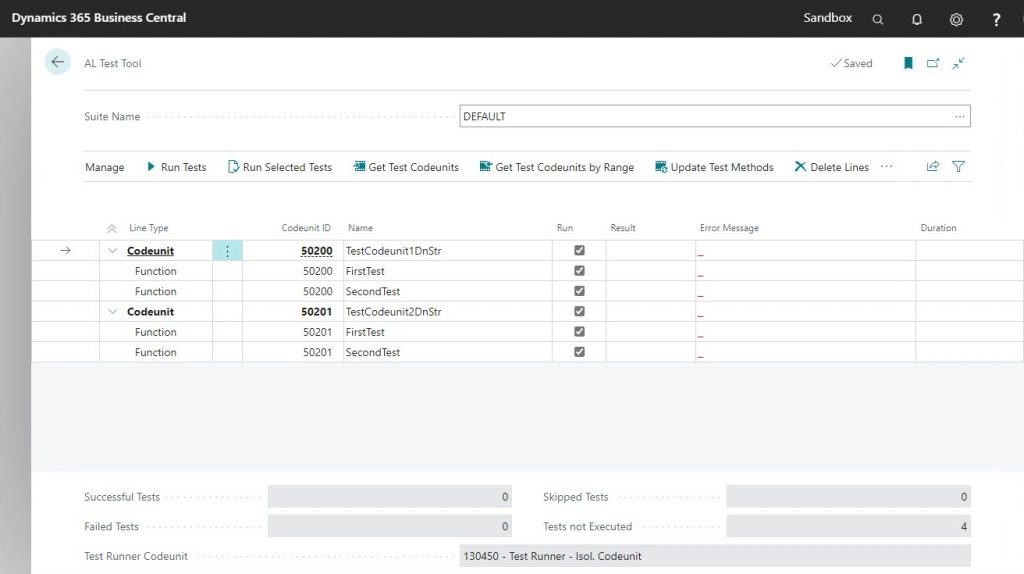
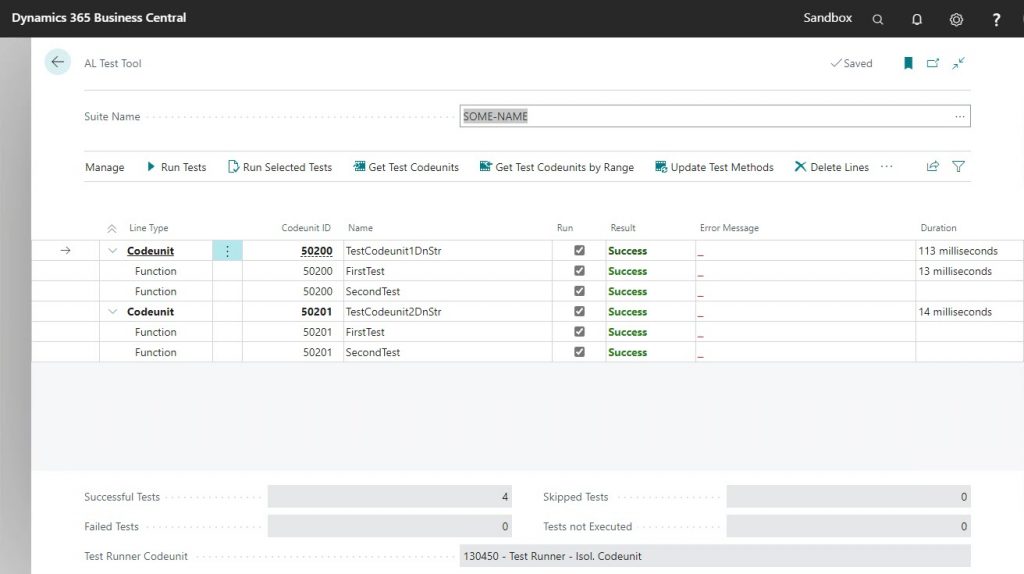
Those test codeunits are deployed into a BC container that has the test toolkit installed. This test toolkit (search for the ‘AL Test Tool’ in Alt+Q) is a UI that allows you to manually run these tests. Just like a standard BC journal page, when you first open the tool, it will create an empty record called ‘DEFAULT’ into which you must then get the test codeunits. Click on the “Get Test Codeunits” action, and only select the two useless codeunits. You should now see the codeunits and their functions in the Test Tool.

It’s kind of a drag to have to manually import the test codeunits into a Test Suite every time you modify something. To make it much easier on you, you can actually write code to do it for you. Put that code into an Install codeunit, and you never have to worry about manually creating a test suite again.

Show Me The Code!!

First we need an Install codeunit with an OnInstallAppPerCompany trigger, which is executed when the app is installed, both during an initial installation and also when performing an update or re-installation. You could probably create a separate “Initialize Test Suite” codeunit so you can run this logic in other places as well, but we are going to just write the code in our trigger directly.

The code below speaks mostly for itself. I like completely recreating the whole suite, but you can of course modify to your requirements. The important part of this example is a codeunit that Microsoft has given to us for this purpose called “Test Suite Mgt.”. This codeunit gives you several functions that you can use to make this possible.

codeunit 50202 InstallDnStr
{
    Subtype = Install;

    trigger OnInstallAppPerCompany()
    var
        TestSuite: Record "AL Test Suite";
        TestMethodLine: Record "Test Method Line";
        MyObject: Record AllObjWithCaption;
        TestSuiteMgt: Codeunit "Test Suite Mgt.";
        TestSuiteName: Code[10];
    begin
        TestSuiteName := 'SOME-NAME';

        // First, create a new Test Suite
        if TestSuite.Get(TestSuiteName) then begin
            TestSuiteMgt.DeleteAllMethods(TestSuite);
        end else begin
            TestSuiteMgt.CreateTestSuite(TestSuiteName);
            TestSuite.Get(TestSuiteName);
        end;

        // Second, pull in the test codeunits
        MyObject.SetRange("Object Type", MyObject."Object Type"::Codeunit);
        MyObject.SetFilter("Object ID", '50200..50249');
        MyObject.SetRange("Object Subtype", 'Test');
        if MyObject.FindSet() then begin
            repeat
                TestSuiteMgt.GetTestMethods(TestSuite, MyObject);
            until MyObject.Next() = 0;
        end;

        // Third, run the tests. This is of course an optional step
        TestMethodLine.SetRange("Test Suite", TestSuiteName);
        TestSuiteMgt.RunSelectedTests(TestMethodLine);
    end;
}

When you deploy your test app, it will now create a new Test Suite called ‘SOME-NAME’, it will pull your test codeunits with their test functions into the Test Suite, and it will execute all tests as part of the installation.

This code is very useful when you are developing the test code, because you won’t ever have to pull in any test codeunits into your test suite manually. Not only that, it will prove very useful when you start using pipelines, and you will be able to have precise control over which codeunits run at what point.

Dependencies

Here are the dependencies that I’m using :

  "dependencies": [
    {
      "id": "23de40a6-dfe8-4f80-80db-d70f83ce8caf",
      "name": "Test Runner",
      "publisher": "Microsoft",
      "version": "18.0.0.0"
    },
    {
      "id":  "5d86850b-0d76-4eca-bd7b-951ad998e997",
      "name":  "Tests-TestLibraries",
      "publisher":  "Microsoft",
      "version": "18.0.0.0"
    }
  ]

Credits

This post has been in my drafts for a while now, based on a question I posted to my Twitter, click on the Twee below to see the replies. The code in this post was copied almost verbatim from Krzysztof’s repo, he has a link in one of the replies. I had worked out my own example based on his code but I lost that when I had to clean up my VM’s.

Use SystemId

If you’re like me, and you use the ‘Page Inspector’ a lot, you have undoubtedly scrolled all the way down, and noticed this group of fields at the bottom. One of those fields is called ‘SystemId’. Today’s post describes some of the important things that you need to know about this field.

The Basics

Toward the end of the ‘NAV’ era, you may have noticed a field called ‘id’ in a lot of tables. This field was meant to have a single-field unique attribute for each record in the database. The original purpose was to provide a more industry standard way to get to records from a webservice, and it was implemented as an actual field of each table for which such functionality was provided.

In BC, the ‘id’ field has been obsoleted and replaced by a new system field called “$systemId”, an attribute that is assigned at the system level. The logic that assigns the values is not accessible to us, it all happens behind the scenes. You can read more about the field itself in Docs.

Some important things to remember:

  • Each SystemId value is unique, you will never see any SystemId value repeat across any table. You could cheat the system and manually assign a value to the field, but if you let BC assign its value it will always be unique
  • Its value cannot be renamed. Unlike PK fields in the database, the SystemId is not editable

So How Does It Work?

You will not see the SystemId as a field anywhere. Drill down into a table’s design and it is not there as a field. You can see the value when using the Page Inspector, but none of the pages have the field visible to the user. That would be pointless, because the SystemId does not have a functional purpose. It’s just a random GUID value that holds no meaning. However, EVERY table has a SystemId field, and since its value is always unique, you could theoretically use the field as its primary key.

You can leave the field alone altogether and just continue using the regular PK fields, and BC will automatically take care of the SystemId. If you are just using or developing ‘normal’ functionality, you will probably never even be aware of the presence of the SystemId.

One really handy thing though is that this is a single field unique value! You could capture a tablerelationship in a single field regardless of the target table’s primary key! You could link to the Sales Line’s SystemId field with a single field foreign key, and not have to worry about document type or line number. All you need to do is store the SystemId as a GUID field, with a tablerelationship to the target table’s SystemId field.

To retrieve a record using its SystemId, you use the GetBySystemId method instead of the regular Get method that you are used to.

How Is It Used?

The main purpose of the SystemId is to facilitate the API. The BC API endpoints are formatted in such a way that you specify the systemId as the unique value for the record that you want to retrieve. Yes you can still do a filter on the PK fields, but the standard way to get a particular record from an API endpoint is to provide its SystemId field value. When posting a new record, the response will return the new record’s SystemId.

You can look at a bunch of tables that are part of the API and see that a lot of tables have new fields for these SystemId fields. Take for instance the Customer table. You can see a bunch of new fields like “Currency Id” and “Payment Terms Id” with logic in OnValidate to update the ‘normal’ fields that are all still there. The new SystemId fields do not replace the existing related fields, they live side by side.

Still Confused

Yes it is still confusing, well maybe ‘cumbersome’ is a better word. The mechanism is fairly straightforward , but it has not made our job easier. Not every tablerelationship has been updated with the SystemId, and where you do see those ‘new’ ones, there is a double field relationship that has to be maintained with validation code. Especially when you need to expand standard APIs, you will have to create those additional SystemId fields on top of existing foreign key fields to ensure data integrity.

Containers And Bacpacs

A while ago an ISV client of mine was working on getting their app into the Embed program. Part of this process was to upload a bacpac with certain characteristics. The characteristics themselves are not relevant for this post but as I was helping them, but I thought I’d write this quick post to share how you can extract your bacpac files from a container, and how to use those bacpac files to create another one.

The setup

I’m starting out with a standard BC container, which was created using BcContainerHelper, and it is called DenSterDev. Coincidentally, I am also using BcContainerHelper to extract the bacpacs and to create the new container. I am using the “C:\ProgramData\BcContainerHelper folder to store the bacpacs, because that folder is recognized both inside and outside of the container.

Extract Bacpac Files

The container is multi-tenant, so there are two databases that we care about: one is the app database, and the other is the tenant database. Both of those are necessary to create the new container. If you have any apps installed on top of the standard container, those will be included in the bacpac file for the app database, and the bacpac for the tenant database contains the data itself.

The benefit of using BcContainerHelper is that we have very handy Cmdlets to get all this stuff in and out of containers, and the bacpacs is no exception. The command is very easy:

Export-BcContainerDatabasesAsBacpac `
    -containerName 'DenSterDev' `
    -tenant default `
    -sqlCredential $Credential `
    -bacpacFolder C:\ProgramData\BcContainerHelper `
    -doNotCheckEntitlements

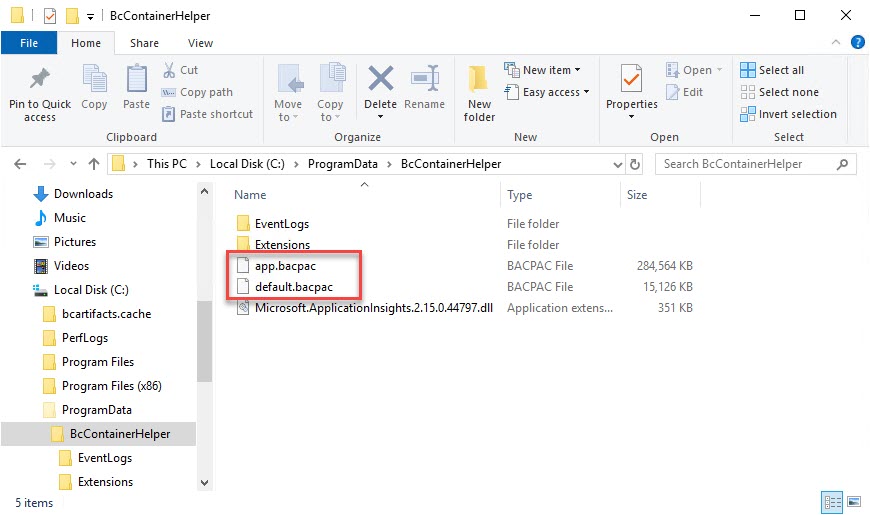
The tenant name is the default name of ‘default’ that is created in each standard BC container. The sqlCredential is a PSCredential object that was created during the container generation, using a username and a secure string password. As stated above, the bacpacFolder is a folder that can be accessed both in and out of the container. The entitlement flag is to bypass the check and prevent an error. When you execute this script, the bacpac files will show up in the bacpacFolder:

Create New Container from Bacpac

We are going to use these same bacpac files to create a new container. I’ll use the same container name:

New-BCContainer `
    -accept_eula `
    -containerName 'DenSterDev' `
    -artifactUrl '<ProperArtifactURL>' `
    -auth NavUserPassword `
    -assignPremiumPlan `
    -updateHosts `
    -accept_outdated `
    -Credential $Credential `
    -additionalParameters @('--env appbacpac=C:\ProgramData\BcContainerHelper\app.bacpac','--env tenantbacpac=C:\ProgramData\BcContainerHelper\default.bacpac')

Same as before, the -Credential parameter contains a PSCredential object. Note that the -additionalParameters spans across multiple lines here, but that should go on the same line in your PowerShell editor.

This command will download all the necessary artifacts and create the same container as the standard. The only difference will be that the app and tenant databases will be created from the bacpac files in your folder, instead of the standard database from the artifact. You can follow along with the script in the terminal window.

Nothing earth shattering, and made super easy by BcContainerHelper, but it took me a while to find the information and make this work. Hat’s off to Dmitry in the BC team, he was very patient with me as I got familiar with this process. Let me know in the comments if this was helpful or if you want to add anything.

Understanding OAuth Authorization Code

In this post, I write about my first experience with developing an app that implements an integration between BC and an external API. If you’re like me, most of the web services stuff goes straight over your head. Sure, with some sample code and following along with demos in a class, I can get it to work. BUT… just ONE itsy bitsy teeny weeny tiny thingy goes wrong and you’re absolutely dead in the water. Thankfully I have friends who are willing to help, and I want to pass on this knowledge so others don’t have to spend days trying to figure this out.

The Flow Itself

The “Authorization Code Grant Flow” is just one of several OAuth flows, and one of the first to be implemented. Go here if you want to read more technical details, but if this is the first time you’re reading about this I can guarantee you that you will not understand any of it, I know I didn’t 🙂

As with all OAuth flows, to get access to the actual API you must first get an access token. The thing that makes the authorization code grant flow stand out from other OAuth flows is:

  • There is an additional token that you must get before requesting the access token, this token is called the ‘Authorization Code’
  • In order to get this authorization code, a human being must enter the credentials. This flow is specifically designed NOT to provide any automated way to get the tokens

The MOST confusing thing is that although there is supposed to be an industry standard for REST APIs, it seems that each one has a slightly different way of connecting. One API that I worked on, for instance, had yet another token that is used for the API itself. As if this stuff isn’t hard enough to understand, some of them make it even more difficult. Most of them make an honest effort to provide really good documentation and in some cases even support forums.

The essential flow requires three things:

  1. API Credentials. You get these by signing up with the API provider, and they usually consist of a login ID and a ‘secret’, sometimes an additional password. They are meant to authenticate a human being logging into the API
  2. Authorization Code. This code is used to request the ‘Access Token’ that is used to get access to the API itself
  3. Access/Refresh Token. This is usually a set of two tokens. The Access Token is used for access to the API, and it usually has an expiration date/time. The Refresh Token is used to get a fresh Access Token. As long as you have a valid Refresh Token, you will not need to log back into the API

Each API that implements the authorization code grant flow will provide an endpoint for the authorization code, as well as an endpoint for the access and refresh tokens. You’d be surprised at how many ways this “standard” flow can be implemented though, so you’ll have to find the details yourself. Just hope that the API provider has good documentation.

Log In for the Authorization Code

You get credentials from the API provider, usually in the form of an ID and a ‘Secret’, sometimes with an additional password. For the authorization code grant flow, a human being is required to enter those credentials to authenticate the connection. In BC, the only way to get past this stage is by using a standard control add-in called ‘OAuthControlAddIn’. I’ve written another post that explains the details.

The control add-in provides the mechanics behind the login and processing the redirect response that comes back from the authorization endpoint, and it passes the authorization code itself back to AL through an event in the control add-in. You then take this authorization code and pass that to the token endpoint for the final piece.

Request The Access/Refresh Token

The token endpoint is the final step of the authentication process of the Authorization Code Grant Flow. Sometimes there is a separate endpoint for new tokens and another one for refreshing tokens. Other APIs have a single endpoint with two modes. One accepts the authorization code, the other accepts a refresh token, and they both return a new token pair.

The API checks the validity of the refresh token in every single API call. It is up to you to make sure that your token is valid, and the API usually provides a straightforward way for you to keep track of this yourself, by for instance providing the expiration date/time as part of the token response.

Keep Your Tokens Fresh

The Access Token usually has an expiration date/time. Some tokens are valid for a short period like 10 minutes, others have a longer shelf life. It is up to you to develop logic that checks the validity of your current tokens, and to request new tokens when they expire.

As long as your tokens are valid, you should not have to re-enter credentials, and there is no need for a new Authorization Code. The authorization code is only used when authenticating a fresh connection to the API. Once you’re past the authorization code stage, you should be able to keep the tokens fresh without having a human being log back in.

In AL, the most common way to store the tokens is through the isolated storage functionality. You can set the scope of isolated storage for the whole company, so that multiple users can share the API connection.

My Difficult Experience

One of the reasons why my experience was so difficult was the fact that the API that I was working with had a third token called ‘RestToken’. At the time, I was barely understanding these codes and tokens, and then there was this other token that I could not find in the excellent training that I had followed. Lucky for me, I had some help and was able to understand what was causing the confusion.

My guess (and it really is only a guess) why this is the case is that the API was initially developed with just this ‘RestToken’ and that at some point they built a wrapper around the API to comply with the OAuth “standard”.

The point is that each API has its own unique attributes, and its own way of implementing something that is supposed to be “standard”. Slowly but surely I started seeing the elements of what makes the flow work, and had an excellent teacher who showed me a solid way to handle that in AL code. Normally I would share the code in these posts. At the moment though I only have the training material and the client production code, neither one is mine to share. Maybe in the future when I’m less busy I’ll take some time to put some code together.

Let me know if this helps or not, I’d be happy to get your feedback and try to help if you need some.

Disable Autoplay in Edge

In this post I’ll show you how to disable autoplay in the new Edge browser. Normally I would just link to the post that helped me, but ironically that one is riddled with autoplaying videos. For that reason I decided to just copy the information in here and spare you the crap popping up by linking to the post.

Step One

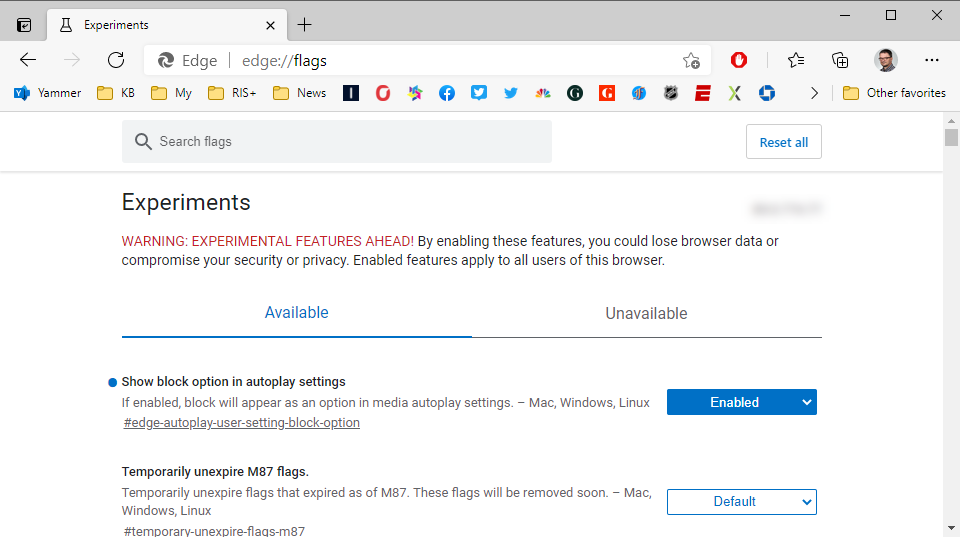
For the first step, enter “edge://flags/” into the address bar, find the setting for ‘Show block option in autoplay settings’, and set this to ‘Enabled’. You’ll get a message that you have to restart Edge for the change to take effect. Don’t worry about any open tabs, it will reload all of them.

Step Two

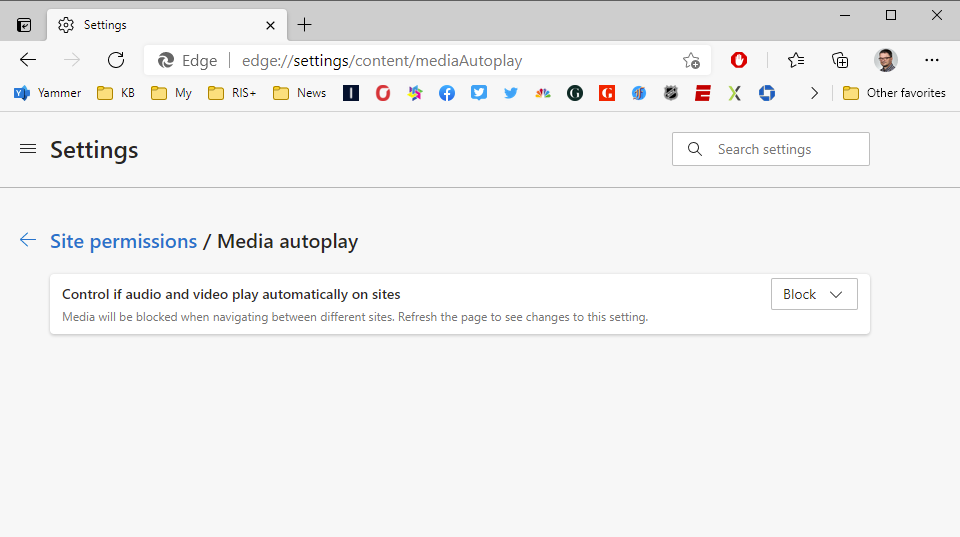
When the browser reloads, enter “edge://settings/content/mediaAutoplay” into the address bar, and set that to ‘Block’.

Done

You’re all set. I tested it in two of the worst offenders (CNN and YouTube) and nothing autoplays for me. I wonder how long it will take before they figure out how to bypass these settings. The annoying part is that you have to go to internal settings. This should really be a simple setting.

OAuth JS Login

This post explains just the login part of the “Authorization Code Grant Flow”, one of the ways to get an OAuth access token from an endpoint. It has taken me WAY too much time to get this, and I had to get some help from my good friend AJ to explain it to me. This is one flow that you will not be able to do in a local container, since the callback URL must be accessible in SaaS.

Authorization Code Grant Flow

The Authorization Code Grant Flow is the most rudimentary OAuth flow. This post won’t explain the flow itself; I’ll write about that in other posts (if I ever get the courage to actually publish that) but I needed to get this part down while it’s still fresh in my mind.

The tricky part about this flow is that it requires a human being to enter credentials of the endpoint. With those credentials, you will get what is called the ‘authorization code’. This authorization code is then used to get the access/refresh tokens themselves.

OAuth Control Add-In

In standard Business Central, there is just one way to catch the authorization code, and that is through a standard JavaScript control called ‘OAuthControlAddIn’. This standard controladdin provides two essential things. First it opens a login screen, where a human being can enter the credentials. Second, it catches the authorization code response. The control add-in feeds the code back through the trigger called ‘AuthorizationCodeRetrieved’.

Why Not Catch the HttpResponse Directly?

THAT, my friend, is a GREAT question, and please forgive me if I get the technical details of the answer wrong because I barely understand this part. When the authorization code endpoint returns the response, it contains the redirect URL that you send into the endpoint. The type of the response causes BC to then automatically forward the response to the redirect URL, WITHOUT a way for you to intercept the response itself. In other words… the response that you see is not the initial response itself, but the response to the response from the redirect call, and THAT response does NOT have the authorization code in it.

Using Postman or the REST client, you can turn off the auto redirect, but AL does not have a way to do that. Microsoft has decided to not allow us to intercept the initial response, and the only way to get the actual authorization code is to use the control add-in. It is the add-in that catches the code and provides that through the ‘AuthorizationCodeRetrieved’ trigger.

Only in SaaS

This automatic forwarding of the authorization code response is the reason why you can’t use this flow on a local container. The redirect URL must be available publicly, which requires your current connection to be in SaaS.

The standard redirect URL is ‘https://businesscentral.dynamics.com/oauthlanding.htm’. You can follow this URL and look at the page source code, and you will see the JavaScript logic there that catches the response. Since a local container does not provide this public access, the redirect will always fail, and you will not be able to catch the authorization code locally.

Here’s How It Works

On the page that you want to provide the action to connect to the API, you add the following control to the content area within the layout section of the page. Note the ‘AuthorizationCodeRetrieved’ trigger that calls another funtion called ‘GetNewTokens’, which is where we finally get the access/refresh tokens.

usercontrol(OAuthControl; OAuthControlAddIn)
{
    ApplicationArea = All;

    trigger ControlAddInReady()
    begin
        ControlAddInReady := true;
    end;

    trigger AuthorizationCodeRetrieved(AuthCode: Text)
    begin
        GetNewTokens(AuthCode);
    end;

    trigger AuthorizationErrorOccurred(AuthError: Text; AuthErrorDescription: Text)
    begin
        Error('%1 %2', AuthError, AuthErrorDescription);
    end;
}

To initialize the login procedure, you then call the ‘StartAuthorization’ method of the add-in. You could have a ‘Login’ action with a call to a ‘DoTheLogin function, like this:

local procedure DoTheLogin()
var
    ConnectionEstablishedMsg: Label 'The connection has already been established';
begin
    if (AccessToken = '') and (RefreshToken = '') then
        CurrPage.OAuthControl.StartAuthorization(GetAuthUrl())
    else
        Message(ConnectionEstablishedMsg);
end;

The control addin then fires the AuthorizationCodeRetrieved trigger, with the authorization code as a parameter, which you can then use to get the access/refresh tokens. Now this code IS part of the initial response, but the HttpClient in AL does not allow us to intercept that response without automatically redirecting the response.

It took me SO LONG to understand how this works, and I could never have done it without AJ’s help. Reading this back now I still don’t know if I am getting the details correct, so I don’t blame you for not getting it. Leave me a message or a comment if this helps or not.

Browse Files in Docker

Use the Docker VSCode extension to browse files in your container

If you struggle using the command prompt to figure out where the files are in your Docker container, this post is for you. I will show you how easy it is to actually browse around the files inside your container.

The Struggle is Real

The first time that I sat behind a PC was in high school in the early 80s. At the time, the only way to ‘communicate’ with your computer was through a DOS prompt. If you were REALLY fancy, you had a .bat file that provided a menu, and you had to type the number and then hit enter to execute what was behind the number. We read how to do the cool things in paper magazines, because the only other resource was books at the library.

The command prompt was not my favorite, and I never really got into computers as much as you’d expect. Not until years later did I find myself working ‘in computers’, and at that time I tried to stick to GUI based tools. For some reason, CLE based tools are back in vogue (or I’m just recently discovering that this is where it’s at) and I find myself struggling to navigate. I kind of know how it works, but it’s difficult for me to keep straight where I am and where the connections are.

Finding Files in my Container

Up until now, the only way that I know of to find files inside a Docker container is to use the command prompt. Using the BCContainerHelper module, you can connect to the container by using the Enter-BCContainer <ContainerName> command. You can tell by the prompt when you are in the container.

The container has its own file system, with folders, just like your host computer. To make things easy, there are two Very Important Folders:

  • The ‘C:\run\my’ folder in the container is mapped to the ‘C:\ProgramData\BcContainerHelper\Extensions\<ContainerName>\my’ folder. This means that the files in those folders are shared by the host and the container, but the path in the container is NOT the same as the path on the host
    • NOTE: this is a container specific folder, so anything that you put into this folder will be deleted when you destroy the container
  • The ‘C:\programdata\bccontainerhelper’ folder is mapped to the same folder on the host. This means that the folder is also shared between the host and the container, PLUS the path is the same in both contexts
    • NOTE: As long as you have BcContainerHelper installed, any files (and additional folders) that you put into this folder will remain there, even when you remove containers. This is a perfect folder for sharing purposes.

This is important to understand, because you will probably use PowerShell scripts to do all sorts of things with containers, and you will need to read and/or write files to folders within the proper context.

A Better Way

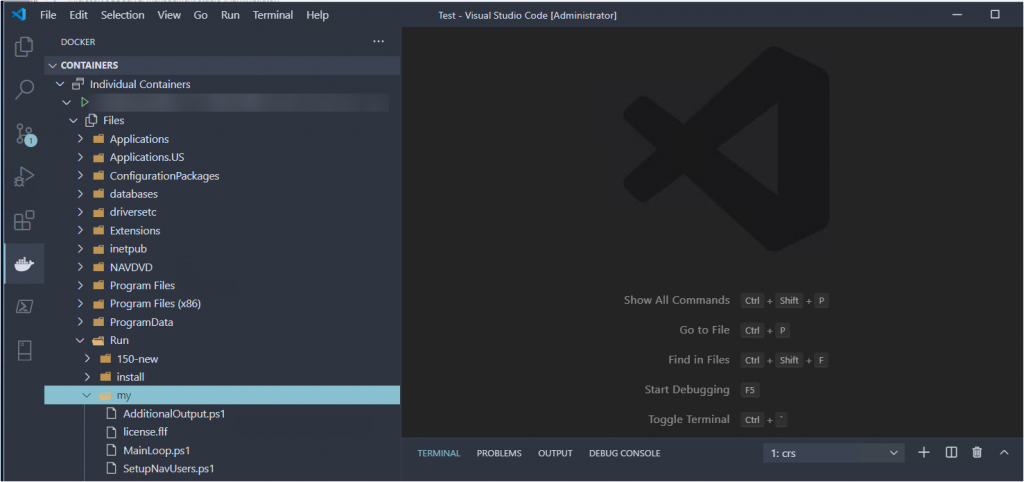
The Docker extension for VSCode was updated this week, and it has a new feature that enables you to browse the files from inside VSCode.

This shot shows the folder structure inside my container

For me, this is a MUCH better way, because I find it very hard to keep track of where I am in the folder structure, and this gives me a bit more context. What I am missing is an easy way to tell which folders are shared, and what the path on the host is.

If you don’t have the Docker extension for VSCode yet, you can find it here. You can also search for it in the VSCode marketplace.

SQL Server and Docker

Learn how to use SQL Server to access the databases in your Docker container

This post is for you if you want to be able to access the SQL Server database inside your Docker container, without having to write the query.

For one of my projects, I needed to be able to see the apps that were uninstalled but still had their schema in the tenant database. That information is in the $ndo$navappuninstalledapp table, and with SQL Server Management Studio (SSMS) it is super easy to look at table data. In my container I assumed that I would have to figure out a way to write the actual query (something I am not very good at). As it turns out, I was wrong. In this post I will explain two very easy ways to access the SQL Server database inside your Docker container.

SQL Server Management Studio

The first, most obvious, option is to do a complete install of SQL Server in whatever edition you have access to. If you want to keep things lean though, you can also install a standalone SSMS. You can download SQL Server Management Studio here.

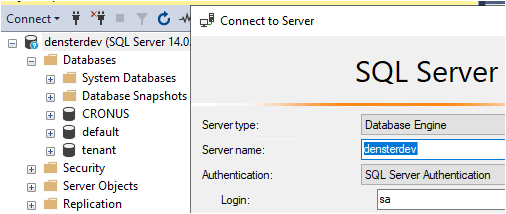
Connecting to a Docker container could not be easier. In the connection dialog, simply enter the name of your container as the server name, and SSMS will connect to it for you. I always use NavUserPassword authentication in my containers, and by default your container password will also work as the sa password inside the container.

My container is called ‘densterdev’, and you can see the default app and tenant databases inside the container.

All I needed to do was look at some table data, and that works just fine. I did not try to do anything more advanced than that.

SQL Server Extension in VSCode

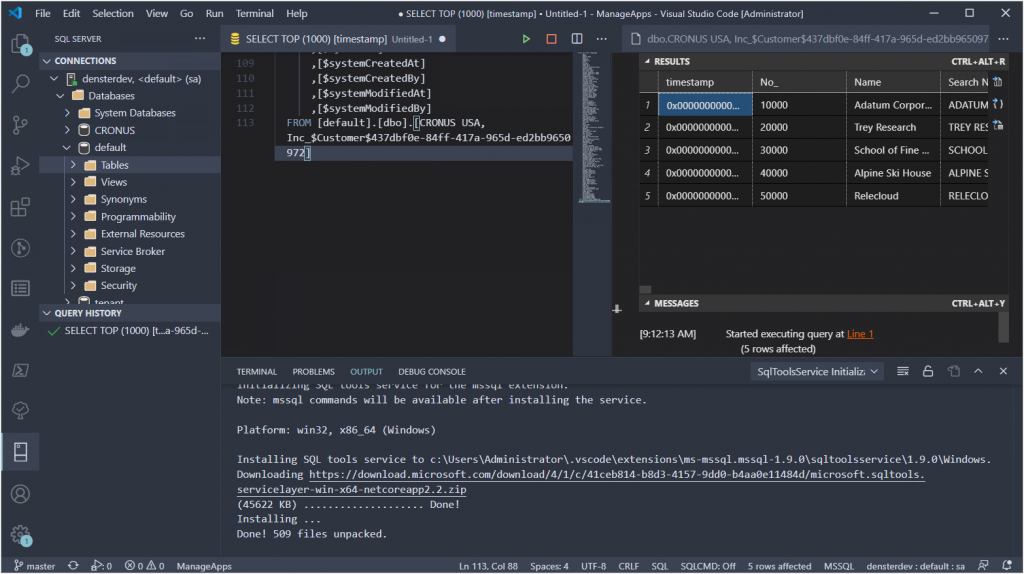
The second option is even easier than installing SSMS, because you are already using VSCode to do your AL development. Microsoft has created a ‘SQL Server’ extension, which works very similar to SSMS. In the extensions search box in VSCode, type ‘SQL’ and select the one made by Microsoft.

After installing you may need to reload VSCode to enable the extension. You will see a new tab on the left navigation pane that will show you the tooltip ‘SQL Server’ when you hover over it. When you click this tab, you will see a heading that says ‘Connections’ at the top, with a + sign next to it. Click this + and follow the prompts. Just like SSMS, you enter the container name as the server name, and it should connect to it with no problem.

The same app and tenant databases are shown inside VSCode

I still did not need to do anything more complex than looking at some data, so I really can’t say what features are available beyond that. My guess is that it is less capable than SSMS, so this may not be an option if you need more advanced capabilities.