This is a really quick tip just for myself to save the script where I can easily get to it, this time a quick way to output the duration of a PowerShell script. When a script takes longer than expected, in my mind I am waiting HOURS for it to complete but it is probably just a minute or two. I’ve run into this before, where I spend WAY too much time trying to locate a good, easy way to output the duration of a script. Without further ado, here’s the PowerShell code:
$startTime = Get-Date

<insert your script here>

$myTimeSpan = New-TimeSpan -Start $startTime -End (Get-Date)

Write-Output ("Execution time was {0} minutes and {1} seconds." -f $myTimeSpan.Minutes, $myTimeSpan.Seconds)
The key elements here being
I was looking for a ‘Time’ function and didn’t realize that in PowerShell you actually need to use the ‘Date’ object to access the time. Get-Date returns a DateTime stamp
Coming from BC, I was looking for something called ‘duration’, so it took quite a bit of time to find out about New-TimeSpan. This creates a ‘TimeSpan’ object that has its own members for easy concatenation of a user-friendly message. I’m only using minutes and seconds here
Hopefully next time I need this I will remember to search my own blog 🙂
The number of apps that come with a standard container has exploded over the past handful of releases. My local setup involves doing development in Hyper-V virtual machines, so local system resources are at a premium. It is very easy to trim the fat so to speak, so read on if you want to know how.
What’s with these apps?
From foreign languages to IRS reports. From integration and migration tools to email functionality and even connectors to external systems like the Spotify app. Having these in separate apps is great, because it is very easy to get rid of them.
The downside is that each app comes with its own set of table extensions, which are implemented as companion tables. Each time that a database action is taken against the main table, the system also has to maintain each companion table. Multiply this issue with the number of companies in your system and you can imagine the performance hit this could take.
Funny as it seems if you know what my desk looks like, but I HATE clutter in the extension list, especially if it is functionality that I just don’t ever use. I will NEVER have a need to use the Norwegian language, nor will I EVER need to use the Paypal links in a local container. In other words, I will never need to use the vast majority of these apps. Most importantly though I had started noticing a real slowing down of the performance in my local containers. I had even started wondering if it is time to replace my machine.
Get rid of these apps!
Lucky for us, it is VERY easy to get rid of apps. The BCContainerHelper module has two commands for you. One is UnInstall-BcContainerApp, which we will use in today’s post. The second one is UnPublish-BcContainerApp, which is useful in case you want to completely get rid of the app altogether. If you want to be a real ninja about it, follow the links to see the underlying PowerShell logic that you can use for inspiration. Me, I like to keep it simple, so I’ll use the BCContainerHelper Cmdlets.
If you were thinking ‘never say never’ when you were reading the previous paragraph, you were absolutely right. What if I get a Norwegian customer tomorrow? Let’s use the uninstall Cmdlet. This will leave the app in the system, ready to be installed again at a later date
The name of the app is enough to uninstall the app. You could also specify the publisher and version if you want but for our purposes the name is enough since all apps in the standard container are published by Microsoft
The ‘doNotSaveData’ parameter is used to make sure that the data is deleted from the companion tables, important because we are going to get rid of those with the next parameter
The ‘doNotSaveSchema’ parameter is used to remove the companion tables from the system. If you do not set this parameter, the schema will remain in the app database
If you are absolutely certain that you will never use the app, you can use the UnPublish Cmdlet instead and REALLY clean up that app list.
Bonus Company Removal
The standard container also comes with a pre-configured company called ‘My Company’ that I personally never use, and we have a command to remove that too:
Get rid of half the companies, get rid of 50% of the unnecessary companion tables.
Put it All Together
In my personal ‘arsenal’ of goodies, I keep a set of scripts to create new containers. One of those is a script called ‘RemoveBloatware.ps1’ that lists just about every app in the standard container, something like this:
Now you can call this script from your NewContainer script and have a nicely trimmed container. It made a real difference for me, I can really notice the better performance. Very useful when you’re in the thick of coding and you need to deploy code changes frequently.
A while ago an ISV client of mine was working on getting their app into the Embed program. Part of this process was to upload a bacpac with certain characteristics. The characteristics themselves are not relevant for this post but as I was helping them, but I thought I’d write this quick post to share how you can extract your bacpac files from a container, and how to use those bacpac files to create another one.
The setup
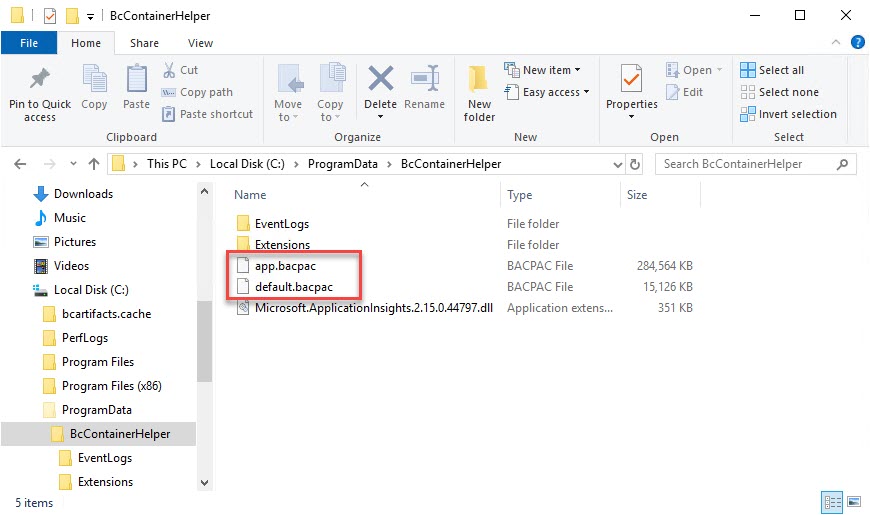
I’m starting out with a standard BC container, which was created using BcContainerHelper, and it is called DenSterDev. Coincidentally, I am also using BcContainerHelper to extract the bacpacs and to create the new container. I am using the “C:\ProgramData\BcContainerHelper folder to store the bacpacs, because that folder is recognized both inside and outside of the container.
Extract Bacpac Files
The container is multi-tenant, so there are two databases that we care about: one is the app database, and the other is the tenant database. Both of those are necessary to create the new container. If you have any apps installed on top of the standard container, those will be included in the bacpac file for the app database, and the bacpac for the tenant database contains the data itself.
The benefit of using BcContainerHelper is that we have very handy Cmdlets to get all this stuff in and out of containers, and the bacpacs is no exception. The command is very easy:
The tenant name is the default name of ‘default’ that is created in each standard BC container. The sqlCredential is a PSCredential object that was created during the container generation, using a username and a secure string password. As stated above, the bacpacFolder is a folder that can be accessed both in and out of the container. The entitlement flag is to bypass the check and prevent an error. When you execute this script, the bacpac files will show up in the bacpacFolder:
Create New Container from Bacpac
We are going to use these same bacpac files to create a new container. I’ll use the same container name:
Same as before, the -Credential parameter contains a PSCredential object. Note that the -additionalParameters spans across multiple lines here, but that should go on the same line in your PowerShell editor.
This command will download all the necessary artifacts and create the same container as the standard. The only difference will be that the app and tenant databases will be created from the bacpac files in your folder, instead of the standard database from the artifact. You can follow along with the script in the terminal window.
Nothing earth shattering, and made super easy by BcContainerHelper, but it took me a while to find the information and make this work. Hat’s off to Dmitry in the BC team, he was very patient with me as I got familiar with this process. Let me know in the comments if this was helpful or if you want to add anything.
Containers are now multi-tenant by default. The New-NavContainer Cmdlet has had a “-multitenant” parameter for a while now, it’s just that not specifying a value for this parameter now means that you get a multi-tenant container. Presumably this is because multi-tenancy is the default for SaaS, and should be for everything. Maybe this was implemented with the switch from NavContainerHelper to BcContainerHelper and I just didn’t pay attention to the details.
The way that I discovered this was that I was working on a training about the BC API, and I had learned that to get to the tenant, you specify it by its ID in the endpoint, like this: https://container:7048/BC/v2.0/[tenant]/[environment]/api/v1.0
Adding “?tenant=default” worked but I was curious whether including the tenantId in the URL was supposed to work in containers. Hint: it is NOT supposed to work that way, at least not based on the replies that I got from Twitter
As I was working through these issues I had created a new container, and instead of removing it, I had set the -multitenant parameter to true and didn’t think of it again until I was working on another project. New container, different script, this time without the -multitenant parameter.
To make a long story short…. I was expecting my container NOT to be multi-tenant, and was annoyed to see that my Postman scripts (the version without specifying the tenant) did not work anymore. It took me WAY too long to discover what the issue was, but there you have it 🙂
Quick post today to point out some new posts by Freddy about a change that he’s made to the container logic in his PowerShell module to switch from downloading images to getting the artifacts and assemble images on the fly. I’ll just link to his blog and kind of summarize. The implications for us Docker consumers, as it turned out, was so small that it was almost uneventful.
Background
Until recently, the process to create a container involved downloading a fully prepared image of that container. This was very easy: download the image, create the container. The problem lies with the sheer number of images that had to be prepared for each situation. Are you on Windows Server 2016? 2019? Which build? Which version of NAV? Which localization? Business Central OnPrem or Sandbox? All in all, to accommodate the entire community, there were hundreds if not thousands of images just to create these containers.
So, to cut down on the sheer volume of those images, we now have what is called Artifacts. Instead of a full image, you download a set of instructions to fetch and build a local image yourself, which is layered with a bunch of components. There are a few common building blocks for the generic image and SQL Server and other such components, and then there are the pieces that we need to prepare the NST, the database, the localization, etcetera.
Instead of having hundreds of images with the same common elements, each common element is a separate download that can be re-used for all images that need it. I’ll leave it to Freddy to explain the details.
What Changes For You?
When I first became aware of this change, I was very skeptical and concerned. I’ve been having some pretty persistent and annoying issues with Docker, and I had visions of it all crapping out on me with this change.
The actual change itself is not very big. Instead of specifying the image name, you specify an artifact URL (the ImageName parameter still exists, and it serves a very useful purpose, but it’s no longer necessary to create a new container). The script then does its work, just like it has before. I made the change, ran the script, and it just created the container without any problem. My containers are usually very straightforward (most of the time I just need the latest US sandbox) and I have had a grand total of zero problems with this particular change.
Posts on the Artifacts
So far, Freddy wrote 5 posts about this change:
The first hint was in this post, in which he announces the move from preparing full images to artifacts
The 5th one explains how to customize the generic image, pretty advanced stuff that I don’t see myself using any time soon, but with artifacts this is possible
Just today, the last full image for OnPrem was uploaded. As it seems, artifacts are here to stay. Lucky for us, this particular change to NavContainerHelper has been seamless, at least for me. My New-NavContainer scripts still work, and I’ve had zero problems with the resulting containers, at least none that are related to Artifacts.
Quite a while ago I wrote about signing your app file, which is a requirement for AppSource. It’s been a while since I had to do this, so I went back to my blog and found the article quite lacking. This post is an attempt to fill in the blanks and give you all the information that you need to sign your app, all in one place.
Your first stop to read about this is right here, the Learn page about signing the app file specifically for Business Central. Most of what I’m about to tell you is in there, I’ll just elaborate a little bit more.
Basically, signing an app file, or an executable file, is a way to tag that file with an attribute that certifies where the file came from. If Acme Rockets signs their rocket skate app, the file has an attribute that shows Acme indeed digitally signed it. Take a look at the properties for ‘explorer.exe’, the executable for Windows Explorer. You can check out the digital signature that verifies that this file was signed by Microsoft.
In a nutshell, you need the following:
A Code Signing Certificate, in ‘pfx’ format
A code signing tool (I’m using ‘signtool’ here)
The SIP from your BC container (don’t ask, I still don’t really know)
A script to actually sign
Code Signing Certificate
The first thing that you need is the Code Signing certificate. This is a particular type of certificate (NOT the same as an SSL certificate) that you must get from an Authenticode licensed certificate authority (there’s a link in the Docs article mentioned above) such as this one or this one or this one or this one. I’m not affiliated with either one, and GoDaddy doesn’t seem to provide code signing certificates anymore, but I’ve worked with certs from two of those companies and they both worked as advertised. For AppSource submissions, you need the regular “Code Signing”, not the extended one or the one for drivers. Go shopping, because I’ve seen prices range between $199 and $499 per year for the same thing.
In order for the signtool to be able to use the certificate, it must be in ‘pfx’ format. One of the providers that I mentioned has a page here that explains how you can create this file format. The actual file will have a password on it, and you can save it on the computer where you have NAV/BC installed, or where your container lives. I usually have a working folder right in the C root where I do this kind of thing.
The Signing Tool
You’ll need a tool to sign the app file – Microsoft recommends SignTool or SignCode. Since their sample script is for SignTool, that’s the one that I used. Now, the text in Docs describes that SignTool is automatically installed with Visual Studio, but that is only partially true. I actually downloaded Visual Studio to see if that works, but the installation configuration that I chose did not include SignTool.
Signtool is part of the Windows SDK, which probably comes in one of the standard Visual Studio configurations. I don’t know which one, so you’ll have to make sure that it is selected when you are installing it. Another way to get it installed is to install the Windows SDK directly, which you can download here. I installed the one for Windows 7 on a Windows Server 2019 Hyper-V VM, and it worked for me. I know, I should have looked a little longer and used the Windows 10 one, but by that time my app file was already signed and dinner smells were filling my office.
The SIP
If you try to sign your app file now, you will probably get an error message that the app file is not recognized. The SignTool program needs to be able to recognize the app file, and for that purpose it needs to have something called ‘the SIP’ registered on the machine where you run the SignTool command. Apparently this is some sort of hash/validation calculation package that is used to create digital signatures. Each program on your computer apparently has one of these.
One way to get ‘the SIP’ is to install NAV/BC on the computer. If you’re like me, and you use containers exclusively, you won’t want to do this. Luckily, the NavContainerHelper module has a Cmdlet to retrieve ‘the SIP’ out of the container.
As you can see, my SignTool is in the Windows 7 SDK folder, you may need to search around for it. Installing the SDK is supposed to register SignTool and you should be able to just use ‘signtool’ as a command. For some reason that did not work for me, which is why I specified the entire path. I split this up to make it look better in this post, the command needs to all be on one line.
One more thing – the timestamp specifies that the file was signed using a certificate that was valid at the time of signing, and the file itself will never expire. Of course if you want to submit a new file after the certificate has expires, you will need to get a new one. If you don’t specify the timestamp, your app file will expire on the same date as your certificate.
Update March 26, 2020 – The timestamping service was provided by Symantec and it looks like they are rebranding that to ‘digicert’. Here is an article that explains the situation. You will need to change the timestamp part in your script:
Replace:
/t http://timestamp.verisign.com/scripts/timestamp.dll
With this:
/t http://timestamp.digicert.com?alg=sha1
All Set
That’s it, you should be all set to sign your app file. I have to be honest and confess that I wrote this mainly for myself, because I spent WAY too much time trying to re-trace my steps and figure out how this works again. It’s now in a single post, hope it helps you as much as it helped me.
No need to install anything. All you need is the app file and your pfx file with a password, and everything else happens in the container (as Freddy puts it “without contaminating the host”). Just copy both files into a shared folder where NavContainerHelper can read the files.
How to get started with modifying the Base Application using Docker
Many partners are still focused on doing custom development for their customers with their one-off implementations. MANY of those customers are existing customers with existing NAV systems with existing customized objects. As much as everyone wants to go to extensions only, and most partners see the need and are more than willing to make the necessary changes, the reality is that many of these existing customers do not want to pay for migrating all of their custom modifications. This reality comes with the need to modify the base app. Since C/SIDE is no longer available, the only way to do this is to use VSCode. This post will explain how you can create a Docker container, and use that container to do modifications on the Base Application.
To get started, click here to read the article on docs.microsoft.com. I say ‘get started’ because it was not enough to get me all the way there, which is the reason why I wrote this post. This article seems to have been written for an actual installation from the product DVD, and there were some additional things you need to know to make it all work if you want to use Docker. At least, that is per the date of this post, because things may change :). I’ll try to revisit this post if it does change.
Alright, so to make this work, you need a few things:
A Docker container that is based on the latest Business Central Docker image.
Configure the Service Tier in the container
Extract the objects from the container into a new AL workspace
Uninstall and Unpublish the Base Application and its dependencies
Create a new Container
For Business Central development I always use the NavContainerHelper module, so before you use any of the commands in this post, update your module:
Update-Module navcontainerhelper
To get the latest Docker image for Business Central I will be using the ‘mcr.microsoft.com/businesscentral/onprem:na-ltsc2019’ image. You can leave the ‘ltsc2019’ part out if you are not sure about the host OS or if you are on Windows Server 2016. You can substitute ‘na’ for your own localization, or leave that tag out altogether if you want to be on the W1 version. To read about which image to use, visit Freddy’s blog here and follow the links to what you need to know. Here is the script that I used to create my container:
I use the ‘-alwaysPull’ switch to make sure that I always have the latest version of the Docker image. The ‘-includeAL’ switch is necessary to include references to the DotNet assemblies in the Docker container. The ‘-additionalParameters’ switch (h/t @tobiasfenster) is used to set the ExtensionAllowedTargetLevel property to ‘OnPrem’. I’ll explain how to set this with a simple PowerShell Cmdlet in a minute.
One more important switch is the ‘-useCleanDatabase’ switch, which can be used to uninstall and unpublish the Base Application and its dependencies, as I will discuss in a little bit. At this point, you have a vanilla Docker container with the latest on premises version of Business Central.
Configure the Service Tier
As the Doc states, there are three things you need to set. It is not very clear exactly how to do that, and not at all how that works on Docker, so let me just explain from scratch.
First, you need to know how to look at, and modify, the Service Tier settings inside the container. Some of these types of commands are available in the navcontainerhelper module, but some of them are not. I did find a Cmdlet to see the settings, but I could not find one to actually modify them. So, to cover all of it, I will show you how you can connect to the container and run regular BC PowerShell Cmdlets from inside the container.
Open a PowerShell ISE window as administrator, and run the commands in the screenshot
Our container name is ‘mysandbox’, and you connect to it by using the ‘Enter-BCContainer’ Cmdlet. You can see how the prompt changes to show you that you are inside the container. At this stage, the navcontainerhelper does not work, so you will have to use the regular BC PowerShell Cmdlets. The next Cmdlet shows you all the properties of the Service Tier that runs inside your container, which in this version of Business Central is called ‘BC’.
According to the Doc, the following settings are important. I am using the names that are used in PowerShell rather than the names in the Doc.
ExtensionAllowedTargetLevel should be set to ‘OnPrem’, although it seems that the value ‘Internal’ also works.
DeveloperServicesEnabled should be set to true. This should be the default value of this particular setting
There is also a mention of the EnableSymbolLoadingAtServerStartup property in the Doc, but I’ve received confirmation (h/t @freddydk) that this property was meant for hybrid C/AL and AL environments, so that is not needed anymore for BC 2019 wave 2
To modify these settings, use the following PowerShell command
Set-NAVServerConfiguration `
      -ServerInstance BC `
      -KeyName ExtensionAllowedTargetLevel `
      -KeyValue OnPrem
After modifying those settings, restart the service tier using the ‘Restart-NAVServerInstance -ServerInstance BC’ command. At that point, the service tier in your container should be configured for doing on premises development. The next thing you need to do is get the application objects out of the container.
Create AL Workspace from Base App
This step is easy, using a navcontainerhelper Cmdlet, so you need to first exit the container (type ‘exit’ and then enter). Then, run this Cmdlet:
One thing to note here is that the ‘-useBaseAppProperties’ switch uses the properties from the container. You will end up with a fully functioning AL workspace, with an app.json and launch.json that is configured to look inside the container for the objects and the DotNet probing path. You will need to configure this yourself if your configuration needs to be different. But, since we’re making this work for a standard container, we’re going to use the standard configuration as well.
One other important thing to note…. As I am writing this post, I’ve had a persistent error message that prevented me from compiling the app, which I narrowed down to having to remove the translation files. The annoying part is that the error message itself does not mention the translation files, but it started working again after I removed them. In your new BaseApp folder, there is a folder called ‘Translations’. Remove all files from that folder, except the ‘*.g.xlf’ file.
One final thing to note is that this is just a simple AL workspace. In a real life situation, you are doing this for a particular customer, so you need to think about source control, workspace settings, things like that. There are some capabilities in the Cmdlet, so take a look here to see all the available parameters of the Cmdlet.
The last thing you will need is to download the symbols for the system apps from the container. The Doc also mentions adding the assemblyProbingPaths to the workspace settings, but if you used the ‘-useBaseAppProperties’ switch, that is already taken care of for you and the setting will point to one of the container’s shared folders.
Uninstall / Unpublish Base App
In the previous step, you’ve created an AL workspace with all of the objects from the Base Application. Now, your container already has a Base App, so in order to create a modified Base App, you will have to get rid of the standard one first. You can be a PowerShell warrior and run the Cmdlets in this section, or you can also use the ‘-useCleanDatabase’ switch in the New-BCContainer Cmdlet in the first section. This will remove the Base App and all its dependencies from your container right away.
On to the PowerShell… In the Doc, under bullet 11, you will find the functions to accomplish this. These are regular NAV PowerShell Cmdlets, so you will need to enter the container first:
function UnpublishAppAndDependencies($ServerInstance, $ApplicationName)
{
     Get-NAVAppInfo -ServerInstance $ServerInstance | Where-Object {
    # If the dependencies of this extension include the application that we want to unpublish, it means we have to unpublish this application first.
    (Get-NavAppInfo -ServerInstance $ServerInstance -Name $_.Name).Dependencies | Where-Object {$_.Name -eq $ApplicationName}
 } | ForEach-Object {
    UnpublishAppAndDependencies $ServerInstance $_.Name
 }

 Unpublish-NavApp -ServerInstance $ServerInstance -Name $ApplicationName
}

function UninstallAndUnpublish($ServerInstance, $ApplicationName)
{
    Uninstall-NavApp -ServerInstance $ServerInstance -Name $ApplicationName -Force
    UnpublishAppAndDependencies $ServerInstance  $ApplicationName

}
This loads the functions into memory, and then you can run the script:
UninstallAndUnpublish -ServerInstance BC -ApplicationName "Base Application"
This will completely remove the Base App and its dependencies.
Ready to Start Developing
That’s it, you should now be ready to start your development. See how that works. Add a field to a table, add that field to its Card page and hit Ctrl+F5. It will probably take a while to compile, but you should see your new field on the page.
Now I do need to say that I completely and wholeheartedly agree with the entire community, and code customizations should really not be done anymore. All development should be done using extensions instead of change the Base App itself. It makes everyone’s life a lot easier if you minimize the amount of development done to the Base App, so even if you have no other choice, try to design the development in such a way that most of it is in an extension, and only modify the Base App for the parts that you can’t figure out how to do in an extension.
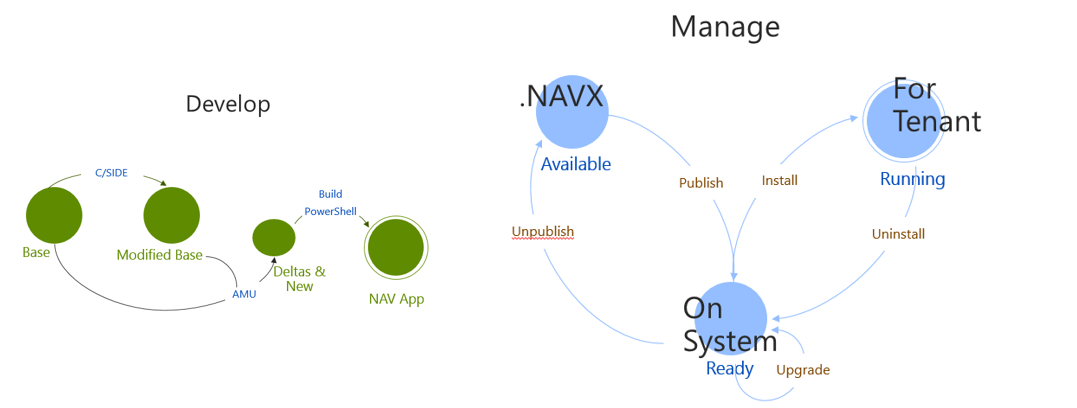
You might have heard people talk about “Extensions v2”, and maybe that doesn’t make a whole lot of sense. Let me take a few minutes and try to explain the concept to you.
Back in 2015, Microsoft announced the concept of extensions to us, in this blog post. I remember reading this article, and being thoroughly confused. At the time I was not in a technical role, and I had let my technical knowledge slip for just a minute it seems.
Extensions v1
For extensions v1, development is done in good old C/SIDE. There are severe limitations as to what you are allowed to do. For instance, you cannot add values to option strings in table fields, and you cannot add code to actions on pages. I won’t get into the details of those limitations, but you must be aware of what you can and cannot do for extensions, because in C/SIDE you can do a LOT more than what you are allowed to do.
The extension itself is compiled in a so-called .NAVX file, also know as a NAV App file. To get to this package file, you must use PowerShell Cmdlets to export the original and modified objects, calculate the delta files, and then build the .NAVX file. To deploy this .NAVX file, you then must use another set of PowerShell Cmdlets.
Especially the development part can be cumbersome. There are many things you are not allowed to do, and as you build the .NAVX file, the system will yell at you when you did something wrong. There are many moving parts, and it takes a lot of discipline to get it right
Extensions v2
For extensions v2, development is done in Visual Studio Code (also known as VSCode), using the AL Language extension. Since you are no longer working in C/SIDE, only the allowable things are allowed. You simply cannot do anything that the tool is not capable of doing. You no longer have to export original objects and compare them to modified objects. Essentially, you are programming the delta files directly in VSCode.
Deploying the solution works simply by building the project from VSCode. You hit F5 and VSCode will build the package and deploys it to the service tier that you specify in the launch file. Deploying the app to a test system still happens with PowerShell Cmdlets.
Hopefully this clears it up a little bit. Once you understand the differences, it’s not so intimidating any longer.
In this article I will explain how you can use PowerShell to extract the right objects and merge those objects, and how to use Visual Studio Code to resolve most of the conflicts in the merged objects.
In a previous article, I explained how you can use PowerShell to create the environments. The script in this article actually use the variables that are assigned in the other one. What I should really do is create a configuration file and load that from both scripts. I wanted to share what I have so far though, without a handy configuration file but hopefully helpful nonetheless.
We start off with the 4 environments that were created in our last article: ORIGINAL, MODIFIED, TARGET, and RESULT. The first two environments contain the standard W1 and the ISV product. Target and RESULT are identical at this point, and they both contain the standard NA localization. All environments are in the same build number (NAV 2017 CU2 in this case). Because I have a developer license that has insert rights in the ISV number range, my strategy is to merge the product modifications into the NA database. If you do not have those insert rights, then a better strategy would be to merge the NA localization into the product environment instead. Microsoft has recently added insert capabilities for the standard object ranges to regular developer licenses, for this particular purpose. As I was working through the conflict objects of this assignment, I was thinking that this may even be the best default strategy anyway.
Due to a limited amount of time, and a limited amount of PowerShell skill, I decided to approach this task pragmatically:
Manually move the ISV specific objects to the RESULT environment
Use PowerShell to export all the objects
Manually eliminate the unmodified objects
NOTE: as I learned later, Waldo’s PowerShell modules actually have logic to remove these after the merge, so this can be scripted as well
Use PowerShell to merge the objects
Use Visual Studio Code (AKA VSCode) to resolve the conflicts as much as possible
Use PowerShell to join the objects
Use C/SIDE to resolve any remaining conflicts
The conflict resolution is something that has to be done manually. Everything else can be scripted in PowerShell. During this process I’ve asked Waldo for some help, and he explained that most of what I am doing here is already part of the merge sample scripts. In the Cloud Ready Software PowerShell module, there is a folder called “PSScripts”, and in that folder you will find a large number of scripts that you can use as an example to get started on your task. As you gain experience in using PowerShell, you will recognize a lot of useful features in those scripts, and you can modify them to your specific needs.
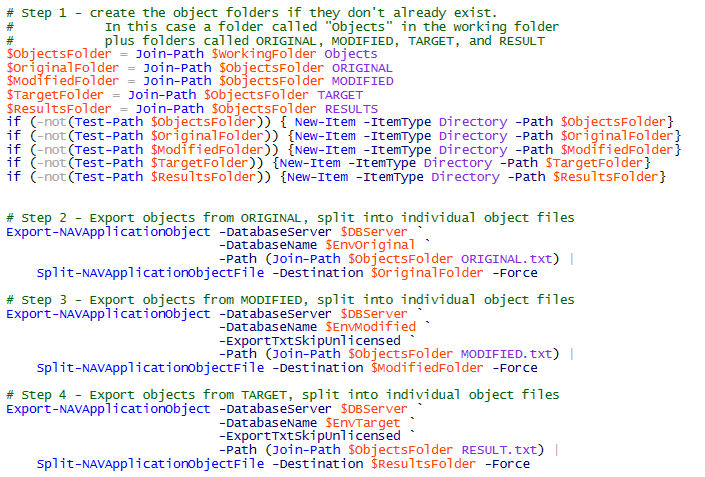
Alright, on to the details. The first part is to use PowerShell to extract the objects into their own folders. I also added commands to create the folder structure itself:
At this point, you will have an “Objects” folder in your working folder, with full object files for ORIGINAL, MODIFIED, and TARGET. Those object files have then been split into individual object files in the ORIGINAL, MODIFIED, and TARGET folders. Before using PowerShell to merge those objects, I used a text compare tool (I like Scooter Software’s Beyond Compare) to eliminate unmodified objects. Remember, I only want to work on the modified objects, so I don’t have to worry about getting confused by objects that were not changed for the ISV product.
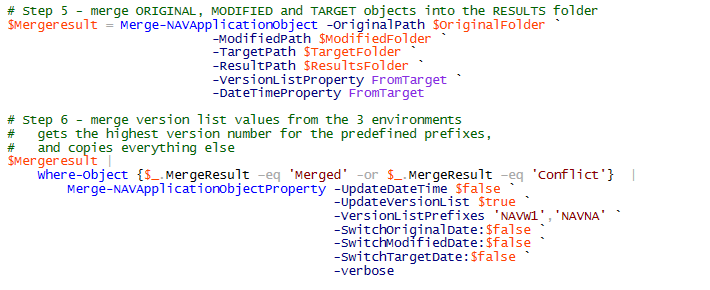
Now that we only have modified objects in all three object folders, we’ll use the merge Cmdlet to do the actual merging of the objects.
If you notice, the output of the “Merge-NAVApplicationObject” Cmdlet is loaded into the variable “$MergeResult”. This object is then piped into the “Merge-NAVApplicationObjectProperty” Cmdlet. The first Cmdlet is a standard NAV PowerShell Cmdlet, and the second one comes with the Cloud Ready Software modules. The standard merge Cmdlet does not merge the Version List property, it simply takes the Version List from one of the three environments. We can have a discussion about whether the Version List is even important anymore, especially if you use Source Code Management. The reality is that most NAV developers depend on proper tags in the Version List, so it is useful to merge those as well. All you need to do is specify the prefixes that you want to merge (In my case NAVW1 and NAVNA) and it will find the highest value for those prefixes. All other prefixes will be simply copied into the RESULT objects.
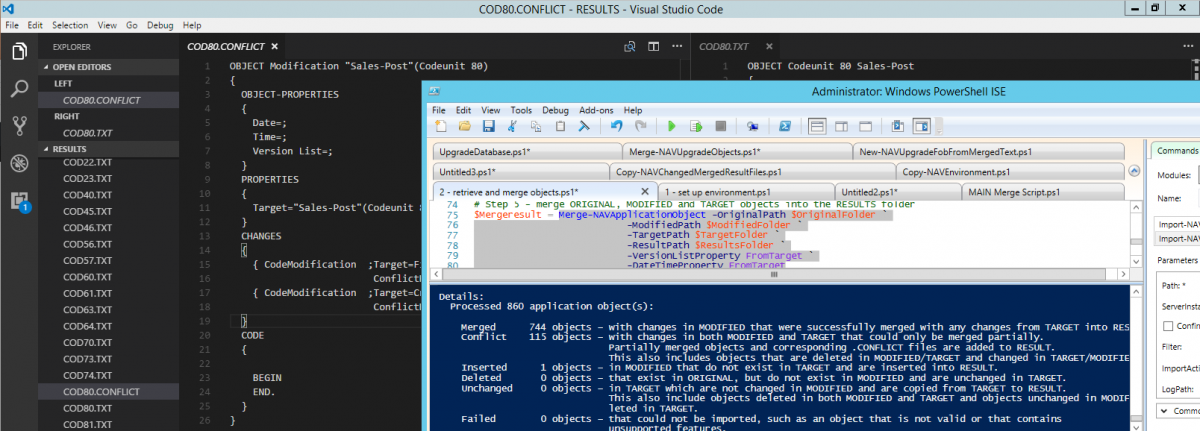
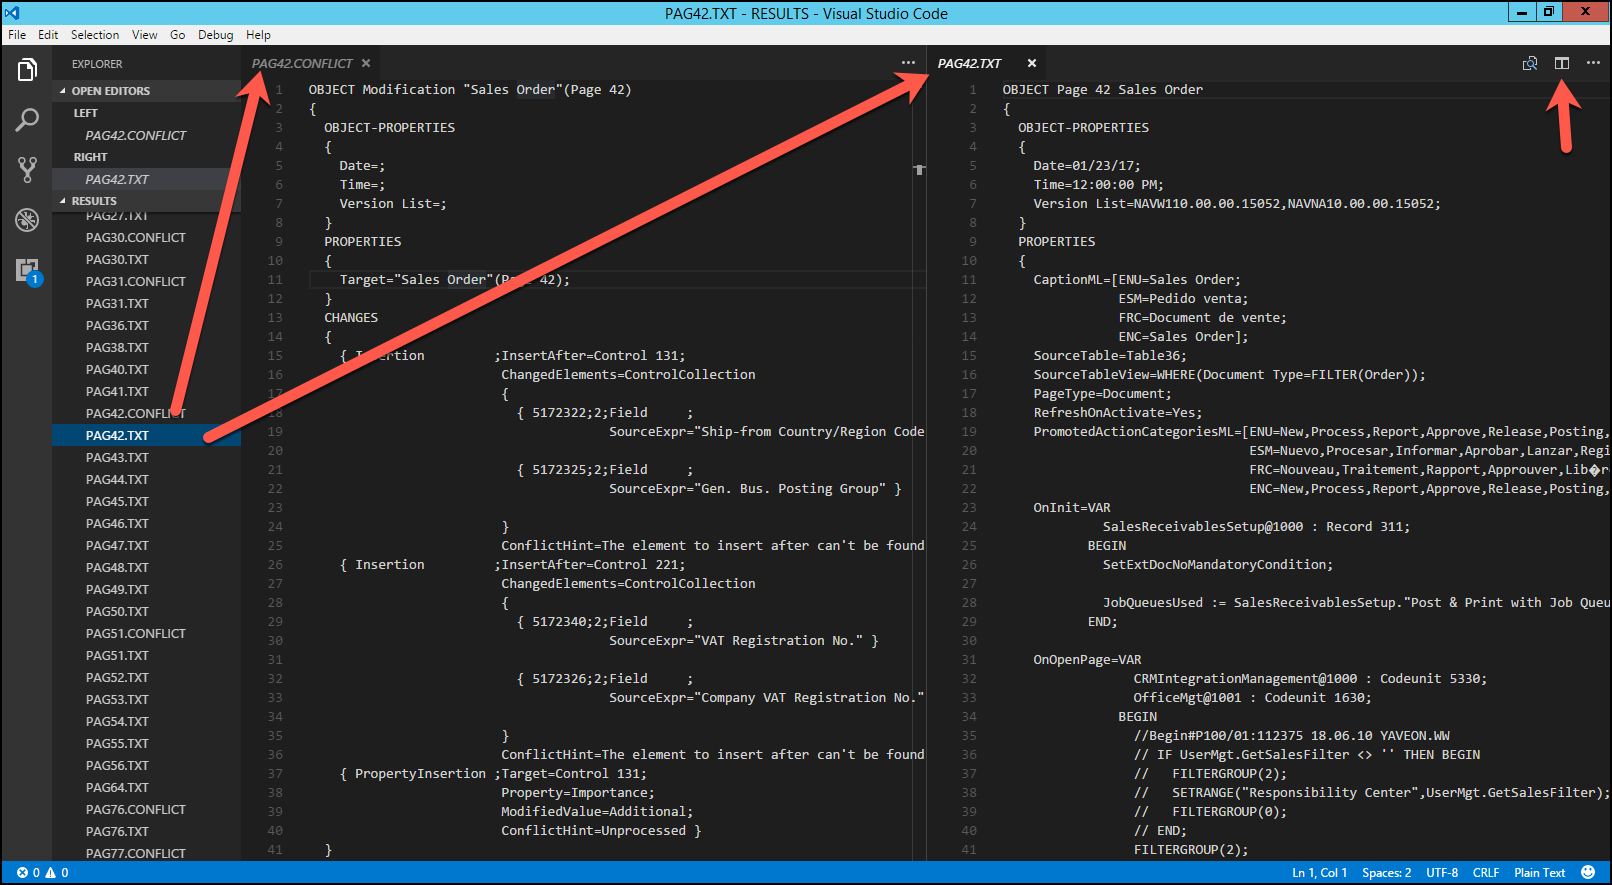
At this point, we have all merged files in the RESULT folder. This includes the objects that were merged successfully, but also the objects that the merge Cmdlet could not resolve, for instance when code was added at the same position in MODIFIED and in TARGET. Since we are going to have to learn how to use VSCode, I decided to use that to resolve the conflicts.
With VSCode installed, you can open the RESULT folder and see the content of this folder inside the file browser at the left hand side. In the upper right hand corner is a button that you can use to split the screen into two (and even three) editor windows. This is very useful for resolving merge conflicts, because you can open the conflict file in one side, and the object file in the other side. You are editing the actual object file here, so you may want to take a backup copy of the folder before you get started.
Now what you must understand is that the conflict files only contains the pieces that the merge Cmdlet could not figure out. In a total of 860 objects, with 6956 individual changes, it was able to merge 96.4% of those changes. An object that may have 4 conflicts can also have a ton of other changes that the merge Cmdlet merged successfully. All YOU have to do is focus on the ones that need manual attention. For instance, codeunits 80 and 90 had a TON of modifications, but it only needed help with 3 of them.
I had a total of 115 conflict files, and I could completely resolve 112 of them in VSCode. I made a note of the few that remained, and decided to import those unchanged into C/SIDE, so I can finish those off in the proper IDE.
The last PowerShell command that I used is to create a single object file, which can then be imported into C/SIDE. Then I finished the last few remaining object files, and was able to compile all objects from there.
I’ve done many of these merges completely manually. To say that I was skeptical that PowerShell would do a good job is putting it mildly. I flat out did not trust the merge Cmdlet, surely they could not do as good a job as I could do. I was wrong. I checked a bunch of objects to see if I could find any mistakes and I could not find any. Not only did the merge Cmdlet do a fine job at merging the objects, it did so in about 5 minutes flat.
Instead of having to manually merge almost 900 objects, all I had to do was focus on the conflicts. Usually, a vertical merge like this would take me anywhere from 2 to 4 weeks, and I was able to finish this one in less than two days. Figuring out the PowerShell scripts took me much longer, but I will be able to use those for the next merge task.
If you kind of know about PowerShell, and you want to use it more, but you don’t really know where to start, then you should read on. I am going to explain to you how you can use PowerShell to create the environments that you need to localize a product.
One of the things that always seem to fall on my plate at my job is to take an ISV product and merge that into the North American localization. I call it ‘localizing a product’. It is not, because localizing a product is much more than simply merging the objects, but it’s what you have to do first. I’ve done a bunch of these manually, and I kind of enjoy the almost mindless nature of the task of working my way through hundreds of objects (sometimes even thousands, I once ‘localized’ a product that had more objects than standard NAV itself).
The first thing you need is to install Waldo’s PowerShell modules, I will be using those for just about everything. I could figure out how to script all of this stuff myself, but why would I if Waldo already did that for us, and he is sharing his scripts. For instructions read Waldo’s blog here.
This post focuses on creating the environments themselves, and for this task you really need just a few things:
A SQL backup for the product in the W1 version of NAV, and make sure that you know exactly which build this was developed in. For instance, the product that I am working with was provided as a SQL Backup, and it was developed in NAV 2017 CU2.
The DVD’s for standard W1 and NA for the same NAV build.
A Development license that has insert rights for the product’s number range. If you only have a regular developer license, or if the ISV refuses to provide you with a license (this happens more often than not) then you will have to merge NA into the product database. This works exactly the same, you just have to figure out which environments are your ORIGINAL, MODIFIED and TARGET.
Use the NA DVD that you just downloaded and install the NA Version with a demo database. I like to give the database a meaningful name, so I called it ‘NAV2017NACU2’. This is all the manual installing that we will do, everything else is PowerShell baby! Actually, you could even use Waldo’s PowerShell modules to do the install as well. You could even write a script that downloads the DVD for you as well, all using Waldo’s PowerShell modules.
If you understand the mechanics of localizing a solution, you will know that we need 4 databases in total: standard W1, Product database in W1, standard NA, and a copy of the standard NA database that will become the product database. In this case, standard W1 is ORIGINAL; product W1 is MODIFIED; standard NA is TARGET and product NA is RESULT. This will become important when we do the merge, which will be another blog post.
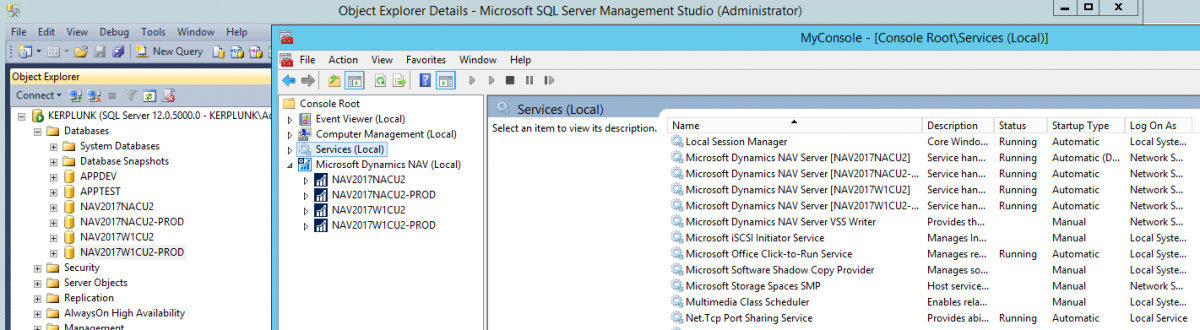
Now the goal is to have a re-usable script, so we’ll use variables instead of having to re-type values multiple times, as you can see in the picture.
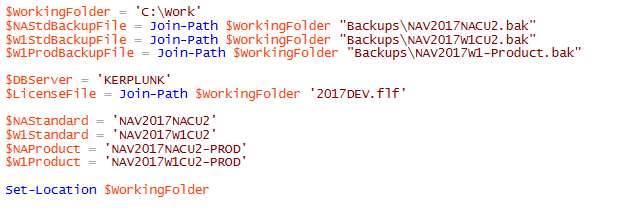
Remember, I installed standard NA. I created the working folder and placed the three backup files into the ‘Backups’ folder. I like to keep things together, but I can imagine having a network location for the standard backup files. The nice thing about using these variables is you can set them however you need them :). My database server is called KERPLUNK, which is just a regular unnamed instance on my VM called KERPLUNK. You could also use a demo installation and then you’d have to set it to ‘KERPLUNK\NAVDEMO’. I will use the 4 names for the database names as well as the service tier names.
The rest of the script is surprisingly simple to put together, here it is:
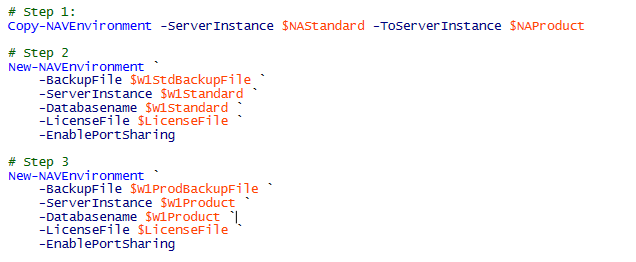
The reason why I start with the ‘Copy-NAVEnvironment’ step is because this script turns on port sharing for both server instances, so I don’t have to take care of that step myself. This is one of Waldo’s script that looks at the first server instance and creates a new one just like it. It creates a SQL Backup from the service instance, restores that into a new database, and finally it creates a new server instance for that new database, and it enables port sharing by default. The ‘New-NAVEnvironment’ is also one of Waldo’s scripts, and it does all the heavy lifting of restoring the database, creating the service tier and setting up port sharing. The full script took maybe 2-3 minutes to run for me, not bad for something that used to take all morning.
This same script could also be used to create your environments for developing extensions. For that you only need a standard database for ORIGINAL and a development database for MODIFIED, both of which will then be used to create the DELTA files for the extension package. If you look at the screenshot of my environment you’ll see an APPDEV and an APPTEST database. Both of these were originally created as copies of the standard database, also using PowerShell.


 With VSCode installed, you can open the RESULT folder and see the content of this folder inside the file browser at the left hand side. In the upper right hand corner is a button that you can use to split the screen into two (and even three) editor windows. This is very useful for resolving merge conflicts, because you can open the conflict file in one side, and the object file in the other side. You are editing the actual object file here, so you may want to take a backup copy of the folder before you get started.