How to Populate a Test Suite

You’ve spent a bunch of time developing test codeunits, and you’ve figured out how to manually pull those into a Test Suite in the Business Central test toolkit. In this post, I will show you how you can automatically populate the test suite, which is especially useful for automatically testing your app in a build pipeline.

What Are We Talking About?

To keep the sample as simple as possible, I started with a Hello World app that I created with the “AL: Go!” command, plus a test app that has a dependency on it. In this test app, I have two test codeunits that don’t do anything. They are completely useless, just meant to show you how to get them into the test tool.

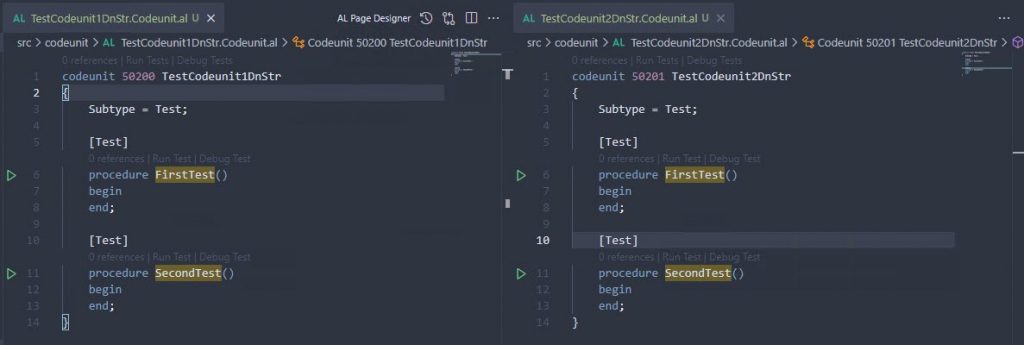
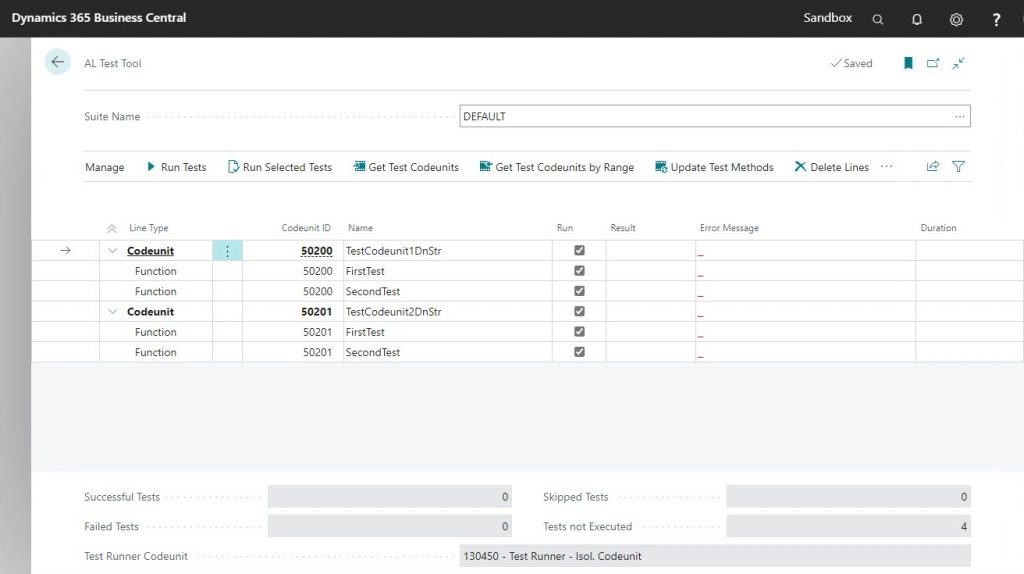
Those test codeunits are deployed into a BC container that has the test toolkit installed. This test toolkit (search for the ‘AL Test Tool’ in Alt+Q) is a UI that allows you to manually run these tests. Just like a standard BC journal page, when you first open the tool, it will create an empty record called ‘DEFAULT’ into which you must then get the test codeunits. Click on the “Get Test Codeunits” action, and only select the two useless codeunits. You should now see the codeunits and their functions in the Test Tool.

It’s kind of a drag to have to manually import the test codeunits into a Test Suite every time you modify something. To make it much easier on you, you can actually write code to do it for you. Put that code into an Install codeunit, and you never have to worry about manually creating a test suite again.

Show Me The Code!!

First we need an Install codeunit with an OnInstallAppPerCompany trigger, which is executed when the app is installed, both during an initial installation and also when performing an update or re-installation. You could probably create a separate “Initialize Test Suite” codeunit so you can run this logic in other places as well, but we are going to just write the code in our trigger directly.

The code below speaks mostly for itself. I like completely recreating the whole suite, but you can of course modify to your requirements. The important part of this example is a codeunit that Microsoft has given to us for this purpose called “Test Suite Mgt.”. This codeunit gives you several functions that you can use to make this possible.

codeunit 50202 InstallDnStr
{
    Subtype = Install;

    trigger OnInstallAppPerCompany()
    var
        TestSuite: Record "AL Test Suite";
        TestMethodLine: Record "Test Method Line";
        MyObject: Record AllObjWithCaption;
        TestSuiteMgt: Codeunit "Test Suite Mgt.";
        TestSuiteName: Code[10];
    begin
        TestSuiteName := 'SOME-NAME';

        // First, create a new Test Suite
        if TestSuite.Get(TestSuiteName) then begin
            TestSuiteMgt.DeleteAllMethods(TestSuite);
        end else begin
            TestSuiteMgt.CreateTestSuite(TestSuiteName);
            TestSuite.Get(TestSuiteName);
        end;

        // Second, pull in the test codeunits
        MyObject.SetRange("Object Type", MyObject."Object Type"::Codeunit);
        MyObject.SetFilter("Object ID", '50200..50249');
        MyObject.SetRange("Object Subtype", 'Test');
        if MyObject.FindSet() then begin
            repeat
                TestSuiteMgt.GetTestMethods(TestSuite, MyObject);
            until MyObject.Next() = 0;
        end;

        // Third, run the tests. This is of course an optional step
        TestMethodLine.SetRange("Test Suite", TestSuiteName);
        TestSuiteMgt.RunSelectedTests(TestMethodLine);
    end;
}

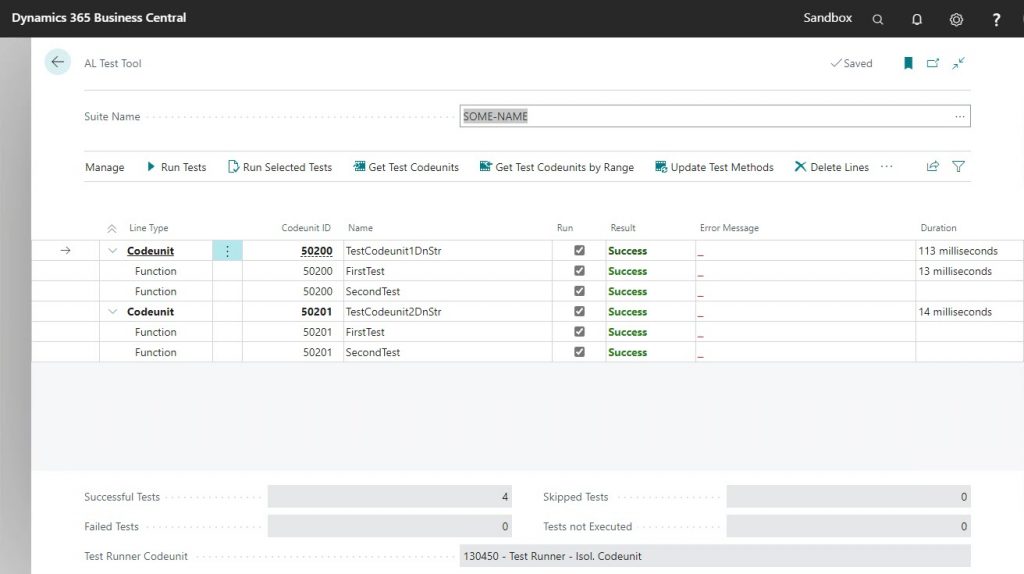
When you deploy your test app, it will now create a new Test Suite called ‘SOME-NAME’, it will pull your test codeunits with their test functions into the Test Suite, and it will execute all tests as part of the installation.

This code is very useful when you are developing the test code, because you won’t ever have to pull in any test codeunits into your test suite manually. Not only that, it will prove very useful when you start using pipelines, and you will be able to have precise control over which codeunits run at what point.

Dependencies

Here are the dependencies that I’m using :

  "dependencies": [
    {
      "id": "23de40a6-dfe8-4f80-80db-d70f83ce8caf",
      "name": "Test Runner",
      "publisher": "Microsoft",
      "version": "18.0.0.0"
    },
    {
      "id":  "5d86850b-0d76-4eca-bd7b-951ad998e997",
      "name":  "Tests-TestLibraries",
      "publisher":  "Microsoft",
      "version": "18.0.0.0"
    }
  ]

Credits

This post has been in my drafts for a while now, based on a question I posted to my Twitter, click on the Twee below to see the replies. The code in this post was copied almost verbatim from Krzysztof’s repo, he has a link in one of the replies. I had worked out my own example based on his code but I lost that when I had to clean up my VM’s.

Containers And Bacpacs

A while ago an ISV client of mine was working on getting their app into the Embed program. Part of this process was to upload a bacpac with certain characteristics. The characteristics themselves are not relevant for this post but as I was helping them, but I thought I’d write this quick post to share how you can extract your bacpac files from a container, and how to use those bacpac files to create another one.

The setup

I’m starting out with a standard BC container, which was created using BcContainerHelper, and it is called DenSterDev. Coincidentally, I am also using BcContainerHelper to extract the bacpacs and to create the new container. I am using the “C:\ProgramData\BcContainerHelper folder to store the bacpacs, because that folder is recognized both inside and outside of the container.

Extract Bacpac Files

The container is multi-tenant, so there are two databases that we care about: one is the app database, and the other is the tenant database. Both of those are necessary to create the new container. If you have any apps installed on top of the standard container, those will be included in the bacpac file for the app database, and the bacpac for the tenant database contains the data itself.

The benefit of using BcContainerHelper is that we have very handy Cmdlets to get all this stuff in and out of containers, and the bacpacs is no exception. The command is very easy:

Export-BcContainerDatabasesAsBacpac `
    -containerName 'DenSterDev' `
    -tenant default `
    -sqlCredential $Credential `
    -bacpacFolder C:\ProgramData\BcContainerHelper `
    -doNotCheckEntitlements

The tenant name is the default name of ‘default’ that is created in each standard BC container. The sqlCredential is a PSCredential object that was created during the container generation, using a username and a secure string password. As stated above, the bacpacFolder is a folder that can be accessed both in and out of the container. The entitlement flag is to bypass the check and prevent an error. When you execute this script, the bacpac files will show up in the bacpacFolder:

Create New Container from Bacpac

We are going to use these same bacpac files to create a new container. I’ll use the same container name:

New-BCContainer `
    -accept_eula `
    -containerName 'DenSterDev' `
    -artifactUrl '<ProperArtifactURL>' `
    -auth NavUserPassword `
    -assignPremiumPlan `
    -updateHosts `
    -accept_outdated `
    -Credential $Credential `
    -additionalParameters @('--env appbacpac=C:\ProgramData\BcContainerHelper\app.bacpac','--env tenantbacpac=C:\ProgramData\BcContainerHelper\default.bacpac')

Same as before, the -Credential parameter contains a PSCredential object. Note that the -additionalParameters spans across multiple lines here, but that should go on the same line in your PowerShell editor.

This command will download all the necessary artifacts and create the same container as the standard. The only difference will be that the app and tenant databases will be created from the bacpac files in your folder, instead of the standard database from the artifact. You can follow along with the script in the terminal window.

Nothing earth shattering, and made super easy by BcContainerHelper, but it took me a while to find the information and make this work. Hat’s off to Dmitry in the BC team, he was very patient with me as I got familiar with this process. Let me know in the comments if this was helpful or if you want to add anything.

Understanding OAuth Authorization Code

In this post, I write about my first experience with developing an app that implements an integration between BC and an external API. If you’re like me, most of the web services stuff goes straight over your head. Sure, with some sample code and following along with demos in a class, I can get it to work. BUT… just ONE itsy bitsy teeny weeny tiny thingy goes wrong and you’re absolutely dead in the water. Thankfully I have friends who are willing to help, and I want to pass on this knowledge so others don’t have to spend days trying to figure this out.

The Flow Itself

The “Authorization Code Grant Flow” is just one of several OAuth flows, and one of the first to be implemented. Go here if you want to read more technical details, but if this is the first time you’re reading about this I can guarantee you that you will not understand any of it, I know I didn’t 🙂

As with all OAuth flows, to get access to the actual API you must first get an access token. The thing that makes the authorization code grant flow stand out from other OAuth flows is:

  • There is an additional token that you must get before requesting the access token, this token is called the ‘Authorization Code’
  • In order to get this authorization code, a human being must enter the credentials. This flow is specifically designed NOT to provide any automated way to get the tokens

The MOST confusing thing is that although there is supposed to be an industry standard for REST APIs, it seems that each one has a slightly different way of connecting. One API that I worked on, for instance, had yet another token that is used for the API itself. As if this stuff isn’t hard enough to understand, some of them make it even more difficult. Most of them make an honest effort to provide really good documentation and in some cases even support forums.

The essential flow requires three things:

  1. API Credentials. You get these by signing up with the API provider, and they usually consist of a login ID and a ‘secret’, sometimes an additional password. They are meant to authenticate a human being logging into the API
  2. Authorization Code. This code is used to request the ‘Access Token’ that is used to get access to the API itself
  3. Access/Refresh Token. This is usually a set of two tokens. The Access Token is used for access to the API, and it usually has an expiration date/time. The Refresh Token is used to get a fresh Access Token. As long as you have a valid Refresh Token, you will not need to log back into the API

Each API that implements the authorization code grant flow will provide an endpoint for the authorization code, as well as an endpoint for the access and refresh tokens. You’d be surprised at how many ways this “standard” flow can be implemented though, so you’ll have to find the details yourself. Just hope that the API provider has good documentation.

Log In for the Authorization Code

You get credentials from the API provider, usually in the form of an ID and a ‘Secret’, sometimes with an additional password. For the authorization code grant flow, a human being is required to enter those credentials to authenticate the connection. In BC, the only way to get past this stage is by using a standard control add-in called ‘OAuthControlAddIn’. I’ve written another post that explains the details.

The control add-in provides the mechanics behind the login and processing the redirect response that comes back from the authorization endpoint, and it passes the authorization code itself back to AL through an event in the control add-in. You then take this authorization code and pass that to the token endpoint for the final piece.

Request The Access/Refresh Token

The token endpoint is the final step of the authentication process of the Authorization Code Grant Flow. Sometimes there is a separate endpoint for new tokens and another one for refreshing tokens. Other APIs have a single endpoint with two modes. One accepts the authorization code, the other accepts a refresh token, and they both return a new token pair.

The API checks the validity of the refresh token in every single API call. It is up to you to make sure that your token is valid, and the API usually provides a straightforward way for you to keep track of this yourself, by for instance providing the expiration date/time as part of the token response.

Keep Your Tokens Fresh

The Access Token usually has an expiration date/time. Some tokens are valid for a short period like 10 minutes, others have a longer shelf life. It is up to you to develop logic that checks the validity of your current tokens, and to request new tokens when they expire.

As long as your tokens are valid, you should not have to re-enter credentials, and there is no need for a new Authorization Code. The authorization code is only used when authenticating a fresh connection to the API. Once you’re past the authorization code stage, you should be able to keep the tokens fresh without having a human being log back in.

In AL, the most common way to store the tokens is through the isolated storage functionality. You can set the scope of isolated storage for the whole company, so that multiple users can share the API connection.

My Difficult Experience

One of the reasons why my experience was so difficult was the fact that the API that I was working with had a third token called ‘RestToken’. At the time, I was barely understanding these codes and tokens, and then there was this other token that I could not find in the excellent training that I had followed. Lucky for me, I had some help and was able to understand what was causing the confusion.

My guess (and it really is only a guess) why this is the case is that the API was initially developed with just this ‘RestToken’ and that at some point they built a wrapper around the API to comply with the OAuth “standard”.

The point is that each API has its own unique attributes, and its own way of implementing something that is supposed to be “standard”. Slowly but surely I started seeing the elements of what makes the flow work, and had an excellent teacher who showed me a solid way to handle that in AL code. Normally I would share the code in these posts. At the moment though I only have the training material and the client production code, neither one is mine to share. Maybe in the future when I’m less busy I’ll take some time to put some code together.

Let me know if this helps or not, I’d be happy to get your feedback and try to help if you need some.

OAuth JS Login

This post explains just the login part of the “Authorization Code Grant Flow”, one of the ways to get an OAuth access token from an endpoint. It has taken me WAY too much time to get this, and I had to get some help from my good friend AJ to explain it to me. This is one flow that you will not be able to do in a local container, since the callback URL must be accessible in SaaS.

Authorization Code Grant Flow

The Authorization Code Grant Flow is the most rudimentary OAuth flow. This post won’t explain the flow itself; I’ll write about that in other posts (if I ever get the courage to actually publish that) but I needed to get this part down while it’s still fresh in my mind.

The tricky part about this flow is that it requires a human being to enter credentials of the endpoint. With those credentials, you will get what is called the ‘authorization code’. This authorization code is then used to get the access/refresh tokens themselves.

OAuth Control Add-In

In standard Business Central, there is just one way to catch the authorization code, and that is through a standard JavaScript control called ‘OAuthControlAddIn’. This standard controladdin provides two essential things. First it opens a login screen, where a human being can enter the credentials. Second, it catches the authorization code response. The control add-in feeds the code back through the trigger called ‘AuthorizationCodeRetrieved’.

Why Not Catch the HttpResponse Directly?

THAT, my friend, is a GREAT question, and please forgive me if I get the technical details of the answer wrong because I barely understand this part. When the authorization code endpoint returns the response, it contains the redirect URL that you send into the endpoint. The type of the response causes BC to then automatically forward the response to the redirect URL, WITHOUT a way for you to intercept the response itself. In other words… the response that you see is not the initial response itself, but the response to the response from the redirect call, and THAT response does NOT have the authorization code in it.

Using Postman or the REST client, you can turn off the auto redirect, but AL does not have a way to do that. Microsoft has decided to not allow us to intercept the initial response, and the only way to get the actual authorization code is to use the control add-in. It is the add-in that catches the code and provides that through the ‘AuthorizationCodeRetrieved’ trigger.

Only in SaaS

This automatic forwarding of the authorization code response is the reason why you can’t use this flow on a local container. The redirect URL must be available publicly, which requires your current connection to be in SaaS.

The standard redirect URL is ‘https://businesscentral.dynamics.com/oauthlanding.htm’. You can follow this URL and look at the page source code, and you will see the JavaScript logic there that catches the response. Since a local container does not provide this public access, the redirect will always fail, and you will not be able to catch the authorization code locally.

Here’s How It Works

On the page that you want to provide the action to connect to the API, you add the following control to the content area within the layout section of the page. Note the ‘AuthorizationCodeRetrieved’ trigger that calls another funtion called ‘GetNewTokens’, which is where we finally get the access/refresh tokens.

usercontrol(OAuthControl; OAuthControlAddIn)
{
    ApplicationArea = All;

    trigger ControlAddInReady()
    begin
        ControlAddInReady := true;
    end;

    trigger AuthorizationCodeRetrieved(AuthCode: Text)
    begin
        GetNewTokens(AuthCode);
    end;

    trigger AuthorizationErrorOccurred(AuthError: Text; AuthErrorDescription: Text)
    begin
        Error('%1 %2', AuthError, AuthErrorDescription);
    end;
}

To initialize the login procedure, you then call the ‘StartAuthorization’ method of the add-in. You could have a ‘Login’ action with a call to a ‘DoTheLogin function, like this:

local procedure DoTheLogin()
var
    ConnectionEstablishedMsg: Label 'The connection has already been established';
begin
    if (AccessToken = '') and (RefreshToken = '') then
        CurrPage.OAuthControl.StartAuthorization(GetAuthUrl())
    else
        Message(ConnectionEstablishedMsg);
end;

The control addin then fires the AuthorizationCodeRetrieved trigger, with the authorization code as a parameter, which you can then use to get the access/refresh tokens. Now this code IS part of the initial response, but the HttpClient in AL does not allow us to intercept that response without automatically redirecting the response.

It took me SO LONG to understand how this works, and I could never have done it without AJ’s help. Reading this back now I still don’t know if I am getting the details correct, so I don’t blame you for not getting it. Leave me a message or a comment if this helps or not.

Browse Files in Docker

Use the Docker VSCode extension to browse files in your container

If you struggle using the command prompt to figure out where the files are in your Docker container, this post is for you. I will show you how easy it is to actually browse around the files inside your container.

The Struggle is Real

The first time that I sat behind a PC was in high school in the early 80s. At the time, the only way to ‘communicate’ with your computer was through a DOS prompt. If you were REALLY fancy, you had a .bat file that provided a menu, and you had to type the number and then hit enter to execute what was behind the number. We read how to do the cool things in paper magazines, because the only other resource was books at the library.

The command prompt was not my favorite, and I never really got into computers as much as you’d expect. Not until years later did I find myself working ‘in computers’, and at that time I tried to stick to GUI based tools. For some reason, CLE based tools are back in vogue (or I’m just recently discovering that this is where it’s at) and I find myself struggling to navigate. I kind of know how it works, but it’s difficult for me to keep straight where I am and where the connections are.

Finding Files in my Container

Up until now, the only way that I know of to find files inside a Docker container is to use the command prompt. Using the BCContainerHelper module, you can connect to the container by using the Enter-BCContainer <ContainerName> command. You can tell by the prompt when you are in the container.

The container has its own file system, with folders, just like your host computer. To make things easy, there are two Very Important Folders:

  • The ‘C:\run\my’ folder in the container is mapped to the ‘C:\ProgramData\BcContainerHelper\Extensions\<ContainerName>\my’ folder. This means that the files in those folders are shared by the host and the container, but the path in the container is NOT the same as the path on the host
    • NOTE: this is a container specific folder, so anything that you put into this folder will be deleted when you destroy the container
  • The ‘C:\programdata\bccontainerhelper’ folder is mapped to the same folder on the host. This means that the folder is also shared between the host and the container, PLUS the path is the same in both contexts
    • NOTE: As long as you have BcContainerHelper installed, any files (and additional folders) that you put into this folder will remain there, even when you remove containers. This is a perfect folder for sharing purposes.

This is important to understand, because you will probably use PowerShell scripts to do all sorts of things with containers, and you will need to read and/or write files to folders within the proper context.

A Better Way

The Docker extension for VSCode was updated this week, and it has a new feature that enables you to browse the files from inside VSCode.

This shot shows the folder structure inside my container

For me, this is a MUCH better way, because I find it very hard to keep track of where I am in the folder structure, and this gives me a bit more context. What I am missing is an easy way to tell which folders are shared, and what the path on the host is.

If you don’t have the Docker extension for VSCode yet, you can find it here. You can also search for it in the VSCode marketplace.

SQL Server and Docker

Learn how to use SQL Server to access the databases in your Docker container

This post is for you if you want to be able to access the SQL Server database inside your Docker container, without having to write the query.

For one of my projects, I needed to be able to see the apps that were uninstalled but still had their schema in the tenant database. That information is in the $ndo$navappuninstalledapp table, and with SQL Server Management Studio (SSMS) it is super easy to look at table data. In my container I assumed that I would have to figure out a way to write the actual query (something I am not very good at). As it turns out, I was wrong. In this post I will explain two very easy ways to access the SQL Server database inside your Docker container.

SQL Server Management Studio

The first, most obvious, option is to do a complete install of SQL Server in whatever edition you have access to. If you want to keep things lean though, you can also install a standalone SSMS. You can download SQL Server Management Studio here.

Connecting to a Docker container could not be easier. In the connection dialog, simply enter the name of your container as the server name, and SSMS will connect to it for you. I always use NavUserPassword authentication in my containers, and by default your container password will also work as the sa password inside the container.

My container is called ‘densterdev’, and you can see the default app and tenant databases inside the container.

All I needed to do was look at some table data, and that works just fine. I did not try to do anything more advanced than that.

SQL Server Extension in VSCode

The second option is even easier than installing SSMS, because you are already using VSCode to do your AL development. Microsoft has created a ‘SQL Server’ extension, which works very similar to SSMS. In the extensions search box in VSCode, type ‘SQL’ and select the one made by Microsoft.

After installing you may need to reload VSCode to enable the extension. You will see a new tab on the left navigation pane that will show you the tooltip ‘SQL Server’ when you hover over it. When you click this tab, you will see a heading that says ‘Connections’ at the top, with a + sign next to it. Click this + and follow the prompts. Just like SSMS, you enter the container name as the server name, and it should connect to it with no problem.

The same app and tenant databases are shown inside VSCode

I still did not need to do anything more complex than looking at some data, so I really can’t say what features are available beyond that. My guess is that it is less capable than SSMS, so this may not be an option if you need more advanced capabilities.

Containers Are Now Multi Tenant

Containers are now multi-tenant by default. The New-NavContainer Cmdlet has had a “-multitenant” parameter for a while now, it’s just that not specifying a value for this parameter now means that you get a multi-tenant container. Presumably this is because multi-tenancy is the default for SaaS, and should be for everything. Maybe this was implemented with the switch from NavContainerHelper to BcContainerHelper and I just didn’t pay attention to the details.

The way that I discovered this was that I was working on a training about the BC API, and I had learned that to get to the tenant, you specify it by its ID in the endpoint, like this: https://container:7048/BC/v2.0/[tenant]/[environment]/api/v1.0

Adding “?tenant=default” worked but I was curious whether including the tenantId in the URL was supposed to work in containers. Hint: it is NOT supposed to work that way, at least not based on the replies that I got from Twitter

As I was working through these issues I had created a new container, and instead of removing it, I had set the -multitenant parameter to true and didn’t think of it again until I was working on another project. New container, different script, this time without the -multitenant parameter.

To make a long story short…. I was expecting my container NOT to be multi-tenant, and was annoyed to see that my Postman scripts (the version without specifying the tenant) did not work anymore. It took me WAY too long to discover what the issue was, but there you have it 🙂

Docker Artifacts

Quick post today to point out some new posts by Freddy about a change that he’s made to the container logic in his PowerShell module to switch from downloading images to getting the artifacts and assemble images on the fly. I’ll just link to his blog and kind of summarize. The implications for us Docker consumers, as it turned out, was so small that it was almost uneventful.

Background

Until recently, the process to create a container involved downloading a fully prepared image of that container. This was very easy: download the image, create the container. The problem lies with the sheer number of images that had to be prepared for each situation. Are you on Windows Server 2016? 2019? Which build? Which version of NAV? Which localization? Business Central OnPrem or Sandbox? All in all, to accommodate the entire community, there were hundreds if not thousands of images just to create these containers.

So, to cut down on the sheer volume of those images, we now have what is called Artifacts. Instead of a full image, you download a set of instructions to fetch and build a local image yourself, which is layered with a bunch of components. There are a few common building blocks for the generic image and SQL Server and other such components, and then there are the pieces that we need to prepare the NST, the database, the localization, etcetera.

Instead of having hundreds of images with the same common elements, each common element is a separate download that can be re-used for all images that need it. I’ll leave it to Freddy to explain the details.

What Changes For You?

When I first became aware of this change, I was very skeptical and concerned. I’ve been having some pretty persistent and annoying issues with Docker, and I had visions of it all crapping out on me with this change.

The actual change itself is not very big. Instead of specifying the image name, you specify an artifact URL (the ImageName parameter still exists, and it serves a very useful purpose, but it’s no longer necessary to create a new container). The script then does its work, just like it has before. I made the change, ran the script, and it just created the container without any problem. My containers are usually very straightforward (most of the time I just need the latest US sandbox) and I have had a grand total of zero problems with this particular change.

Posts on the Artifacts

So far, Freddy wrote 5 posts about this change:

Just today, the last full image for OnPrem was uploaded. As it seems, artifacts are here to stay. Lucky for us, this particular change to NavContainerHelper has been seamless, at least for me. My New-NavContainer scripts still work, and I’ve had zero problems with the resulting containers, at least none that are related to Artifacts.

Bye Bye WITH

This past week there was a PGI for the MVP’s about something that the Business Central team is preparing for, and they were asking the MVP’s for their feedback. The topic was their plan to discontinue the WITH statement from the AL language. For me personally this is not a big deal, because I’ve always hated using WITH, especially when it spans more than a page of code. I get distracted very easily, and I lose track of which variable these fields apply to. As a result, I’ve always tried to write code and mention variable names explicitly.

As you can imagine, emotions run high about this one, especially with people who like to get upset about stuff. I won’t point to specific instances of this because I don’t like to call people out and get them even more upset. I just want to share some details with you.

There is no ‘official announcement’ but Esben replied to an issue in the AL repo on github here. Microsoft put together a virtual event and created a bunch of videos where they present a lot of content about Business Central here: https://aka.ms/virtual/businesscentral/2020RW1. The details about why they are getting rid of WITH are in the “Interfaces and extensibility” video, which you can find under the Developer track in the Library.

Good Reason

Microsoft is not just implementing this change because they like making our lives difficult. There are some very serious problems related to the WITH statement, especially surrounding dependencies between apps. There are two types of WITH statements:

  • Explicit WITH – this is when you see the keyword ‘with’ in your AL code, and it is meant to make it so that you don’t have to repeat the variable name. Very handy if you want to set a bunch of field values, let’s say in a Customer record variable, you can type ‘with Customer do begin’ and now you can access fields directly without having to type the variable name for each one of them
  • Implicit WITH – this is when a record is implied, like on page objects or in a report dataitem. You can simply type field names, and its record is implied because of where the code is written. By the way, it looks like for now they are letting us keep the implicit WITH (meaning we won’t have to type out ‘Rec’) in table and tableextension objects.

Let’s say you add a procedure called ‘IsImportant’ to a codeunit in which you have a WITH statement, or to a page (doesn’t matter which table the page shows). You call the IsImportant procedure to run some business logic. Everything works great.

The problem occurs when Microsoft then adds a field or a procedure with the same name. Let’s say your IsImportant function does something in some logic about the Vendor table. If Microsoft now adds a field called IsImportant, there is an ambiguity about what this refers to. In your code, it will never reach the Vendor table, because it will find the function in your object before it gets to the Vendor table. Or vice versa, depending on how the code is written and what the scope is at that time. The presentation that I mentioned before will have a bunch of examples to explain, so come back in a few days and I will add a link to the recording to this post.

Not leaving us hanging

One thing to remember is that Microsoft is NOT going to just throw this out at us and leave us high and dry, without any help in fixing this. One of the people on the call had already done some investigating, and figured out that he will have to fix this in 21,000 places in a variety of apps for his customers. This is a LOT of work, and we all need some time to process this.

Some things to remember:

  • This is currently in preview in the AL insider build, and the target is the next major version of the AL language
  • At that time, these will still not be errors, but warnings. The statement will not actually go away until 2021. I can’t find in my notes if it will be wave 1 or 2, but at the earliest this will be spring 2021
  • You will not have to go searching for them yourself, the code analyzer will show you exactly where they are
  • Microsoft is working on tools to help us. The proof of concept that was shown to us was a first version where you have to open each page object and click on the tool and it will fix the implicit WITH on the whole page for you
  • There was also a tool to fix an explicit WITH in code. Both of these tools were still first versions, but they worked and looked like they were easy to use
  • There were already some discussions about options on maybe creating some external tools that utilize these tools. We have a wonderful community of people that are creating AL tools, and I am pretty sure that by the time this becomes really important (meaning by the time you can’t postpone this any longer) we will have really handy tools that will make this a piece of cake

Start NOW

You could include the rule in your ruleset.json file (it’s rule AL0606 for explicit WITH and AL0604 for implicit WITH) and completely ignore the issue. You would be doing yourself a disservice though. I would recommend that you stop using WITH immediately, and start fixing it in every object that you touch from now on, at the very least the explicit WITH. I might wait fixing implicit WITH statements on page objects until there is a more user friendly version of the tool, but I am absolutely going to try and see how much work it actually is.

If it’s one of those point/click fixes and it takes no effort at all, I can totally see myself just whip out 4-5 pages at a time while a container is rebuilding. If you have a ton of customers with a ton of customizations then yes it could be a big task, and you might want to wait until there is a better tool to help you through.

This is one of those things that you can’t postpone forever, you will have to address it at some point. I don’t like having to “fix” something like this either, but there are more important things in this world right now, I just can’t get upset about it.

Sign App File – part 2

Quite a while ago I wrote about signing your app file, which is a requirement for AppSource. It’s been a while since I had to do this, so I went back to my blog and found the article quite lacking. This post is an attempt to fill in the blanks and give you all the information that you need to sign your app, all in one place.

Your first stop to read about this is right here, the Learn page about signing the app file specifically for Business Central. Most of what I’m about to tell you is in there, I’ll just elaborate a little bit more.

Basically, signing an app file, or an executable file, is a way to tag that file with an attribute that certifies where the file came from. If Acme Rockets signs their rocket skate app, the file has an attribute that shows Acme indeed digitally signed it. Take a look at the properties for ‘explorer.exe’, the executable for Windows Explorer. You can check out the digital signature that verifies that this file was signed by Microsoft.

In a nutshell, you need the following:

  • A Code Signing Certificate, in ‘pfx’ format
  • A code signing tool (I’m using ‘signtool’ here)
  • The SIP from your BC container (don’t ask, I still don’t really know)
  • A script to actually sign

Code Signing Certificate

The first thing that you need is the Code Signing certificate. This is a particular type of certificate (NOT the same as an SSL certificate) that you must get from an Authenticode licensed certificate authority (there’s a link in the Docs article mentioned above) such as this one or this one or this one or this one. I’m not affiliated with either one, and GoDaddy doesn’t seem to provide code signing certificates anymore, but I’ve worked with certs from two of those companies and they both worked as advertised. For AppSource submissions, you need the regular “Code Signing”, not the extended one or the one for drivers. Go shopping, because I’ve seen prices range between $199 and $499 per year for the same thing.

In order for the signtool to be able to use the certificate, it must be in ‘pfx’ format. One of the providers that I mentioned has a page here that explains how you can create this file format. The actual file will have a password on it, and you can save it on the computer where you have NAV/BC installed, or where your container lives. I usually have a working folder right in the C root where I do this kind of thing.

The Signing Tool

You’ll need a tool to sign the app file – Microsoft recommends SignTool or SignCode. Since their sample script is for SignTool, that’s the one that I used. Now, the text in Docs describes that SignTool is automatically installed with Visual Studio, but that is only partially true. I actually downloaded Visual Studio to see if that works, but the installation configuration that I chose did not include SignTool.

Signtool is part of the Windows SDK, which probably comes in one of the standard Visual Studio configurations. I don’t know which one, so you’ll have to make sure that it is selected when you are installing it. Another way to get it installed is to install the Windows SDK directly, which you can download here. I installed the one for Windows 7 on a Windows Server 2019 Hyper-V VM, and it worked for me. I know, I should have looked a little longer and used the Windows 10 one, but by that time my app file was already signed and dinner smells were filling my office.

The SIP

If you try to sign your app file now, you will probably get an error message that the app file is not recognized. The SignTool program needs to be able to recognize the app file, and for that purpose it needs to have something called ‘the SIP’ registered on the machine where you run the SignTool command. Apparently this is some sort of hash/validation calculation package that is used to create digital signatures. Each program on your computer apparently has one of these.

One way to get ‘the SIP’ is to install NAV/BC on the computer. If you’re like me, and you use containers exclusively, you won’t want to do this. Luckily, the NavContainerHelper module has a Cmdlet to retrieve ‘the SIP’ out of the container.

 Install-NAVSipCryptoProviderFromBCContainer YourContainerName 

This Cmdlet gets ‘the SIP’ out of the container and registers it on the host. At this point, you should be all set to sign your app file.

Script to Sign

The last element is the command to actually create the digital signature. Not much to say about that, so here it is:

"C:\Program Files\Microsoft SDKs\Windows\v7.1\Bin\signtool.exe" sign 
    /f "C:\WorkFolder\CodeSignCert.pfx" 
    /p "Your Password" 
    /t http://timestamp.verisign.com/scripts/timestamp.dll "C:\YourRepo\Publisher_AppName_1.0.0.0.app"

As you can see, my SignTool is in the Windows 7 SDK folder, you may need to search around for it. Installing the SDK is supposed to register SignTool and you should be able to just use ‘signtool’ as a command. For some reason that did not work for me, which is why I specified the entire path. I split this up to make it look better in this post, the command needs to all be on one line.

One more thing – the timestamp specifies that the file was signed using a certificate that was valid at the time of signing, and the file itself will never expire. Of course if you want to submit a new file after the certificate has expires, you will need to get a new one. If you don’t specify the timestamp, your app file will expire on the same date as your certificate.

Update March 26, 2020 – The timestamping service was provided by Symantec and it looks like they are rebranding that to ‘digicert’. Here is an article that explains the situation. You will need to change the timestamp part in your script:

Replace:
/t http://timestamp.verisign.com/scripts/timestamp.dll 
With this:
/t http://timestamp.digicert.com?alg=sha1

All Set

That’s it, you should be all set to sign your app file. I have to be honest and confess that I wrote this mainly for myself, because I spent WAY too much time trying to re-trace my steps and figure out how this works again. It’s now in a single post, hope it helps you as much as it helped me.

Update – March 18, 2020

Turns out, there is a simple command for this….

$MyAppFile = "C:\ProgramData\NavContainerHelper\Extensions\Publisher_AppName_1.0.0.0.app"
$MyPfx = "C:\ProgramData\NavContainerHelper\Extensions\CodeSignCert.pfx"
$MyPassword = ConvertTo-SecureString "Your password" -AsPlainText -Force
$MyContainerName = "YourContainer"

Sign-NavContainerApp -appFile $MyAppFile -pfxFile $MyPfx -pfxPassword $MyPassword -containerName $MyContainerName

No need to install anything. All you need is the app file and your pfx file with a password, and everything else happens in the container (as Freddy puts it “without contaminating the host”). Just copy both files into a shared folder where NavContainerHelper can read the files.