Sign App File – part 2

Quite a while ago I wrote about signing your app file, which is a requirement for AppSource. It’s been a while since I had to do this, so I went back to my blog and found the article quite lacking. This post is an attempt to fill in the blanks and give you all the information that you need to sign your app, all in one place.

Your first stop to read about this is right here, the Learn page about signing the app file specifically for Business Central. Most of what I’m about to tell you is in there, I’ll just elaborate a little bit more.

Basically, signing an app file, or an executable file, is a way to tag that file with an attribute that certifies where the file came from. If Acme Rockets signs their rocket skate app, the file has an attribute that shows Acme indeed digitally signed it. Take a look at the properties for ‘explorer.exe’, the executable for Windows Explorer. You can check out the digital signature that verifies that this file was signed by Microsoft.

In a nutshell, you need the following:

  • A Code Signing Certificate, in ‘pfx’ format
  • A code signing tool (I’m using ‘signtool’ here)
  • The SIP from your BC container (don’t ask, I still don’t really know)
  • A script to actually sign

Code Signing Certificate

The first thing that you need is the Code Signing certificate. This is a particular type of certificate (NOT the same as an SSL certificate) that you must get from an Authenticode licensed certificate authority (there’s a link in the Docs article mentioned above) such as this one or this one or this one or this one. I’m not affiliated with either one, and GoDaddy doesn’t seem to provide code signing certificates anymore, but I’ve worked with certs from two of those companies and they both worked as advertised. For AppSource submissions, you need the regular “Code Signing”, not the extended one or the one for drivers. Go shopping, because I’ve seen prices range between $199 and $499 per year for the same thing.

In order for the signtool to be able to use the certificate, it must be in ‘pfx’ format. One of the providers that I mentioned has a page here that explains how you can create this file format. The actual file will have a password on it, and you can save it on the computer where you have NAV/BC installed, or where your container lives. I usually have a working folder right in the C root where I do this kind of thing.

The Signing Tool

You’ll need a tool to sign the app file – Microsoft recommends SignTool or SignCode. Since their sample script is for SignTool, that’s the one that I used. Now, the text in Docs describes that SignTool is automatically installed with Visual Studio, but that is only partially true. I actually downloaded Visual Studio to see if that works, but the installation configuration that I chose did not include SignTool.

Signtool is part of the Windows SDK, which probably comes in one of the standard Visual Studio configurations. I don’t know which one, so you’ll have to make sure that it is selected when you are installing it. Another way to get it installed is to install the Windows SDK directly, which you can download here. I installed the one for Windows 7 on a Windows Server 2019 Hyper-V VM, and it worked for me. I know, I should have looked a little longer and used the Windows 10 one, but by that time my app file was already signed and dinner smells were filling my office.

The SIP

If you try to sign your app file now, you will probably get an error message that the app file is not recognized. The SignTool program needs to be able to recognize the app file, and for that purpose it needs to have something called ‘the SIP’ registered on the machine where you run the SignTool command. Apparently this is some sort of hash/validation calculation package that is used to create digital signatures. Each program on your computer apparently has one of these.

One way to get ‘the SIP’ is to install NAV/BC on the computer. If you’re like me, and you use containers exclusively, you won’t want to do this. Luckily, the NavContainerHelper module has a Cmdlet to retrieve ‘the SIP’ out of the container.

 Install-NAVSipCryptoProviderFromBCContainer YourContainerName 

This Cmdlet gets ‘the SIP’ out of the container and registers it on the host. At this point, you should be all set to sign your app file.

Script to Sign

The last element is the command to actually create the digital signature. Not much to say about that, so here it is:

"C:\Program Files\Microsoft SDKs\Windows\v7.1\Bin\signtool.exe" sign 
    /f "C:\WorkFolder\CodeSignCert.pfx" 
    /p "Your Password" 
    /t http://timestamp.verisign.com/scripts/timestamp.dll "C:\YourRepo\Publisher_AppName_1.0.0.0.app"

As you can see, my SignTool is in the Windows 7 SDK folder, you may need to search around for it. Installing the SDK is supposed to register SignTool and you should be able to just use ‘signtool’ as a command. For some reason that did not work for me, which is why I specified the entire path. I split this up to make it look better in this post, the command needs to all be on one line.

One more thing – the timestamp specifies that the file was signed using a certificate that was valid at the time of signing, and the file itself will never expire. Of course if you want to submit a new file after the certificate has expires, you will need to get a new one. If you don’t specify the timestamp, your app file will expire on the same date as your certificate.

Update March 26, 2020 – The timestamping service was provided by Symantec and it looks like they are rebranding that to ‘digicert’. Here is an article that explains the situation. You will need to change the timestamp part in your script:

Replace:
/t http://timestamp.verisign.com/scripts/timestamp.dll 
With this:
/t http://timestamp.digicert.com?alg=sha1

All Set

That’s it, you should be all set to sign your app file. I have to be honest and confess that I wrote this mainly for myself, because I spent WAY too much time trying to re-trace my steps and figure out how this works again. It’s now in a single post, hope it helps you as much as it helped me.

Update – March 18, 2020

Turns out, there is a simple command for this….

$MyAppFile = "C:\ProgramData\NavContainerHelper\Extensions\Publisher_AppName_1.0.0.0.app"
$MyPfx = "C:\ProgramData\NavContainerHelper\Extensions\CodeSignCert.pfx"
$MyPassword = ConvertTo-SecureString "Your password" -AsPlainText -Force
$MyContainerName = "YourContainer"

Sign-NavContainerApp -appFile $MyAppFile -pfxFile $MyPfx -pfxPassword $MyPassword -containerName $MyContainerName

No need to install anything. All you need is the app file and your pfx file with a password, and everything else happens in the container (as Freddy puts it “without contaminating the host”). Just copy both files into a shared folder where NavContainerHelper can read the files.

Extensible Enums

The AL language has an object type called ‘enum’. This object type defines a list of possible values in the form of a set of key/value pairs, plus captions. You can then create a field in a table or table extension enum as its data type, and the field will provide the user with a drop down list of those values. Just like option fields, the database stores the numerical values of the enum in the field.

To define a new enum, you create a new .al file in which you define the enum as an object, and you list the options of the enum as follows:

Note that the ‘Extensible’ property is set to true, so it will be possible to extend the enum with additional options when the enum is used in other extensions.

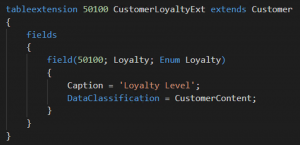
To link a field in a table or a table extension, you define the field as an enum type field, and specify the enum name as part of the field definition. In the following screenshot we’re adding an enum type field to the Customer table in a new tableextension:

Now, in order for this enum to be extended, you would have the app that includes the enum as a dependency (which puts the original enum into the current app’s symbol references), and then you would create a new object called an ‘enumextension’, in which you define additional values.

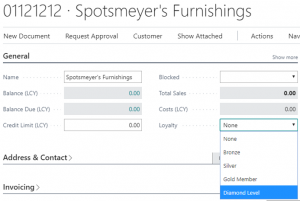
Now when you look at the Customer Card, you can see all the values in the dropdown for the new field:

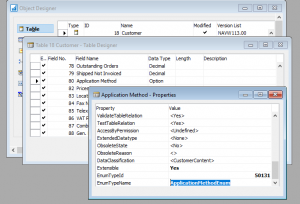
It is also possible to link an option field in C/SIDE to an enum in AL, as shown in the following screenshot:

When I learned about the extensible enum type, I was salivating at the thought that it would be possible to extend the available options in a ton of tables (type in sales/purchase line, account type in journals, entry type in ledgers to name just a few of them). It IS possible to do just that, and eventually the goal is to replace all option type fields in Business Central with enum type fields, it’s just that it comes with a crap ton of refactoring of existing code.

There is a lot of code that checks for all available option values, with an ELSE leg in the CASE statement for ‘other values’. All of that code will need to be refactored to allow for extended enums instead of just raising an error with an unrecognized value.

Now you know about enums, start using them instead of option type fields, and make them as extensible as possible.

AppSource Test Drive

Everybody knows about AppSource by now. Everybody is also struggling how to make AppSource work for them, and especially how to provide customers and prospects a trial of their functionality. You could create a sandbox environment and try things out in there, but that doesn’t have test data that is specific for your product. You could install the product into a production tenant, but then you have an app in there that you might not want after all.

One of the lesser known features of AppSource is the Test Drive. This feature provides an ISV partner a completely isolated trial experience  of their product, in an environment that is completely in their control. What’s even better is that the Test Drive can be done in a number of different ways, so you can tailor it exactly to your requirements.

The Test Drive can be a part of a comprehensive marketing strategy, in which you can implement an environment that can showcase even the most complex features of your software, in a way that provides ample opportunity to your customers to learn how to use your product in a non-production environment that is still in the cloud, without having to get a team of consultants onsite.

The way that it works is essentially that the Test Drive is a standalone tenant that has a template company. This template company has your product already installed, and it has proper test data already populated. You can create all the data that you need for your product to run properly. Then, through the SaaSification techniques, you would implement a path into the features of your product, taking the user into your product one step at a time.

If you are interested in providing a Test Drive, please watch this video, in which I go into some more detail about this feature.

To find out more about the test drive, and other information about apps for Business Central, visit http://aka.ms/ReadyToGo

Signing an App Package File

One of the cool things about my work is that I get to participate in some things very early. This is often really cool, but it also comes with some frustration when things don’t go very smoothly, or when there is little information to work with. One of those things, which I had absolutely NO knowledge of, was signing an app file… I had not a clue what this means, and no clue where to go to get this information.

The page where Microsoft explains how this works can be found here. It looks like a really nice and informative page now, but a few months ago it was confusing as heck, and it was not very helpful to me. At the time, I was working on an app for one of our customers, and one of the steps to get apps into AppSource is to sign the app file before you submit it.

Electronically signing a file is essentially a way to identify the source of the file and certify that the file comes from a known source. The ISV partner that develops an app must register with the signing authorities, and then every time that they release a file, they have to stamp that file with their identifying attributes. The process to do this is to ‘sign’ the file.

I’m not going into the details of how to get this done, the resource in Docs.microsoft is quite good now, so you can read it there. One thing I do want to share is that you should ALWAYS timestamp your signing. If you don’t timestamp the signature, your app will expire the same date as your certificate. If you DO timestamp, the signature will be timestamped with a date that was within the validity of your certification, and your app file will never expire. You do have to keep your certificate valid of course, but at least by timestamping the signature, the files that you sign will not expire.

During the whole process of getting the certificate and the signature, I worked with someone at Microsoft, who helped me get my customer’s app signed, and he also took my feedback to improve the documentation. I noticed something about the documentation that I think should be pointed out.

Documentation for Business Central is now in a new space called ‘docs.microsoft.com‘. In contrast with MSDN, Docs is almost interactive with the community. Maybe you’ve noticed, but each page in Docs has a feedback section. Scroll down on any page in there, and you will see that there is a section where you as a consumer of this information can leave your feedback.

I did this, and to my surprise I got an email. As it happened, the person that was working on the signing page knew my name and knew how to get a hold of me, and we worked together to make the page more informative. It was a coincidence that we knew about each other, but what was no coincidence was that there are actual product group people at Microsoft that are responsible for the documentation. There is a team of documentation people that watch out for issues on Docs, and they pick up issues within days of submission!!

The feedback system links back through GitHub issues, so if you’ve ever submitted something to the AL team, you know that this is pretty direct communication. I am wondering though, if Microsoft will take this a step further, and open up Docs as a public repository where people can make suggested changes. I think yes, but I’m not sure because there’s not really a history of direct collaboration like that. I have good hope though, because the culture at Microsoft is getting more collaborative by the day.

Translations for Business Central Apps

My struggle to get the new translation files right has been real and too long to recount on this blog. When I finally got it right, it felt like it was more of a coincidence than actual skill to finally get it done.

It started with the app submission checklist, where one of the requirements is to “include all translations of countries your extension is supporting”. The app that I was working on was targeted for the US market, so all I needed was a translation file for ‘en-US’. The page on docs that explains translations explained what I needed to do. Or did it?

Turning on the translation feature in the app.json file and replacing all ML captions and such was easy enough. The trouble begins when you run into the details.

As soon as you rebuild the app, VSCode generated the default translation file in a new folder called ‘Translations’, and the translation file will be called “<YourAppname>.g.xlf”. Because the development language is ‘en-US’, this generated translation file is also specified for the ‘en-US’ language.

The translation page on Docs specifies that you need to copy the generated file “to avoid that the file is overwritten next time the extension is built”. Each time that you build the app it will re-create the generated xlf file. What that means is that you need to make a copy of the translation file and use the copy to do your actual translation work.

So I did make that copy, and because I was working on a US only app, I felt I was done with my translation. I had the generated file in my workspace, I had a copy of it for the ‘en-US’ language, I thought I was good to go. Alas, the app submission failed because they could not find any translation file in my app. Something was missing from my translation file.

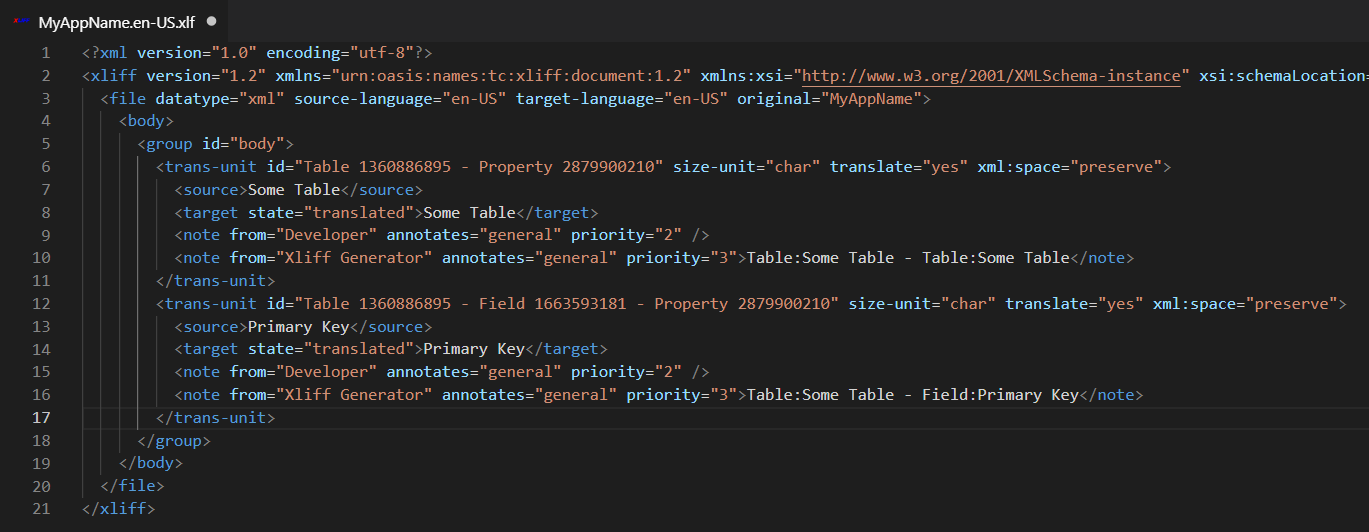
The generated file only has nodes for “source”, which comes from all of your text strings like labels and captions and comments and such. The translation itself is in a node that is NOT included in the generated xlf file, you have to create that. The name of this node is “target”, and this is where the actual translation goes for each source element.

So, I copied and pasted all of the source nodes, made target nodes out of them, and by this time I had a direct line to the validation person at Microsoft, who was willing to hop on a Skype call and look at my workspace. He was also surprised to see that my workspace DID have the translation file, while the app file that I sent to him did not. As it turns out, the target node needs to have an attribute called “state” with a value “translated”.

In order to get the translation file in its proper state, you should use the proper tool, and I found that the Microsoft Multilingual app toolkit editor is the easiest one to work with. It puts the right elements into the xlf file, and when I used that tool, my app file was finally accepted.

How Do I Videos

My company was commissioned late last year to create some short ‘How Do I’ videos on how to accomplish a bunch of simple technical tasks in Business Central. In total we created about a dozen videos, and they were all published on the “Dynamics 365” channel on YouTube. This channel has a TON of video content about all sorts of topics related to Dynamics 365 in general. Business Central is actually not a main topic in this channel, they are mostly focused on Sales, Marketing, Operations.

Anyway, I wanted to put links to the videos that I recorded in a blog post, so it would be easy to find them. As a result of these videos, we’ve been commissioned to create 30 hours of real training material for Business Central. Yes you read that right… THIRTY HOURS!!!! That’s almost a whole week!!!! Unfortunately, these larger videos will be published in the Dynamics Learning Portal, which is a subscription service inside PartnerSource. You have to have PartnerSource access and also pay extra to be able to access those videos.

I’ve already brought up in an internal meeting that it would be really cool if those videos could be public, and I did not get shot down. I doubt that they will be though, but I will make it a mission to mention this at every step of the way. I’ll keep you posted. On to the videos…

The first one is an easy one, how to add a field in an extension:

Next, how to add a field with a foreign key relation to another table:

Next, how to add some AL code to an extension:

Then, how to add upgrade logic to an extension:

And finally, how to connect to a web service: