Extending the AL Language

Over the past year, I’ve taught many people how to develop extensions for Business Central using Visual Studio Code. Usually I try to keep the workshop to standard features in VSCode and the standard AL Language extension. One of the things I don’t usually cover in any detail is an additional extension that extends that language, the “CRS AL Language Extension”. Since I am one of the owners of CRS, I could take part of the credit for it, but you should know that it was developed pretty much 100% by Waldo. If you want to read more about the extension itself, read Waldo’s latest blog post about it, he’s much better at explaining it than I am.

There are a bunch of really useful features in this extension, but I want to specifically mention a couple that I think are indispensable. In fact, I would bet quite a bit of money that Microsoft will include some of these features in the official AL Language sooner rather than later. It would really not even be necessary, since these extensions are all open source anyway.

Rename/Reorganize

The feature that I use the most myself is the rename and reorganize feature. The extension provides a way to set up how you want files to be organized, and what you want the naming convention to be. Personally I don’t really care all that much about the specifics of any particular convention, as long as what I am doing is consistent, so that at some point things will be in the same place for every project that you work on. I usually just leave the default settings in there, and I know exactly where to find my objects. Go here to read more about how you can customize it to your needs.

Run in Web Client

There are a few standard ways to run a page that you are currently working on. If you’ve added access to the page to a role center you can just start the web client and browse to the page. If this is not the case, you can use the Search feature and start your page from there. You could also set a startup object in launch.json, and when you start the web client from VSCode, it will open on that object. Waldo’s AL extension provides a really easy way to start the current object from the Command Palette, using the ‘Run current object’ command. In the new version of the extension, this command now also shows up in the status bar. Finally, you can right click an object and the ‘Run Current Object’ command can be selected from the context menu.

These two features are the ones that I use the most, and they alone are worth getting the extension. I could not do AL development work without this extension. Download this extension and use it. If you have ideas to make it better, let Waldo know, he loves getting feedback and making it better.
My Take on Using Docker

This past week, there was another post by my good friend Arend-Jan Kauffmann about using Docker directly on Windows 10 (what are you still doing here? Go read AJ’s post!). He had previously written about using Docker in a Hyper-V VM, and he has helped me understand how this all works a number of times. Just to be sure I mention this here, you can read all about the technical details on Tobias Fenster’s blog but that goes over my head very quickly.

The reason why I am writing this is because I am very reluctant to make the step to install Docker directly on my laptop. What works for me at the moment is where I have Hyper-V enabled on my laptop, and I have a VM with just Windows Server 2016 (creating one with Windows Server 2019 is very high on the todo list). My Docker is installed in a snapshot of that VM, and that is where I do all of my development work. I wrote about this before, read it here.

See… I am the king of screwing up my computer. If there is anything, ANYTHING, that will mess up my computer and render it absolutely useless, I WILL find it, and I will kill my computer (I am hearing that in Liam Neeson’s voice by the way). I have had to re-install my laptop so many times because of things that went wrong. When I have a problem like this in my VM, I don’t even spend any time trying to figure out what went wrong (that gives me a headache just thinking about it). All I need to do is delete the snapshot, create a new one, and I’m back up in a matter of minutes. All my dev work is in repos that I sync regularly, so I never have to worry about losing any work.

I’ve read about Docker straight on Windows 10, and it sounds very nice and easy to use. At the same time, I read blog posts and even Tweets that mention damage to the host OS from normal Docker operations, and I just KNOW that if I try it will happen to me. My reluctance to use Docker on Windows 10 directly does not come from wanting to stay in the past, but it is more from the knowledge that I’m going to screw up my computer.

Maybe I’m too cautious, but for now I will stick to my setup and continue to use Docker inside a VM. It works for me, and for now that’s good enough.

Extensible Enums

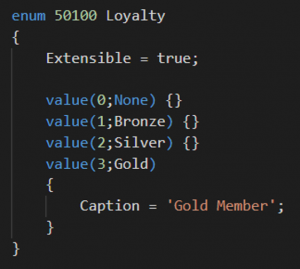
The AL language has an object type called ‘enum’. This object type defines a list of possible values in the form of a set of key/value pairs, plus captions. You can then create a field in a table or table extension enum as its data type, and the field will provide the user with a drop down list of those values. Just like option fields, the database stores the numerical values of the enum in the field.

To define a new enum, you create a new .al file in which you define the enum as an object, and you list the options of the enum as follows:

Note that the ‘Extensible’ property is set to true, so it will be possible to extend the enum with additional options when the enum is used in other extensions.

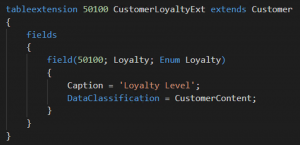
To link a field in a table or a table extension, you define the field as an enum type field, and specify the enum name as part of the field definition. In the following screenshot we’re adding an enum type field to the Customer table in a new tableextension:

Now, in order for this enum to be extended, you would have the app that includes the enum as a dependency (which puts the original enum into the current app’s symbol references), and then you would create a new object called an ‘enumextension’, in which you define additional values.

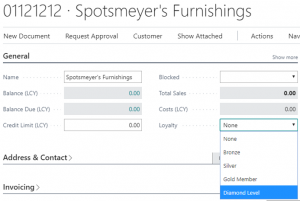
Now when you look at the Customer Card, you can see all the values in the dropdown for the new field:

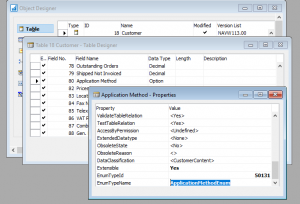
It is also possible to link an option field in C/SIDE to an enum in AL, as shown in the following screenshot:

When I learned about the extensible enum type, I was salivating at the thought that it would be possible to extend the available options in a ton of tables (type in sales/purchase line, account type in journals, entry type in ledgers to name just a few of them). It IS possible to do just that, and eventually the goal is to replace all option type fields in Business Central with enum type fields, it’s just that it comes with a crap ton of refactoring of existing code.

There is a lot of code that checks for all available option values, with an ELSE leg in the CASE statement for ‘other values’. All of that code will need to be refactored to allow for extended enums instead of just raising an error with an unrecognized value.

Now you know about enums, start using them instead of option type fields, and make them as extensible as possible.

AppSource Test Drive

Everybody knows about AppSource by now. Everybody is also struggling how to make AppSource work for them, and especially how to provide customers and prospects a trial of their functionality. You could create a sandbox environment and try things out in there, but that doesn’t have test data that is specific for your product. You could install the product into a production tenant, but then you have an app in there that you might not want after all.

One of the lesser known features of AppSource is the Test Drive. This feature provides an ISV partner a completely isolated trial experience  of their product, in an environment that is completely in their control. What’s even better is that the Test Drive can be done in a number of different ways, so you can tailor it exactly to your requirements.

The Test Drive can be a part of a comprehensive marketing strategy, in which you can implement an environment that can showcase even the most complex features of your software, in a way that provides ample opportunity to your customers to learn how to use your product in a non-production environment that is still in the cloud, without having to get a team of consultants onsite.

The way that it works is essentially that the Test Drive is a standalone tenant that has a template company. This template company has your product already installed, and it has proper test data already populated. You can create all the data that you need for your product to run properly. Then, through the SaaSification techniques, you would implement a path into the features of your product, taking the user into your product one step at a time.

If you are interested in providing a Test Drive, please watch this video, in which I go into some more detail about this feature.

To find out more about the test drive, and other information about apps for Business Central, visit http://aka.ms/ReadyToGo

Signing an App Package File

One of the cool things about my work is that I get to participate in some things very early. This is often really cool, but it also comes with some frustration when things don’t go very smoothly, or when there is little information to work with. One of those things, which I had absolutely NO knowledge of, was signing an app file… I had not a clue what this means, and no clue where to go to get this information.

The page where Microsoft explains how this works can be found here. It looks like a really nice and informative page now, but a few months ago it was confusing as heck, and it was not very helpful to me. At the time, I was working on an app for one of our customers, and one of the steps to get apps into AppSource is to sign the app file before you submit it.

Electronically signing a file is essentially a way to identify the source of the file and certify that the file comes from a known source. The ISV partner that develops an app must register with the signing authorities, and then every time that they release a file, they have to stamp that file with their identifying attributes. The process to do this is to ‘sign’ the file.

I’m not going into the details of how to get this done, the resource in Docs.microsoft is quite good now, so you can read it there. One thing I do want to share is that you should ALWAYS timestamp your signing. If you don’t timestamp the signature, your app will expire the same date as your certificate. If you DO timestamp, the signature will be timestamped with a date that was within the validity of your certification, and your app file will never expire. You do have to keep your certificate valid of course, but at least by timestamping the signature, the files that you sign will not expire.

During the whole process of getting the certificate and the signature, I worked with someone at Microsoft, who helped me get my customer’s app signed, and he also took my feedback to improve the documentation. I noticed something about the documentation that I think should be pointed out.

Documentation for Business Central is now in a new space called ‘docs.microsoft.com‘. In contrast with MSDN, Docs is almost interactive with the community. Maybe you’ve noticed, but each page in Docs has a feedback section. Scroll down on any page in there, and you will see that there is a section where you as a consumer of this information can leave your feedback.

I did this, and to my surprise I got an email. As it happened, the person that was working on the signing page knew my name and knew how to get a hold of me, and we worked together to make the page more informative. It was a coincidence that we knew about each other, but what was no coincidence was that there are actual product group people at Microsoft that are responsible for the documentation. There is a team of documentation people that watch out for issues on Docs, and they pick up issues within days of submission!!

The feedback system links back through GitHub issues, so if you’ve ever submitted something to the AL team, you know that this is pretty direct communication. I am wondering though, if Microsoft will take this a step further, and open up Docs as a public repository where people can make suggested changes. I think yes, but I’m not sure because there’s not really a history of direct collaboration like that. I have good hope though, because the culture at Microsoft is getting more collaborative by the day.

Translations for Business Central Apps

My struggle to get the new translation files right has been real and too long to recount on this blog. When I finally got it right, it felt like it was more of a coincidence than actual skill to finally get it done.

It started with the app submission checklist, where one of the requirements is to “include all translations of countries your extension is supporting”. The app that I was working on was targeted for the US market, so all I needed was a translation file for ‘en-US’. The page on docs that explains translations explained what I needed to do. Or did it?

Turning on the translation feature in the app.json file and replacing all ML captions and such was easy enough. The trouble begins when you run into the details.

As soon as you rebuild the app, VSCode generated the default translation file in a new folder called ‘Translations’, and the translation file will be called “<YourAppname>.g.xlf”. Because the development language is ‘en-US’, this generated translation file is also specified for the ‘en-US’ language.

The translation page on Docs specifies that you need to copy the generated file “to avoid that the file is overwritten next time the extension is built”. Each time that you build the app it will re-create the generated xlf file. What that means is that you need to make a copy of the translation file and use the copy to do your actual translation work.

So I did make that copy, and because I was working on a US only app, I felt I was done with my translation. I had the generated file in my workspace, I had a copy of it for the ‘en-US’ language, I thought I was good to go. Alas, the app submission failed because they could not find any translation file in my app. Something was missing from my translation file.

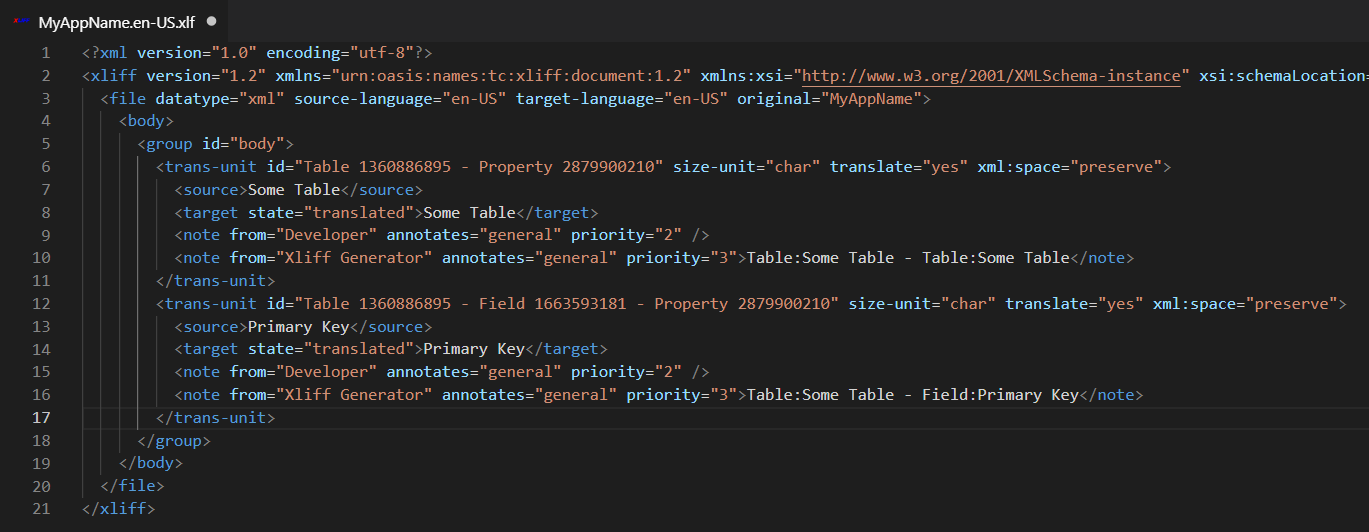
The generated file only has nodes for “source”, which comes from all of your text strings like labels and captions and comments and such. The translation itself is in a node that is NOT included in the generated xlf file, you have to create that. The name of this node is “target”, and this is where the actual translation goes for each source element.

So, I copied and pasted all of the source nodes, made target nodes out of them, and by this time I had a direct line to the validation person at Microsoft, who was willing to hop on a Skype call and look at my workspace. He was also surprised to see that my workspace DID have the translation file, while the app file that I sent to him did not. As it turns out, the target node needs to have an attribute called “state” with a value “translated”.

In order to get the translation file in its proper state, you should use the proper tool, and I found that the Microsoft Multilingual app toolkit editor is the easiest one to work with. It puts the right elements into the xlf file, and when I used that tool, my app file was finally accepted.

How Do I Videos

My company was commissioned late last year to create some short ‘How Do I’ videos on how to accomplish a bunch of simple technical tasks in Business Central. In total we created about a dozen videos, and they were all published on the “Dynamics 365” channel on YouTube. This channel has a TON of video content about all sorts of topics related to Dynamics 365 in general. Business Central is actually not a main topic in this channel, they are mostly focused on Sales, Marketing, Operations.

Anyway, I wanted to put links to the videos that I recorded in a blog post, so it would be easy to find them. As a result of these videos, we’ve been commissioned to create 30 hours of real training material for Business Central. Yes you read that right… THIRTY HOURS!!!! That’s almost a whole week!!!! Unfortunately, these larger videos will be published in the Dynamics Learning Portal, which is a subscription service inside PartnerSource. You have to have PartnerSource access and also pay extra to be able to access those videos.

I’ve already brought up in an internal meeting that it would be really cool if those videos could be public, and I did not get shot down. I doubt that they will be though, but I will make it a mission to mention this at every step of the way. I’ll keep you posted. On to the videos…

The first one is an easy one, how to add a field in an extension:

Next, how to add a field with a foreign key relation to another table:

Next, how to add some AL code to an extension:

Then, how to add upgrade logic to an extension:

And finally, how to connect to a web service:

Extensions V1 vs V2

You might have heard people talk about “Extensions v2”, and maybe that doesn’t make a whole lot of sense. Let me take a few minutes and try to explain the concept to you.

Back in 2015, Microsoft announced the concept of extensions to us, in this blog post. I remember reading this article, and being thoroughly confused. At the time I was not in a technical role, and I had let my technical knowledge slip for just a minute it seems.

Extensions v1

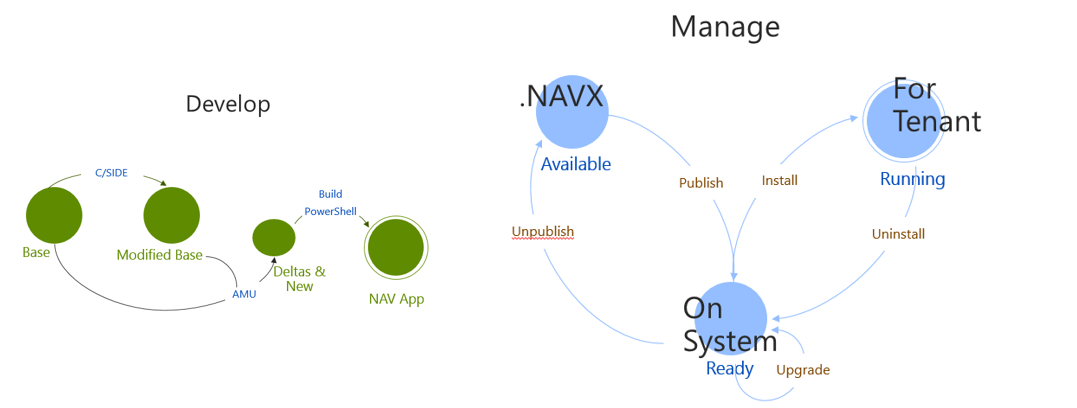
For extensions v1, development is done in good old C/SIDE. There are severe limitations as to what you are allowed to do. For instance, you cannot add values to option strings in table fields, and you cannot add code to actions on pages. I won’t get into the details of those limitations, but you must be aware of what you can and cannot do for extensions, because in C/SIDE you can do a LOT more than what you are allowed to do.

The extension itself is compiled in a so-called .NAVX file, also know as a NAV App file. To get to this package file, you must use PowerShell Cmdlets to export the original and modified objects, calculate the delta files, and then build the .NAVX file. To deploy this .NAVX file, you then must use another set of PowerShell Cmdlets.

Especially the development part can be cumbersome. There are many things you are not allowed to do, and as you build the .NAVX file, the system will yell at you when you did something wrong. There are many moving parts, and it takes a lot of discipline to get it right

Extensions v2

For extensions v2, development is done in Visual Studio Code (also known as VSCode), using the AL Language extension. Since you are no longer working in C/SIDE, only the allowable things are allowed. You simply cannot do anything that the tool is not capable of doing. You no longer have to export original objects and compare them to modified objects. Essentially, you are programming the delta files directly in VSCode.

Deploying the solution works simply by building the project from VSCode. You hit F5 and VSCode will build the package and deploys it to the service tier that you specify in the launch file. Deploying the app to a test system still happens with PowerShell Cmdlets.

Hopefully this clears it up a little bit. Once you understand the differences, it’s not so intimidating any longer.

NAV Techdays 2016 Recap

This past week was the NAV Techdays event in Antwerpen. If you don’t know what this is, head out to their website and read the ‘About’ section. This year’s edition was I think the 7th time, and it was the first time that there were more than 1,000 attendees! In my opinion, this event is BY FAR the best technical event for NAV, head and shoulders above any other event, not in the least because there are two days of pre-conference workshops.

Last year was the first time I had gone to NAV Techdays, and after the truly exhausting three days, I was utterly satisfied and I promised myself that I would do everything in my power to come back every year going forward.

My highlights:

  • Pre-conference workshops. I had signed up for Black Belt Powershell by Eric ‘Waldo’ Wauters, and for Deep Dive into Events/Extensions by Arend-Jan Kauffmann. Both days were very intense, there was a TON of new information for me, and I was utterly done at the end of both days. The knowledge that I have gotten out of these two workshops will help me stay relevant as a technical person in the NAV world. These two workshops alone were worth traveling to Europe for.
  • Extensions related sessions – I made it a point to attend as many sessions about extensions as possible, since I believe it is the most important technological development in our industry this year. Especially Gunnar’s session about migrating to Events and Waldo’s session about Extensions Best Practices were eye openers
  • PowerBI and NAV by Steven Renders was absolutely INCREDIBLE. The sheer amount of information that this guy put into his session was just unbelievable. I bet he could fill two days of proper training about all the things that he showed us. Well done Steven!

I would have liked to see the sessions about Office 365 and the design patterns session, but I can’t be in two places at the same time. Lucky for me (and everyone else) Luc records all of the sessions and puts them on YouTube. He even puts the videos in individual playlists per year, for instance you can see all videos for 2016 here.

NAV Techdays is my favorite event. The sessions, the pre-conference workshops, the super-comfortable venue, the amenities, the production, the expo area, meeting my kind of peeps in person. It feels like this is “my” event, and I hope to be able to go each and every year from here on out.

Update 11/20/2016: Slide decks available here

Update 11/23/2016: Added links to YouTube videos

The Skinny on Extensions

Earlier this month I wanted to write about what’s new in NAV 2017, and my fellow MVP and good friend Eric ‘Waldo’ Wauters beat me to it. So, my next plan was to write something comprehensive about extensions. I am signed up for a deep dive workshop next month, and I want to be well prepared. Again, as I am collecting information, this guy publishes a large post about extensions, and judging from the title it looks like it was the first of three posts. So…. instead of doing the work myself, I waited for him to post number three, and give you the links in here: Part 1, Part 2, and Part 3.

I could try and say something intelligent about these posts, but I’d make myself look foolish. After the workshop I’ll have plenty to share anyway. Enjoy 🙂