If you kind of know about PowerShell, and you want to use it more, but you don’t really know where to start, then you should read on. I am going to explain to you how you can use PowerShell to create the environments that you need to localize a product.
One of the things that always seem to fall on my plate at my job is to take an ISV product and merge that into the North American localization. I call it ‘localizing a product’. It is not, because localizing a product is much more than simply merging the objects, but it’s what you have to do first. I’ve done a bunch of these manually, and I kind of enjoy the almost mindless nature of the task of working my way through hundreds of objects (sometimes even thousands, I once ‘localized’ a product that had more objects than standard NAV itself).
This time around, I wanted to use PowerShell to automate as much as I could. Lucky for me, I attended Waldo’s “PowerShell Black Belt” workshop at NAV Techdays (read my review of this fantastic event here) and I should have all the tools to get this started.
The first thing you need is to install Waldo’s PowerShell modules, I will be using those for just about everything. I could figure out how to script all of this stuff myself, but why would I if Waldo already did that for us, and he is sharing his scripts. For instructions read Waldo’s blog here.
This post focuses on creating the environments themselves, and for this task you really need just a few things:
- A SQL backup for the product in the W1 version of NAV, and make sure that you know exactly which build this was developed in. For instance, the product that I am working with was provided as a SQL Backup, and it was developed in NAV 2017 CU2.
- The DVD’s for standard W1 and NA for the same NAV build.
- A Development license that has insert rights for the product’s number range. If you only have a regular developer license, or if the ISV refuses to provide you with a license (this happens more often than not) then you will have to merge NA into the product database. This works exactly the same, you just have to figure out which environments are your ORIGINAL, MODIFIED and TARGET.
Use the NA DVD that you just downloaded and install the NA Version with a demo database. I like to give the database a meaningful name, so I called it ‘NAV2017NACU2’. This is all the manual installing that we will do, everything else is PowerShell baby! Actually, you could even use Waldo’s PowerShell modules to do the install as well. You could even write a script that downloads the DVD for you as well, all using Waldo’s PowerShell modules.
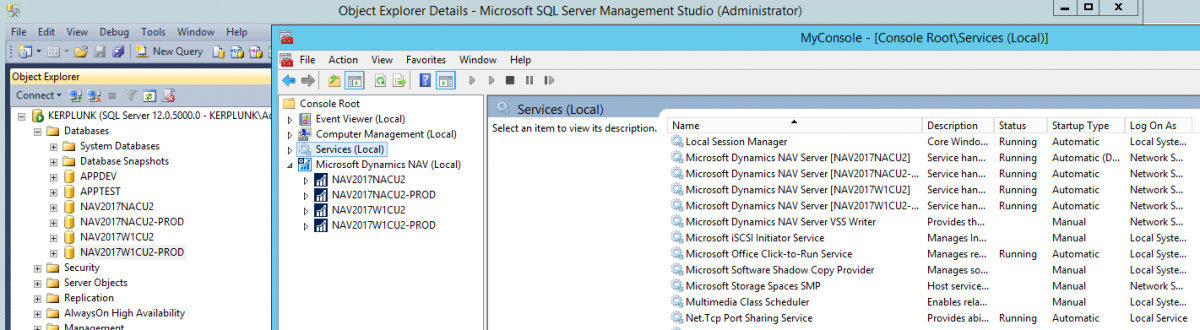
If you understand the mechanics of localizing a solution, you will know that we need 4 databases in total: standard W1, Product database in W1, standard NA, and a copy of the standard NA database that will become the product database. In this case, standard W1 is ORIGINAL; product W1 is MODIFIED; standard NA is TARGET and product NA is RESULT. This will become important when we do the merge, which will be another blog post.
Now the goal is to have a re-usable script, so we’ll use variables instead of having to re-type values multiple times, as you can see in the picture.
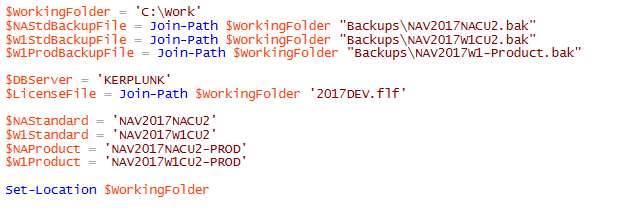
Remember, I installed standard NA. I created the working folder and placed the three backup files into the ‘Backups’ folder. I like to keep things together, but I can imagine having a network location for the standard backup files. The nice thing about using these variables is you can set them however you need them :). My database server is called KERPLUNK, which is just a regular unnamed instance on my VM called KERPLUNK. You could also use a demo installation and then you’d have to set it to ‘KERPLUNK\NAVDEMO’. I will use the 4 names for the database names as well as the service tier names.
The rest of the script is surprisingly simple to put together, here it is:
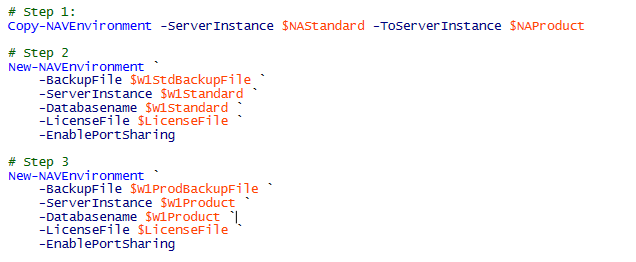
The reason why I start with the ‘Copy-NAVEnvironment’ step is because this script turns on port sharing for both server instances, so I don’t have to take care of that step myself. This is one of Waldo’s script that looks at the first server instance and creates a new one just like it. It creates a SQL Backup from the service instance, restores that into a new database, and finally it creates a new server instance for that new database, and it enables port sharing by default. The ‘New-NAVEnvironment’ is also one of Waldo’s scripts, and it does all the heavy lifting of restoring the database, creating the service tier and setting up port sharing. The full script took maybe 2-3 minutes to run for me, not bad for something that used to take all morning.
This same script could also be used to create your environments for developing extensions. For that you only need a standard database for ORIGINAL and a development database for MODIFIED, both of which will then be used to create the DELTA files for the extension package. If you look at the screenshot of my environment you’ll see an APPDEV and an APPTEST database. Both of these were originally created as copies of the standard database, also using PowerShell.
I’m planning to also put this into a video but I actually have this work to deliver so I’ll focus on that first. Up next is getting the objects out and comparing them to create a set of merged objects. Stay tuned!
Update 4/22/2017: added link to the new article about localizing the objects, and you can download the scripts here.