Whether you’re working on AppSource apps or Per Tenant Extensions, or even a code custom on premises extension, by now every one of your AL projects includes a test app right? This really means that every development project is really two apps. One is the app itself, the other the test app. In this post I’ll tell you an easy way to organize your workspace.
As you know, each AL workspace is essentially a folder with a file for each object, plus the necessary files to define the app itself. Since you are now also using source control, each AL workspace is also a Git repository. Logically, you would then have a repo for the app, and also a repo for the test app. What if I told you that you could have a single repo that includes both AL workspaces, all at the same time.
Start the Repo
First, you create the repo itself, whether you’re on GitHub or Azure DevOps. This is essentially an empty repository, we will create the AL workspaces in a bit. Let’s call it ‘MyRepo’. I’ll include a .gitignore and a readme.
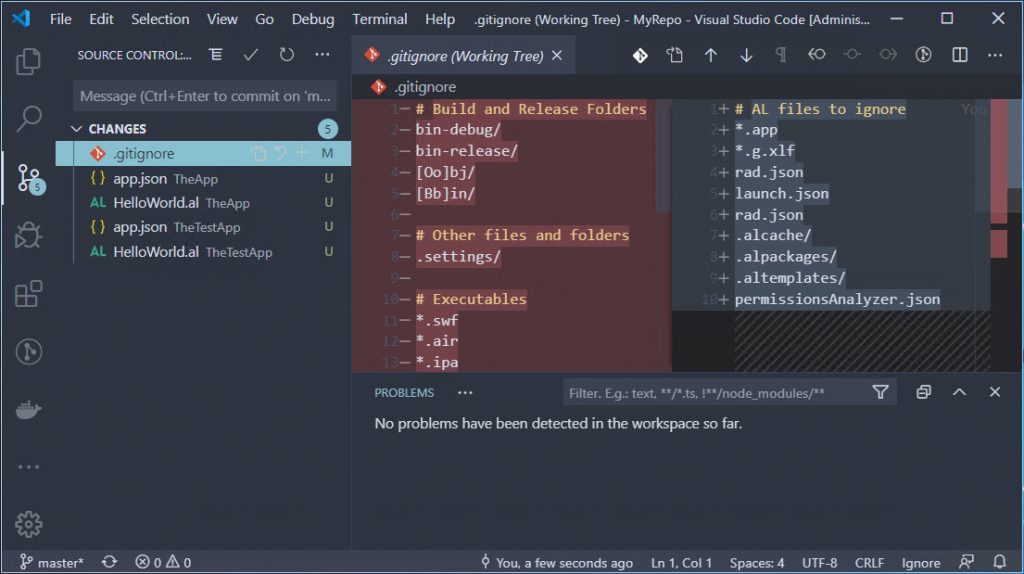
I’ll clone this repo in VSCode. Set up the .gitignore file for AL, and VSCode is now tracking everything that happens in this repo. Normally, you’d fill the new folder with the AL workspace files, so that this single repo has one single AL workspace. To have the app as well as the test app in this repo, you simply create two AL workspaces in the same folder.
Add the App Workspaces
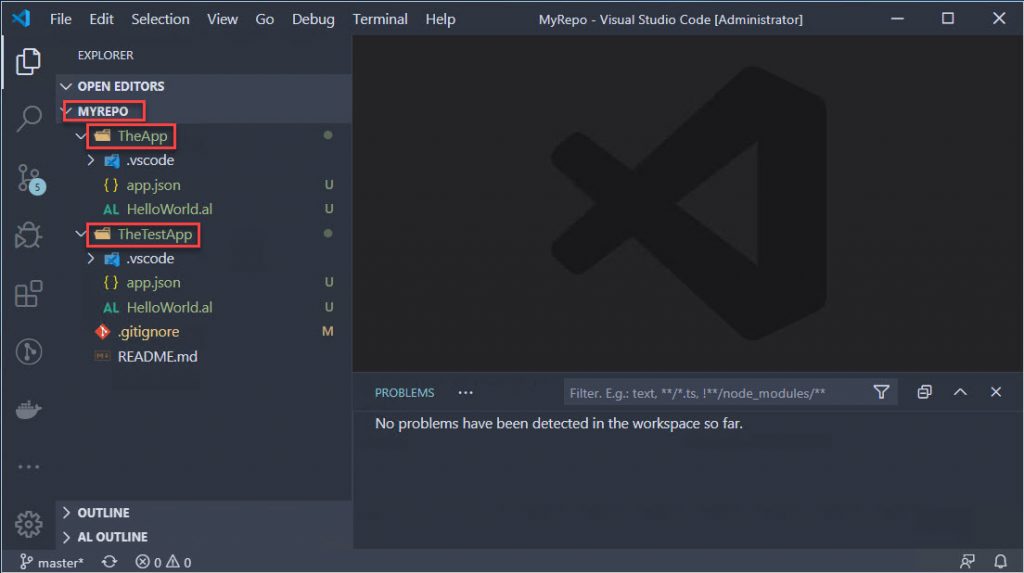
If you have existing apps, just copy the folders into the repository. If you are starting a new (test) app, use the ‘AL: Go!’ command, saving the project in the ‘MyRepo’ folder. Repeat for the test app. Each time that you create a new AL project, VSCode will automatically open the new workspace. To see the repo itself, re-open the MyRepo workspace and you will find the two apps in the same root folder.
Going to the Source Control tab you can see that it tracks changes in both folders, and the single gitignore file works on both of them. How to set this up as an app and test app is for another post, but you now have one single repository with two apps.
Work on Each App Separately
When you are looking at MyRepo in VSCode, at some point you will get a message that the manifest is missing, and you’ll get all sorts of messages in the problems window. You can’t even download symbols like this. In other words… you can’t really work on your app like this. I usually keep a folder with some PowerShell to create my development containers, I plan to keep app documentation in there as well, and it appears that this is the right place to store some pipeline files. To work on the apps themselves though, you will have to open the app’s folders in VSCode individually.
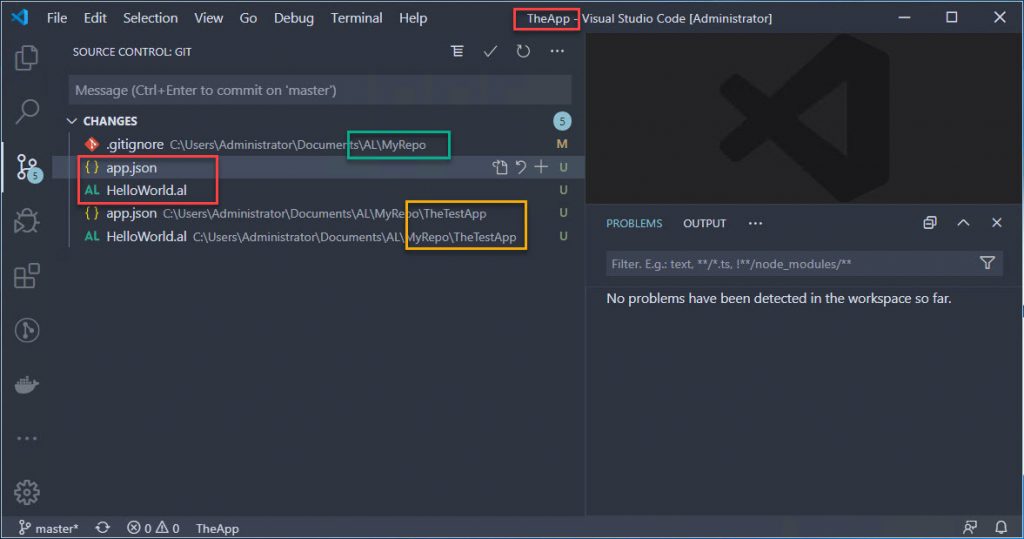
It gets a little tricky here because VSCode will show all the modified files for the whole repository in the Source Control tab. If you have modified files in both the app as well as in the test app, whether you are looking at one or the other, you will see them all.
The green one is a change I made to the gitignore file, which is in the root folder for the main repository. The red ones are changes in the AL workspace called ‘TheApp’, and finally the yellow ones are in ‘TheTestApp’. Whether you are looking at MyRepo or either one of the apps, you can commit any changes that you select to your repo from the App/TestApp folders.
The good part though is that you can simply open the app folder and work on that as if it were part of its own repo. Then you can commit and sync, open the test app and work on that. At the end of the day, when all objects are checked in, the single repo includes the app itself as well as the test app.
Each folder is considered its own AL workspace, so you can modify settings for the app and for the test app. What I really like about this way of working is that everything is part of a single repo. Two Apps, One Repo!
Using Workspaces
VSCode has something called ‘workspaces’. You may have noticed a selection on the File menu called ‘Add Folder to Workspace’. When you then save the workspace, VSCode will save a collection of attributes in what is called a ‘code-workspace’ file. I’ve tried to make this work, and I was wrestling with it a little bit. For instance, settings are defined inside the ‘code-workspace’ file instead of a separate settings.json file.
In addition there were some other things that confused me a little bit, so I posted a quick poll to my favorite hashtag, asking the community what they do, and there were quite a few votes.
Hey #bcalhelp, quick informal poll about best way to organizing your @code projects. I'm thinking one root folder = one repo, and code-workspace files for easy access. Personal preference or 'real' reasons?
One of my clients asked me to help them convert an add-on that they developed in C/CIDE into an AppSource app. This add-on includes the functionality to export some data into an Excel file, using the Excel Buffer table.
The Excel Buffer table is also available in AL, but one of the issues is that as soon as you set the target of the extension to ‘Cloud’ (Which as you know is an attribute in app.json), the compiler will scream at you that you can’t use certain functions of the Excel Buffer, because their Scope has been set to on premises. So if your C/AL object uses the ‘OpenExcel’ function, for instance, you can’t use that for AppSource apps because its scope is OnPrem. This type of thing usually takes me days to figure out, so I thought I’d ask Twitter with my favorite community hashtag #bcalhelp
Hey #bcalhelp I'm converting an onprem addon to an AppSource app. It uses the Excel Buffer table to create an Excel sheet, and some of the methods are not exposed for cloud. Would love to see some examples of how to make that work, or what alternatives there are
Within a day I received a bunch of helpful suggestions, I just love this community! The one that put me over the top was a phone call with my good friend AJ, who not only showed me, but he also sent me some sample code that he was working on. He’s working on a blog post about this topic himself, so I’ll let him share that and I’ll post a link to his blog once he puts it online. I want to mention Owen too because he had sent me essentially the same suggestions, but to an email address that I hardly ever use anymore, so I didn’t see that until days later.
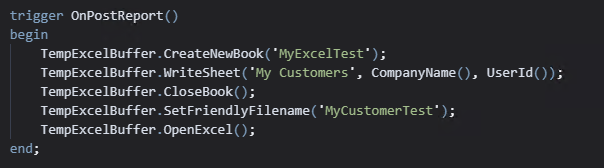
As you can see by the trigger name, I had to put this into a report object (which I’ll share when I find time to put it in a repo). My main problem was that I needed to be able to provide a way for the user to open the Excel file. For this to work, you use the OpenExcel function. This actually does not open Excel, but what it does instead is it downloads the Excel file into the Downloads folder on your computer, and then you can open that file from there.
Some additional pointers:
CreateNewBook creates a new file, with a new sheet. If you already have the file created, and you need to add a sheet to the existing file, then you would use the SelectOrAddSheet function
TheWriteSheet function writes the records from the Excel Buffer table into the sheet. Each record represents a cell value
You will need to use the NewRow, AddColumn functions to ‘walk the grid’ of the cells in your sheet. Also very useful functions: ClearNewRow and SetCurrent. I ended up adding a GetCurrentRow function to an Excel Buffer table extension
The CurrentRow and CurrentCol variables in the Excel Buffer table are your friend. Forget about the letter/numbers of the Excel file itself, just use the row/column numbers
SetFriendlyFileName is not mandatory, but otherwise the file will be called ‘Book1’ or something
Like I said before, AJ is working on a post for this as well, and he said he was going to offer a repo with the objects as well. If I don’t forget I’ll create a sample report and offer that as a PR to AJ’s Excel repo.
As @NKarolak suggested, the names of the translation files must match the name in app.json. I was very skeptical about this, because this was never the case in any of the AppSource apps I’ve worked on, and the Doc for the translation files specifically says that there is no enforced naming of the translation files. It might be a new requirement though.
When I first created my AL workspace by exporting it from my container, the translation files were named as follows:
The name in app.json is ‘Base Application’ so the space character is replaced with ‘%20’ which is the html representation for the space character. Since the original error message did not mention the file name, I did not think that the file name itself was the problem.
I decided to try Natalie’s suggestion and replaced the ‘%20’ with a regular space, and voila, it published the app as expected.
Next, I changed the name in my app.json to ‘Super Base Application’ and it errored out again. Once I changed the translation files to match the name in app.json, it worked again.
Moral of the story: when developing a modified Base App, you have to match the translation files to the name in app.json.
How to get started with modifying the Base Application using Docker
Many partners are still focused on doing custom development for their customers with their one-off implementations. MANY of those customers are existing customers with existing NAV systems with existing customized objects. As much as everyone wants to go to extensions only, and most partners see the need and are more than willing to make the necessary changes, the reality is that many of these existing customers do not want to pay for migrating all of their custom modifications. This reality comes with the need to modify the base app. Since C/SIDE is no longer available, the only way to do this is to use VSCode. This post will explain how you can create a Docker container, and use that container to do modifications on the Base Application.
To get started, click here to read the article on docs.microsoft.com. I say ‘get started’ because it was not enough to get me all the way there, which is the reason why I wrote this post. This article seems to have been written for an actual installation from the product DVD, and there were some additional things you need to know to make it all work if you want to use Docker. At least, that is per the date of this post, because things may change :). I’ll try to revisit this post if it does change.
Alright, so to make this work, you need a few things:
A Docker container that is based on the latest Business Central Docker image.
Configure the Service Tier in the container
Extract the objects from the container into a new AL workspace
Uninstall and Unpublish the Base Application and its dependencies
Create a new Container
For Business Central development I always use the NavContainerHelper module, so before you use any of the commands in this post, update your module:
Update-Module navcontainerhelper
To get the latest Docker image for Business Central I will be using the ‘mcr.microsoft.com/businesscentral/onprem:na-ltsc2019’ image. You can leave the ‘ltsc2019’ part out if you are not sure about the host OS or if you are on Windows Server 2016. You can substitute ‘na’ for your own localization, or leave that tag out altogether if you want to be on the W1 version. To read about which image to use, visit Freddy’s blog here and follow the links to what you need to know. Here is the script that I used to create my container:
I use the ‘-alwaysPull’ switch to make sure that I always have the latest version of the Docker image. The ‘-includeAL’ switch is necessary to include references to the DotNet assemblies in the Docker container. The ‘-additionalParameters’ switch (h/t @tobiasfenster) is used to set the ExtensionAllowedTargetLevel property to ‘OnPrem’. I’ll explain how to set this with a simple PowerShell Cmdlet in a minute.
One more important switch is the ‘-useCleanDatabase’ switch, which can be used to uninstall and unpublish the Base Application and its dependencies, as I will discuss in a little bit. At this point, you have a vanilla Docker container with the latest on premises version of Business Central.
Configure the Service Tier
As the Doc states, there are three things you need to set. It is not very clear exactly how to do that, and not at all how that works on Docker, so let me just explain from scratch.
First, you need to know how to look at, and modify, the Service Tier settings inside the container. Some of these types of commands are available in the navcontainerhelper module, but some of them are not. I did find a Cmdlet to see the settings, but I could not find one to actually modify them. So, to cover all of it, I will show you how you can connect to the container and run regular BC PowerShell Cmdlets from inside the container.
Open a PowerShell ISE window as administrator, and run the commands in the screenshot
Our container name is ‘mysandbox’, and you connect to it by using the ‘Enter-BCContainer’ Cmdlet. You can see how the prompt changes to show you that you are inside the container. At this stage, the navcontainerhelper does not work, so you will have to use the regular BC PowerShell Cmdlets. The next Cmdlet shows you all the properties of the Service Tier that runs inside your container, which in this version of Business Central is called ‘BC’.
According to the Doc, the following settings are important. I am using the names that are used in PowerShell rather than the names in the Doc.
ExtensionAllowedTargetLevel should be set to ‘OnPrem’, although it seems that the value ‘Internal’ also works.
DeveloperServicesEnabled should be set to true. This should be the default value of this particular setting
There is also a mention of the EnableSymbolLoadingAtServerStartup property in the Doc, but I’ve received confirmation (h/t @freddydk) that this property was meant for hybrid C/AL and AL environments, so that is not needed anymore for BC 2019 wave 2
To modify these settings, use the following PowerShell command
Set-NAVServerConfiguration `
      -ServerInstance BC `
      -KeyName ExtensionAllowedTargetLevel `
      -KeyValue OnPrem
After modifying those settings, restart the service tier using the ‘Restart-NAVServerInstance -ServerInstance BC’ command. At that point, the service tier in your container should be configured for doing on premises development. The next thing you need to do is get the application objects out of the container.
Create AL Workspace from Base App
This step is easy, using a navcontainerhelper Cmdlet, so you need to first exit the container (type ‘exit’ and then enter). Then, run this Cmdlet:
One thing to note here is that the ‘-useBaseAppProperties’ switch uses the properties from the container. You will end up with a fully functioning AL workspace, with an app.json and launch.json that is configured to look inside the container for the objects and the DotNet probing path. You will need to configure this yourself if your configuration needs to be different. But, since we’re making this work for a standard container, we’re going to use the standard configuration as well.
One other important thing to note…. As I am writing this post, I’ve had a persistent error message that prevented me from compiling the app, which I narrowed down to having to remove the translation files. The annoying part is that the error message itself does not mention the translation files, but it started working again after I removed them. In your new BaseApp folder, there is a folder called ‘Translations’. Remove all files from that folder, except the ‘*.g.xlf’ file.
One final thing to note is that this is just a simple AL workspace. In a real life situation, you are doing this for a particular customer, so you need to think about source control, workspace settings, things like that. There are some capabilities in the Cmdlet, so take a look here to see all the available parameters of the Cmdlet.
The last thing you will need is to download the symbols for the system apps from the container. The Doc also mentions adding the assemblyProbingPaths to the workspace settings, but if you used the ‘-useBaseAppProperties’ switch, that is already taken care of for you and the setting will point to one of the container’s shared folders.
Uninstall / Unpublish Base App
In the previous step, you’ve created an AL workspace with all of the objects from the Base Application. Now, your container already has a Base App, so in order to create a modified Base App, you will have to get rid of the standard one first. You can be a PowerShell warrior and run the Cmdlets in this section, or you can also use the ‘-useCleanDatabase’ switch in the New-BCContainer Cmdlet in the first section. This will remove the Base App and all its dependencies from your container right away.
On to the PowerShell… In the Doc, under bullet 11, you will find the functions to accomplish this. These are regular NAV PowerShell Cmdlets, so you will need to enter the container first:
function UnpublishAppAndDependencies($ServerInstance, $ApplicationName)
{
     Get-NAVAppInfo -ServerInstance $ServerInstance | Where-Object {
    # If the dependencies of this extension include the application that we want to unpublish, it means we have to unpublish this application first.
    (Get-NavAppInfo -ServerInstance $ServerInstance -Name $_.Name).Dependencies | Where-Object {$_.Name -eq $ApplicationName}
 } | ForEach-Object {
    UnpublishAppAndDependencies $ServerInstance $_.Name
 }

 Unpublish-NavApp -ServerInstance $ServerInstance -Name $ApplicationName
}

function UninstallAndUnpublish($ServerInstance, $ApplicationName)
{
    Uninstall-NavApp -ServerInstance $ServerInstance -Name $ApplicationName -Force
    UnpublishAppAndDependencies $ServerInstance  $ApplicationName

}
This loads the functions into memory, and then you can run the script:
UninstallAndUnpublish -ServerInstance BC -ApplicationName "Base Application"
This will completely remove the Base App and its dependencies.
Ready to Start Developing
That’s it, you should now be ready to start your development. See how that works. Add a field to a table, add that field to its Card page and hit Ctrl+F5. It will probably take a while to compile, but you should see your new field on the page.
Now I do need to say that I completely and wholeheartedly agree with the entire community, and code customizations should really not be done anymore. All development should be done using extensions instead of change the Base App itself. It makes everyone’s life a lot easier if you minimize the amount of development done to the Base App, so even if you have no other choice, try to design the development in such a way that most of it is in an extension, and only modify the Base App for the parts that you can’t figure out how to do in an extension.
Over the past year, I’ve taught many people how to develop extensions for Business Central using Visual Studio Code. Usually I try to keep the workshop to standard features in VSCode and the standard AL Language extension. One of the things I don’t usually cover in any detail is an additional extension that extends that language, the “CRS AL Language Extension”. Since I am one of the owners of CRS, I could take part of the credit for it, but you should know that it was developed pretty much 100% by Waldo. If you want to read more about the extension itself, read Waldo’s latest blog post about it, he’s much better at explaining it than I am.
There are a bunch of really useful features in this extension, but I want to specifically mention a couple that I think are indispensable. In fact, I would bet quite a bit of money that Microsoft will include some of these features in the official AL Language sooner rather than later. It would really not even be necessary, since these extensions are all open source anyway.
Rename/Reorganize
The feature that I use the most myself is the rename and reorganize feature. The extension provides a way to set up how you want files to be organized, and what you want the naming convention to be. Personally I don’t really care all that much about the specifics of any particular convention, as long as what I am doing is consistent, so that at some point things will be in the same place for every project that you work on. I usually just leave the default settings in there, and I know exactly where to find my objects. Go here to read more about how you can customize it to your needs.
Run in Web Client
There are a few standard ways to run a page that you are currently working on. If you’ve added access to the page to a role center you can just start the web client and browse to the page. If this is not the case, you can use the Search feature and start your page from there. You could also set a startup object in launch.json, and when you start the web client from VSCode, it will open on that object. Waldo’s AL extension provides a really easy way to start the current object from the Command Palette, using the ‘Run current object’ command. In the new version of the extension, this command now also shows up in the status bar. Finally, you can right click an object and the ‘Run Current Object’ command can be selected from the context menu.
These two features are the ones that I use the most, and they alone are worth getting the extension. I could not do AL development work without this extension. Download this extension and use it. If you have ideas to make it better, let Waldo know, he loves getting feedback and making it better.
This past week, there was another post by my good friend Arend-Jan Kauffmann about using Docker directly on Windows 10 (what are you still doing here? Go read AJ’s post!). He had previously written about using Docker in a Hyper-V VM, and he has helped me understand how this all works a number of times. Just to be sure I mention this here, you can read all about the technical details on Tobias Fenster’s blog but that goes over my head very quickly.
The reason why I am writing this is because I am very reluctant to make the step to install Docker directly on my laptop. What works for me at the moment is where I have Hyper-V enabled on my laptop, and I have a VM with just Windows Server 2016 (creating one with Windows Server 2019 is very high on the todo list). My Docker is installed in a snapshot of that VM, and that is where I do all of my development work. I wrote about this before, read it here.
See… I am the king of screwing up my computer. If there is anything, ANYTHING, that will mess up my computer and render it absolutely useless, I WILL find it, and I will kill my computer (I am hearing that in Liam Neeson’s voice by the way). I have had to re-install my laptop so many times because of things that went wrong. When I have a problem like this in my VM, I don’t even spend any time trying to figure out what went wrong (that gives me a headache just thinking about it). All I need to do is delete the snapshot, create a new one, and I’m back up in a matter of minutes. All my dev work is in repos that I sync regularly, so I never have to worry about losing any work.
I’ve read about Docker straight on Windows 10, and it sounds very nice and easy to use. At the same time, I read blog posts and even Tweets that mention damage to the host OS from normal Docker operations, and I just KNOW that if I try it will happen to me. My reluctance to use Docker on Windows 10 directly does not come from wanting to stay in the past, but it is more from the knowledge that I’m going to screw up my computer.
Maybe I’m too cautious, but for now I will stick to my setup and continue to use Docker inside a VM. It works for me, and for now that’s good enough.
Maybe you remember, last year I wrote about signing an App Package file, but that post was really about how I got to collaborate with someone at Microsoft, and one of the things we did was improve the online documentation for this topic.
At the time, I had noticed that there was a feedback button on each page in Docs, and underneath the feedback button it said something like ‘feedback is linked to GitHub Issues’, which led me to wonder if we’d ever see Docs in a repo that we could actually contribute to.
Now today, through a tweet by one of the managers at Microsoft, there was a link to a blog post about that very topic: here it is.
Just think how great this is! Not only do we get access to the source files of the actual documentation, we have a mechanism to contribute to the content. If you ever find yourself confused by any of the documentation, you can either leave your feedback on Docs, or you can make a change and submit a pull request to the repo itself! Either way, the actual system that is used to maintain the docs source files is also used to track issues, and you can create issues yourself in that very system!
One of the coolest features in VSCode is the ability to check your code at design time for specific things. This post will explain how you can turn on code analysis, and how to get away with breaking the rules that it tries to enforce.
There are three things you have to know about code analysis: First, it is a feature that can be enabled and disabled at will. Second, there are sets of rules for specific purposes that you can turn on and off. Finally, you can define exceptions to those rules, and what to do when the code analyzer finds a violation of one of the rules. All three items are found in the user settings, and the exceptions are then stored in a separate file called a ‘ruleset.json’ file.
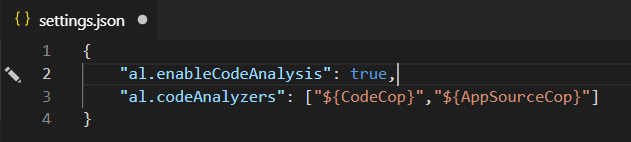
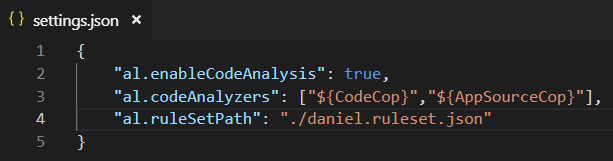
Open the user settings from the Command Palette. You will need to have different levels of scrutiny for different projects, like one client has an on premises implementation, and another is developing an app for AppSource. These must follow different sets of rules, so they get their own codeanalyzers. Since each project is different, I would say that you define the code analysis attributes at the workspace level. You can set these features up in the sort of UI rendering of user settings, but I like to see the json file in the editor and use Intellisense there.
The code analysis feature is turned on by setting “al.enableCodeAnalysis” to “true”. In the “al.codeAnalyzers” property, you can define which set of rules is enabled. The one you should always enable is the ‘CodeCop’, which enforces some basic syntax rules. Then, depending on whether you are doing development for AppSource or for a tenant specific extension you can choose either the ‘AppSourceCop’ or the ‘PerTenantExtensionCop’. You should not have both of those last two enabled at the same time, because some rules for AppSource don’t apply for PerTenant and vice versa.
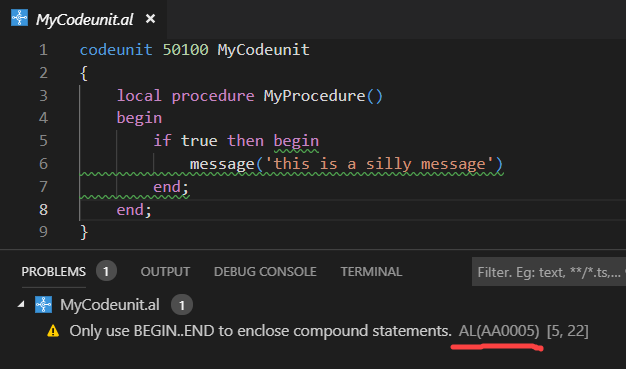
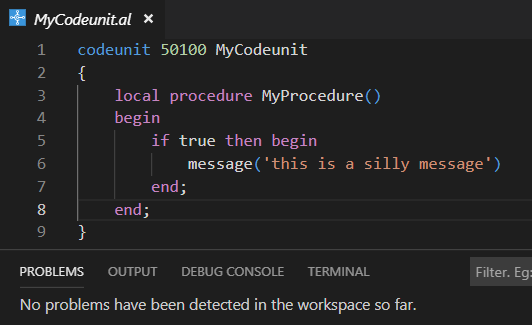
In my settings.json, I’ve turned on code analysis, and I have enabled the CodeCop and the AppSourceCop. To show you what this looks like when code analysis finds a violation in a code editor I’ve created a very simple codeunit:
Code analysis doesn’t like my code, the CodeCop does not approve of using BEGIN..END for a single statement. Personally I don’t agree with that rule, because I always use BEGIN..END in IF statements, I make fewer mistakes that way. The rule is not really a big problem, because the squiggly line under my code is green. If I had violated a really important rule, like missing a prefix in a field name, it would have been red.
Lucky for me, I can define for myself how certain rules are handled. Note that the problems screen shows which rule is broken (number AA0005). Let me show you how you can define what happens.
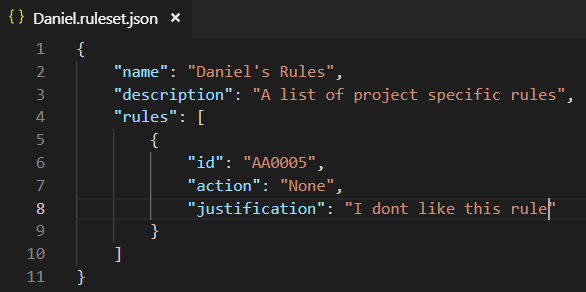
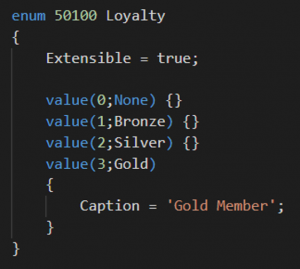
First, you create a new .json file in your workspace, and you set it up to be a ruleset. I am calling mine ‘Daniel.ruleset.json’ and I am putting it in my workspace root. Here’s a screenshot of the ruleset file:
Under the “action” you can set what you want to happen when this rule is broken. I don’t like the rule at all so I want it to ignore this rule altogether so I’ve set it to “None”. All you have to do now is tell settings where to look for additional rulesets, like this:
The rule itself still works, I’ve just overridden its behavior to something that I like. Going back to my codeunit, there is no longer the annoying little squiggly line, and this violation is no longer listed in the problems window.
No problem, I’m happy 🙂
One word of warning about using the ruleset to create exceptions on AppSource rules. Some of these rules are there because they are required for acceptance into AppSource. For instance, you MUST give EVERY field name a specific prefix/suffix. You can turn this rule off, but if any of your fields is missing a prefix/suffix, your app will not be accepted. Be aware which rules you break, because the code police WILL find you eventually 🙂
I started to write this post while flying across the Atlantic Ocean on the second of a three leg journey home, a BA flight from London to Phoenix. It has been a very long trip that started when I traveled to Holland for Directions EMEA in Den Haag at the end of October. Since Directions and NAV Techdays were relatively close together, I decided to just stay with my family in Holland for those 4 weeks rather than fly back and forth twice in less than a month. This has been the longest that I’ve ever been away from home, and I was SO ready to be back in my own house.
NAV Techdays ended last Friday, and it’s been another fantastic week, as we’ve come to expect. As far as I can tell, the attendees in my pre-conference workshop were happy with the content, I can’t wait to get the feedback and see what I can improve for next time.
As per usual, Luc has posted the videos in record time, less than a week after the event. The whole playlist can be found here, and I wanted to highlight some of my favorite sessions. One of the most important developments in current technology is machine learning and AI. Dmitry Katson and Steven Renders put together an awesome session to introduce machine learning to us. The award for most entertaining session goes to Waldo and Vjeko, who put on a concert and wowed the audience with some really cool content. I also want to point out the session about CI/CD, which is going to be one of the most important things for everyone that is serious about implementing a professional development practice. Of course, I have to also mention the Docker session, which is the technology that makes it all possible.
Furtunately, next year’s event is not scheduled on Thanksgiving, which is a national holiday here in the US, one that typically involves lots of friends and family, and lots of food. I’ve had to miss it the past couple of years, and each time I’ve been bummed to hear the stories of all the great meals and gatherings that my family got to have without me. Next year I’ll be home for Turkey Day!
Thanks for another super event, it’s one of my favorite weeks of the year.
The AL language has an object type called ‘enum’. This object type defines a list of possible values in the form of a set of key/value pairs, plus captions. You can then create a field in a table or table extension enum as its data type, and the field will provide the user with a drop down list of those values. Just like option fields, the database stores the numerical values of the enum in the field.
To define a new enum, you create a new .al file in which you define the enum as an object, and you list the options of the enum as follows:
Note that the ‘Extensible’ property is set to true, so it will be possible to extend the enum with additional options when the enum is used in other extensions.
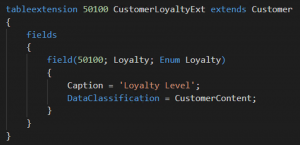
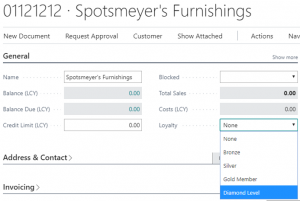
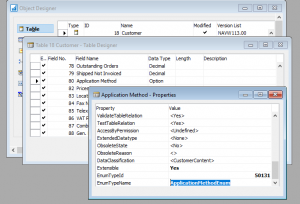
To link a field in a table or a table extension, you define the field as an enum type field, and specify the enum name as part of the field definition. In the following screenshot we’re adding an enum type field to the Customer table in a new tableextension:
Now, in order for this enum to be extended, you would have the app that includes the enum as a dependency (which puts the original enum into the current app’s symbol references), and then you would create a new object called an ‘enumextension’, in which you define additional values.
Now when you look at the Customer Card, you can see all the values in the dropdown for the new field:
It is also possible to link an option field in C/SIDE to an enum in AL, as shown in the following screenshot:
When I learned about the extensible enum type, I was salivating at the thought that it would be possible to extend the available options in a ton of tables (type in sales/purchase line, account type in journals, entry type in ledgers to name just a few of them). It IS possible to do just that, and eventually the goal is to replace all option type fields in Business Central with enum type fields, it’s just that it comes with a crap ton of refactoring of existing code.
There is a lot of code that checks for all available option values, with an ELSE leg in the CASE statement for ‘other values’. All of that code will need to be refactored to allow for extended enums instead of just raising an error with an unrecognized value.
Now you know about enums, start using them instead of option type fields, and make them as extensible as possible.