Containers And Bacpacs

A while ago an ISV client of mine was working on getting their app into the Embed program. Part of this process was to upload a bacpac with certain characteristics. The characteristics themselves are not relevant for this post but as I was helping them, but I thought I’d write this quick post to share how you can extract your bacpac files from a container, and how to use those bacpac files to create another one.

The setup

I’m starting out with a standard BC container, which was created using BcContainerHelper, and it is called DenSterDev. Coincidentally, I am also using BcContainerHelper to extract the bacpacs and to create the new container. I am using the “C:\ProgramData\BcContainerHelper folder to store the bacpacs, because that folder is recognized both inside and outside of the container.

Extract Bacpac Files

The container is multi-tenant, so there are two databases that we care about: one is the app database, and the other is the tenant database. Both of those are necessary to create the new container. If you have any apps installed on top of the standard container, those will be included in the bacpac file for the app database, and the bacpac for the tenant database contains the data itself.

The benefit of using BcContainerHelper is that we have very handy Cmdlets to get all this stuff in and out of containers, and the bacpacs is no exception. The command is very easy:

Export-BcContainerDatabasesAsBacpac `
    -containerName 'DenSterDev' `
    -tenant default `
    -sqlCredential $Credential `
    -bacpacFolder C:\ProgramData\BcContainerHelper `
    -doNotCheckEntitlements

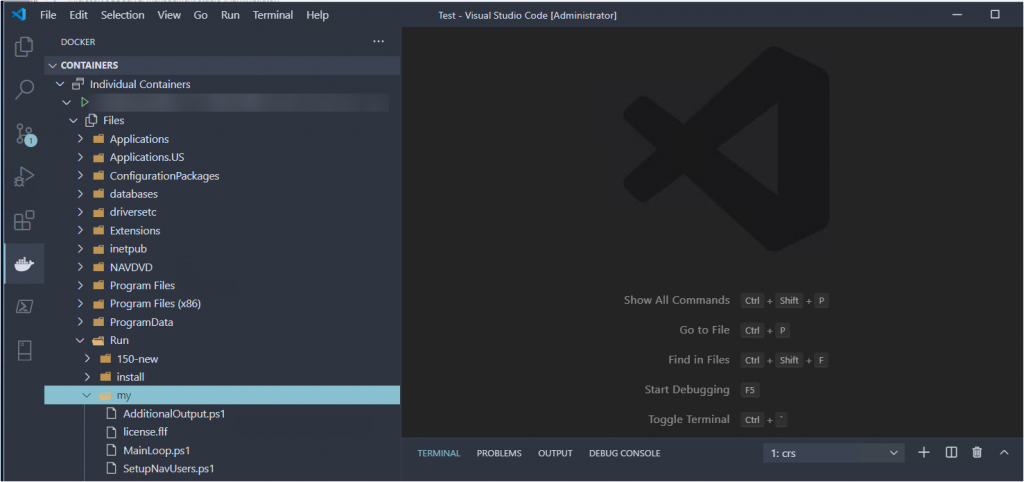
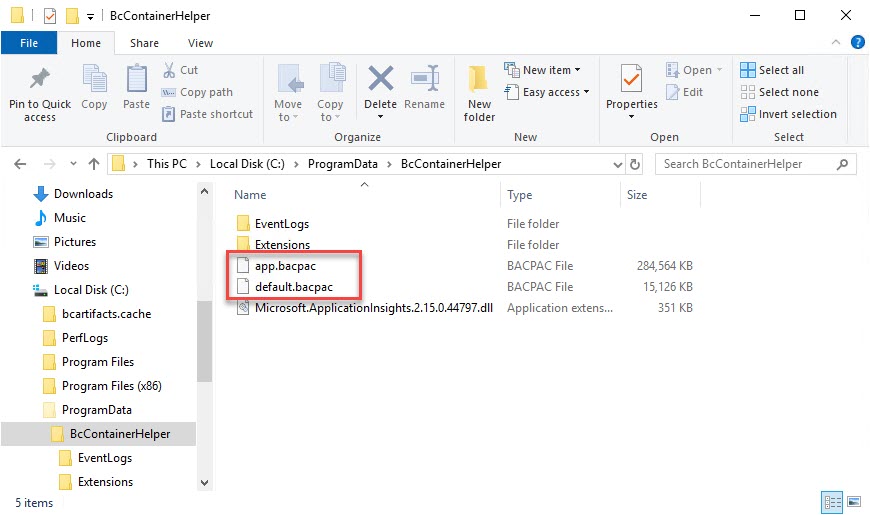
The tenant name is the default name of ‘default’ that is created in each standard BC container. The sqlCredential is a PSCredential object that was created during the container generation, using a username and a secure string password. As stated above, the bacpacFolder is a folder that can be accessed both in and out of the container. The entitlement flag is to bypass the check and prevent an error. When you execute this script, the bacpac files will show up in the bacpacFolder:

Create New Container from Bacpac

We are going to use these same bacpac files to create a new container. I’ll use the same container name:

New-BCContainer `
    -accept_eula `
    -containerName 'DenSterDev' `
    -artifactUrl '<ProperArtifactURL>' `
    -auth NavUserPassword `
    -assignPremiumPlan `
    -updateHosts `
    -accept_outdated `
    -Credential $Credential `
    -additionalParameters @('--env appbacpac=C:\ProgramData\BcContainerHelper\app.bacpac','--env tenantbacpac=C:\ProgramData\BcContainerHelper\default.bacpac')

Same as before, the -Credential parameter contains a PSCredential object. Note that the -additionalParameters spans across multiple lines here, but that should go on the same line in your PowerShell editor.

This command will download all the necessary artifacts and create the same container as the standard. The only difference will be that the app and tenant databases will be created from the bacpac files in your folder, instead of the standard database from the artifact. You can follow along with the script in the terminal window.

Nothing earth shattering, and made super easy by BcContainerHelper, but it took me a while to find the information and make this work. Hat’s off to Dmitry in the BC team, he was very patient with me as I got familiar with this process. Let me know in the comments if this was helpful or if you want to add anything.

Browse Files in Docker

Use the Docker VSCode extension to browse files in your container

If you struggle using the command prompt to figure out where the files are in your Docker container, this post is for you. I will show you how easy it is to actually browse around the files inside your container.

The Struggle is Real

The first time that I sat behind a PC was in high school in the early 80s. At the time, the only way to ‘communicate’ with your computer was through a DOS prompt. If you were REALLY fancy, you had a .bat file that provided a menu, and you had to type the number and then hit enter to execute what was behind the number. We read how to do the cool things in paper magazines, because the only other resource was books at the library.

The command prompt was not my favorite, and I never really got into computers as much as you’d expect. Not until years later did I find myself working ‘in computers’, and at that time I tried to stick to GUI based tools. For some reason, CLE based tools are back in vogue (or I’m just recently discovering that this is where it’s at) and I find myself struggling to navigate. I kind of know how it works, but it’s difficult for me to keep straight where I am and where the connections are.

Finding Files in my Container

Up until now, the only way that I know of to find files inside a Docker container is to use the command prompt. Using the BCContainerHelper module, you can connect to the container by using the Enter-BCContainer <ContainerName> command. You can tell by the prompt when you are in the container.

The container has its own file system, with folders, just like your host computer. To make things easy, there are two Very Important Folders:

  • The ‘C:\run\my’ folder in the container is mapped to the ‘C:\ProgramData\BcContainerHelper\Extensions\<ContainerName>\my’ folder. This means that the files in those folders are shared by the host and the container, but the path in the container is NOT the same as the path on the host
    • NOTE: this is a container specific folder, so anything that you put into this folder will be deleted when you destroy the container
  • The ‘C:\programdata\bccontainerhelper’ folder is mapped to the same folder on the host. This means that the folder is also shared between the host and the container, PLUS the path is the same in both contexts
    • NOTE: As long as you have BcContainerHelper installed, any files (and additional folders) that you put into this folder will remain there, even when you remove containers. This is a perfect folder for sharing purposes.

This is important to understand, because you will probably use PowerShell scripts to do all sorts of things with containers, and you will need to read and/or write files to folders within the proper context.

A Better Way

The Docker extension for VSCode was updated this week, and it has a new feature that enables you to browse the files from inside VSCode.

This shot shows the folder structure inside my container

For me, this is a MUCH better way, because I find it very hard to keep track of where I am in the folder structure, and this gives me a bit more context. What I am missing is an easy way to tell which folders are shared, and what the path on the host is.

If you don’t have the Docker extension for VSCode yet, you can find it here. You can also search for it in the VSCode marketplace.

SQL Server and Docker

Learn how to use SQL Server to access the databases in your Docker container

This post is for you if you want to be able to access the SQL Server database inside your Docker container, without having to write the query.

For one of my projects, I needed to be able to see the apps that were uninstalled but still had their schema in the tenant database. That information is in the $ndo$navappuninstalledapp table, and with SQL Server Management Studio (SSMS) it is super easy to look at table data. In my container I assumed that I would have to figure out a way to write the actual query (something I am not very good at). As it turns out, I was wrong. In this post I will explain two very easy ways to access the SQL Server database inside your Docker container.

SQL Server Management Studio

The first, most obvious, option is to do a complete install of SQL Server in whatever edition you have access to. If you want to keep things lean though, you can also install a standalone SSMS. You can download SQL Server Management Studio here.

Connecting to a Docker container could not be easier. In the connection dialog, simply enter the name of your container as the server name, and SSMS will connect to it for you. I always use NavUserPassword authentication in my containers, and by default your container password will also work as the sa password inside the container.

My container is called ‘densterdev’, and you can see the default app and tenant databases inside the container.

All I needed to do was look at some table data, and that works just fine. I did not try to do anything more advanced than that.

SQL Server Extension in VSCode

The second option is even easier than installing SSMS, because you are already using VSCode to do your AL development. Microsoft has created a ‘SQL Server’ extension, which works very similar to SSMS. In the extensions search box in VSCode, type ‘SQL’ and select the one made by Microsoft.

After installing you may need to reload VSCode to enable the extension. You will see a new tab on the left navigation pane that will show you the tooltip ‘SQL Server’ when you hover over it. When you click this tab, you will see a heading that says ‘Connections’ at the top, with a + sign next to it. Click this + and follow the prompts. Just like SSMS, you enter the container name as the server name, and it should connect to it with no problem.

The same app and tenant databases are shown inside VSCode

I still did not need to do anything more complex than looking at some data, so I really can’t say what features are available beyond that. My guess is that it is less capable than SSMS, so this may not be an option if you need more advanced capabilities.

Containers Are Now Multi Tenant

Containers are now multi-tenant by default. The New-NavContainer Cmdlet has had a “-multitenant” parameter for a while now, it’s just that not specifying a value for this parameter now means that you get a multi-tenant container. Presumably this is because multi-tenancy is the default for SaaS, and should be for everything. Maybe this was implemented with the switch from NavContainerHelper to BcContainerHelper and I just didn’t pay attention to the details.

The way that I discovered this was that I was working on a training about the BC API, and I had learned that to get to the tenant, you specify it by its ID in the endpoint, like this: https://container:7048/BC/v2.0/[tenant]/[environment]/api/v1.0

Adding “?tenant=default” worked but I was curious whether including the tenantId in the URL was supposed to work in containers. Hint: it is NOT supposed to work that way, at least not based on the replies that I got from Twitter

As I was working through these issues I had created a new container, and instead of removing it, I had set the -multitenant parameter to true and didn’t think of it again until I was working on another project. New container, different script, this time without the -multitenant parameter.

To make a long story short…. I was expecting my container NOT to be multi-tenant, and was annoyed to see that my Postman scripts (the version without specifying the tenant) did not work anymore. It took me WAY too long to discover what the issue was, but there you have it 🙂

Docker Artifacts

Quick post today to point out some new posts by Freddy about a change that he’s made to the container logic in his PowerShell module to switch from downloading images to getting the artifacts and assemble images on the fly. I’ll just link to his blog and kind of summarize. The implications for us Docker consumers, as it turned out, was so small that it was almost uneventful.

Background

Until recently, the process to create a container involved downloading a fully prepared image of that container. This was very easy: download the image, create the container. The problem lies with the sheer number of images that had to be prepared for each situation. Are you on Windows Server 2016? 2019? Which build? Which version of NAV? Which localization? Business Central OnPrem or Sandbox? All in all, to accommodate the entire community, there were hundreds if not thousands of images just to create these containers.

So, to cut down on the sheer volume of those images, we now have what is called Artifacts. Instead of a full image, you download a set of instructions to fetch and build a local image yourself, which is layered with a bunch of components. There are a few common building blocks for the generic image and SQL Server and other such components, and then there are the pieces that we need to prepare the NST, the database, the localization, etcetera.

Instead of having hundreds of images with the same common elements, each common element is a separate download that can be re-used for all images that need it. I’ll leave it to Freddy to explain the details.

What Changes For You?

When I first became aware of this change, I was very skeptical and concerned. I’ve been having some pretty persistent and annoying issues with Docker, and I had visions of it all crapping out on me with this change.

The actual change itself is not very big. Instead of specifying the image name, you specify an artifact URL (the ImageName parameter still exists, and it serves a very useful purpose, but it’s no longer necessary to create a new container). The script then does its work, just like it has before. I made the change, ran the script, and it just created the container without any problem. My containers are usually very straightforward (most of the time I just need the latest US sandbox) and I have had a grand total of zero problems with this particular change.

Posts on the Artifacts

So far, Freddy wrote 5 posts about this change:

Just today, the last full image for OnPrem was uploaded. As it seems, artifacts are here to stay. Lucky for us, this particular change to NavContainerHelper has been seamless, at least for me. My New-NavContainer scripts still work, and I’ve had zero problems with the resulting containers, at least none that are related to Artifacts.

Bye Bye WITH

This past week there was a PGI for the MVP’s about something that the Business Central team is preparing for, and they were asking the MVP’s for their feedback. The topic was their plan to discontinue the WITH statement from the AL language. For me personally this is not a big deal, because I’ve always hated using WITH, especially when it spans more than a page of code. I get distracted very easily, and I lose track of which variable these fields apply to. As a result, I’ve always tried to write code and mention variable names explicitly.

As you can imagine, emotions run high about this one, especially with people who like to get upset about stuff. I won’t point to specific instances of this because I don’t like to call people out and get them even more upset. I just want to share some details with you.

There is no ‘official announcement’ but Esben replied to an issue in the AL repo on github here. Microsoft put together a virtual event and created a bunch of videos where they present a lot of content about Business Central here: https://aka.ms/virtual/businesscentral/2020RW1. The details about why they are getting rid of WITH are in the “Interfaces and extensibility” video, which you can find under the Developer track in the Library.

Good Reason

Microsoft is not just implementing this change because they like making our lives difficult. There are some very serious problems related to the WITH statement, especially surrounding dependencies between apps. There are two types of WITH statements:

  • Explicit WITH – this is when you see the keyword ‘with’ in your AL code, and it is meant to make it so that you don’t have to repeat the variable name. Very handy if you want to set a bunch of field values, let’s say in a Customer record variable, you can type ‘with Customer do begin’ and now you can access fields directly without having to type the variable name for each one of them
  • Implicit WITH – this is when a record is implied, like on page objects or in a report dataitem. You can simply type field names, and its record is implied because of where the code is written. By the way, it looks like for now they are letting us keep the implicit WITH (meaning we won’t have to type out ‘Rec’) in table and tableextension objects.

Let’s say you add a procedure called ‘IsImportant’ to a codeunit in which you have a WITH statement, or to a page (doesn’t matter which table the page shows). You call the IsImportant procedure to run some business logic. Everything works great.

The problem occurs when Microsoft then adds a field or a procedure with the same name. Let’s say your IsImportant function does something in some logic about the Vendor table. If Microsoft now adds a field called IsImportant, there is an ambiguity about what this refers to. In your code, it will never reach the Vendor table, because it will find the function in your object before it gets to the Vendor table. Or vice versa, depending on how the code is written and what the scope is at that time. The presentation that I mentioned before will have a bunch of examples to explain, so come back in a few days and I will add a link to the recording to this post.

Not leaving us hanging

One thing to remember is that Microsoft is NOT going to just throw this out at us and leave us high and dry, without any help in fixing this. One of the people on the call had already done some investigating, and figured out that he will have to fix this in 21,000 places in a variety of apps for his customers. This is a LOT of work, and we all need some time to process this.

Some things to remember:

  • This is currently in preview in the AL insider build, and the target is the next major version of the AL language
  • At that time, these will still not be errors, but warnings. The statement will not actually go away until 2021. I can’t find in my notes if it will be wave 1 or 2, but at the earliest this will be spring 2021
  • You will not have to go searching for them yourself, the code analyzer will show you exactly where they are
  • Microsoft is working on tools to help us. The proof of concept that was shown to us was a first version where you have to open each page object and click on the tool and it will fix the implicit WITH on the whole page for you
  • There was also a tool to fix an explicit WITH in code. Both of these tools were still first versions, but they worked and looked like they were easy to use
  • There were already some discussions about options on maybe creating some external tools that utilize these tools. We have a wonderful community of people that are creating AL tools, and I am pretty sure that by the time this becomes really important (meaning by the time you can’t postpone this any longer) we will have really handy tools that will make this a piece of cake

Start NOW

You could include the rule in your ruleset.json file (it’s rule AL0606 for explicit WITH and AL0604 for implicit WITH) and completely ignore the issue. You would be doing yourself a disservice though. I would recommend that you stop using WITH immediately, and start fixing it in every object that you touch from now on, at the very least the explicit WITH. I might wait fixing implicit WITH statements on page objects until there is a more user friendly version of the tool, but I am absolutely going to try and see how much work it actually is.

If it’s one of those point/click fixes and it takes no effort at all, I can totally see myself just whip out 4-5 pages at a time while a container is rebuilding. If you have a ton of customers with a ton of customizations then yes it could be a big task, and you might want to wait until there is a better tool to help you through.

This is one of those things that you can’t postpone forever, you will have to address it at some point. I don’t like having to “fix” something like this either, but there are more important things in this world right now, I just can’t get upset about it.

Mark Down your Documentation

We all have great intentions when we start a new project that THIS TIME we are going to create the best awesomest documentation! Yet somehow, when we are knee deep in testing, when we are wrestling product owners and project management types about scope creep, documentation seems to always fall by the wayside. What if I told you that there was a relatively easy way to include documentation in your development workflow?

Over the past few months I have been working on a number of apps that one of my clients is planning to submit to AppSource. One of Microsoft’s requirements (which you can read here in the Technical Validation Checklist) is that each app submission has what they call ‘User Scenario Documents‘. Another requirement, this one from the Marketing Checklist is that the publisher provides online help. These sound awfully similar to the requirement that you must provide a test app that includes automated tests for the user scenarios that I mentioned just now. These three requirements result in an awful lot of writing, and they all essentially cover the same thing.

As I was organizing the apps that I am working on, I started looking around at how various companies have provided their documentation, with of course Microsoft as the shiny example. You see, I’ve been a big fan of the way that they have moved their documentation to docs.microsoft.com. Not only do they have away to provide direct feedback (which I’ve written about before here), as it turns out, their actual documents are in a public repository that we as members of the community can contribute to. The source documentation is written in what is called ‘Markdown’, and there is a build process that publishes the documents into the Docs website. These tools are often capable of outputting the content in multiple formats. You might be able to Generate your user documentation as well as your online help from the same source content.

Now before we get all fancy and automated, let’s go over the basics first.

Workflow

The documentation itself is done in so-called markdown files. Basically Markdown is a way to tag content with formatting. It is very similar in structure (not syntax) to HTML, which is not a coincidence because markdown was originally conceived as a text-to-HTML conversion tool.

You create *.md files with the text, plus image files for screenshots and such, and you structure the help content using the markdown formatting. It’s very simple and rudimentary, and this is totally by design. It takes a little effort to get used to it, but it’s actually quite simple to master, and it looks great very quickly.

Because you create separate *.md files for each topic, and you keep the images as separate files as well, markdown is absolutely PERFECT to be source controlled. At the moment I am simply including a ‘Documentation’ folder in my repository, so I am keeping my documentation inside my development repository. If you read my “Two Apps, One Repo” post, the documentation folder is at the same level as the other app root folders.

The Business Central documentation, for instance, is on a separate repository on its own, completely separate from the source code of the application itself. You could totally choose to track the documentation separately. There is no one way to do it, you can fit your process to your own needs.

I’ve been told that there are tools out there that will convert markdown to a number of different targets such as PDF, HTML, and even Word. I don’t really want to spend a bunch of time trying figure those out, so let me stop at covering markdown itself. As I move into creating the documentation targets, I will follow up here.

The important take-away here is that you can include documentation in source control. As such, you can make it part of your development process, and track it to work items.

Resources

Here are some useful resources for Markdown itself, and some tools that convert markdown to other formats like PDF and HTML:

  • Introduction to Markdown by the guy that invented it. Not very descriptive or a particularly good reference, but kudos to him for coming up with the simple and powerful concept
  • Since we’re working with Microsoft products, and because they have taken a lot of time to establish a good process, I must include their time to document their guide for authoring for Business Central. You will want to read the Style Guide, look for the link in that post
  • I asked the community how they create help files and documentation, and was referred to this guy that works for/with Microsoft (as far as I can tell he is an external resource who manages the Docs team). He’s put together a video about their process, included in this blog post. He is very responsive on Twitter, so ask him if you have any questions
  • I have to include this post by Eva Dupont, who is responsible for all Business Central content in Docs. I’ve mentioned this before, but it needs to be repeated as many times as I can. She also wrote a handy primer on migrating your help files.

You can also check out the many really good responses that I received when I asked the community:

I’m just collecting information at this point. There’s lots of good ideas, lots of tools to help get there, it’s just a matter of picking the ones that fit your process. For me I’ll try to keep it simple and effective, and I have a feeling that my clients will have strong opinions as well. I’ll keep you posted on what will happen.

Two Apps, One Repo

Whether you’re working on AppSource apps or Per Tenant Extensions, or even a code custom on premises extension, by now every one of your AL projects includes a test app right? This really means that every development project is really two apps. One is the app itself, the other the test app. In this post I’ll tell you an easy way to organize your workspace.

As you know, each AL workspace is essentially a folder with a file for each object, plus the necessary files to define the app itself. Since you are now also using source control, each AL workspace is also a Git repository. Logically, you would then have a repo for the app, and also a repo for the test app. What if I told you that you could have a single repo that includes both AL workspaces, all at the same time.

Start the Repo

First, you create the repo itself, whether you’re on GitHub or Azure DevOps. This is essentially an empty repository, we will create the AL workspaces in a bit. Let’s call it ‘MyRepo’. I’ll include a .gitignore and a readme.

I’ll clone this repo in VSCode. Set up the .gitignore file for AL, and VSCode is now tracking everything that happens in this repo. Normally, you’d fill the new folder with the AL workspace files, so that this single repo has one single AL workspace. To have the app as well as the test app in this repo, you simply create two AL workspaces in the same folder.

Add the App Workspaces

If you have existing apps, just copy the folders into the repository. If you are starting a new (test) app, use the ‘AL: Go!’ command, saving the project in the ‘MyRepo’ folder. Repeat for the test app. Each time that you create a new AL project, VSCode will automatically open the new workspace. To see the repo itself, re-open the MyRepo workspace and you will find the two apps in the same root folder.

Going to the Source Control tab you can see that it tracks changes in both folders, and the single gitignore file works on both of them. How to set this up as an app and test app is for another post, but you now have one single repository with two apps.

Work on Each App Separately

When you are looking at MyRepo in VSCode, at some point you will get a message that the manifest is missing, and you’ll get all sorts of messages in the problems window. You can’t even download symbols like this. In other words… you can’t really work on your app like this. I usually keep a folder with some PowerShell to create my development containers, I plan to keep app documentation in there as well, and it appears that this is the right place to store some pipeline files. To work on the apps themselves though, you will have to open the app’s folders in VSCode individually.

It gets a little tricky here because VSCode will show all the modified files for the whole repository in the Source Control tab. If you have modified files in both the app as well as in the test app, whether you are looking at one or the other, you will see them all.

The green one is a change I made to the gitignore file, which is in the root folder for the main repository. The red ones are changes in the AL workspace called ‘TheApp’, and finally the yellow ones are in ‘TheTestApp’. Whether you are looking at MyRepo or either one of the apps, you can commit any changes that you select to your repo from the App/TestApp folders.

The good part though is that you can simply open the app folder and work on that as if it were part of its own repo. Then you can commit and sync, open the test app and work on that. At the end of the day, when all objects are checked in, the single repo includes the app itself as well as the test app.

Each folder is considered its own AL workspace, so you can modify settings for the app and for the test app. What I really like about this way of working is that everything is part of a single repo. Two Apps, One Repo!

Using Workspaces

VSCode has something called ‘workspaces’. You may have noticed a selection on the File menu called ‘Add Folder to Workspace’. When you then save the workspace, VSCode will save a collection of attributes in what is called a ‘code-workspace’ file. I’ve tried to make this work, and I was wrestling with it a little bit. For instance, settings are defined inside the ‘code-workspace’ file instead of a separate settings.json file.

In addition there were some other things that confused me a little bit, so I posted a quick poll to my favorite hashtag, asking the community what they do, and there were quite a few votes.

It seems there are a few people working on posts about workspaces, so I will defer to them. I am looking forward to reading about that!

Excel Buffer for the Cloud

One of my clients asked me to help them convert an add-on that they developed in C/CIDE into an AppSource app. This add-on includes the functionality to export some data into an Excel file, using the Excel Buffer table.

The Excel Buffer table is also available in AL, but one of the issues is that as soon as you set the target of the extension to ‘Cloud’ (Which as you know is an attribute in app.json), the compiler will scream at you that you can’t use certain functions of the Excel Buffer, because their Scope has been set to on premises. So if your C/AL object uses the ‘OpenExcel’ function, for instance, you can’t use that for AppSource apps because its scope is OnPrem. This type of thing usually takes me days to figure out, so I thought I’d ask Twitter with my favorite community hashtag #bcalhelp

Within a day I received a bunch of helpful suggestions, I just love this community! The one that put me over the top was a phone call with my good friend AJ, who not only showed me, but he also sent me some sample code that he was working on. He’s working on a blog post about this topic himself, so I’ll let him share that and I’ll post a link to his blog once he puts it online. I want to mention Owen too because he had sent me essentially the same suggestions, but to an email address that I hardly ever use anymore, so I didn’t see that until days later.

As you can see by the trigger name, I had to put this into a report object (which I’ll share when I find time to put it in a repo). My main problem was that I needed to be able to provide a way for the user to open the Excel file. For this to work, you use the OpenExcel function. This actually does not open Excel, but what it does instead is it downloads the Excel file into the Downloads folder on your computer, and then you can open that file from there.

Some additional pointers:

  • CreateNewBook creates a new file, with a new sheet. If you already have the file created, and you need to add a sheet to the existing file, then you would use the SelectOrAddSheet function
  • TheWriteSheet function writes the records from the Excel Buffer table into the sheet. Each record represents a cell value
  • You will need to use the NewRow, AddColumn functions to ‘walk the grid’ of the cells in your sheet. Also very useful functions: ClearNewRow and SetCurrent. I ended up adding a GetCurrentRow function to an Excel Buffer table extension
  • The CurrentRow and CurrentCol variables in the Excel Buffer table are your friend. Forget about the letter/numbers of the Excel file itself, just use the row/column numbers
  • SetFriendlyFileName is not mandatory, but otherwise the file will be called ‘Book1’ or something

Like I said before, AJ is working on a post for this as well, and he said he was going to offer a repo with the objects as well. If I don’t forget I’ll create a sample report and offer that as a PR to AJ’s Excel repo.

Translation File Names Must Match App.json

This is a quick follow-up on my previous post about creating a container for modified Base App development, about the translation file issue. After publishing that post, I also reported the error message to the AL repo on Github and to the MicrosoftDocs repo.

As @NKarolak suggested, the names of the translation files must match the name in app.json. I was very skeptical about this, because this was never the case in any of the AppSource apps I’ve worked on, and the Doc for the translation files specifically says that there is no enforced naming of the translation files. It might be a new requirement though.

When I first created my AL workspace by exporting it from my container, the translation files were named as follows:

The name in app.json is ‘Base Application’ so the space character is replaced with ‘%20’ which is the html representation for the space character. Since the original error message did not mention the file name, I did not think that the file name itself was the problem.

I decided to try Natalie’s suggestion and replaced the ‘%20’ with a regular space, and voila, it published the app as expected.

Next, I changed the name in my app.json to ‘Super Base Application’ and it errored out again. Once I changed the translation files to match the name in app.json, it worked again.

Moral of the story: when developing a modified Base App, you have to match the translation files to the name in app.json.