This is a really quick tip just for myself to save the script where I can easily get to it, this time a quick way to output the duration of a PowerShell script. When a script takes longer than expected, in my mind I am waiting HOURS for it to complete but it is probably just a minute or two. I’ve run into this before, where I spend WAY too much time trying to locate a good, easy way to output the duration of a script. Without further ado, here’s the PowerShell code:
$startTime = Get-Date

<insert your script here>

$myTimeSpan = New-TimeSpan -Start $startTime -End (Get-Date)

Write-Output ("Execution time was {0} minutes and {1} seconds." -f $myTimeSpan.Minutes, $myTimeSpan.Seconds)
The key elements here being
I was looking for a ‘Time’ function and didn’t realize that in PowerShell you actually need to use the ‘Date’ object to access the time. Get-Date returns a DateTime stamp
Coming from BC, I was looking for something called ‘duration’, so it took quite a bit of time to find out about New-TimeSpan. This creates a ‘TimeSpan’ object that has its own members for easy concatenation of a user-friendly message. I’m only using minutes and seconds here
Hopefully next time I need this I will remember to search my own blog 🙂
As a Microsoft partner, you have to create a bunch of accounts to get into a bunch of systems. Microsoft is on a continuing mission to make things easier by putting most of it into a single portal called “Partner Center”. In this post I will focus on one particular thing – how to get access to insider builds of BC, which you need to validate your extension against future releases.
I’m writing this because the engagement was not listed for one of my clients. Microsoft support was no help, and I could not find this information in some of the obvious places. Just a quick post, mostly for my own reference but I can’t imagine that I am the only one that is having difficulties getting into the program. Thanks to our little Twitterverse for helping me out.
Collaborate
First, you need access to Collaborate itself. From your Partner Center portal dashboard, you should see a rectangle with the word ‘Collaborate’, the shortlink is aka.ms/collaborate. If you do not have access yet, this is where you would have a link to where you can submit a request to be admitted.
Insider Builds
To get to the insider builds, you have to be enrolled in something called an engagement called ‘Ready! for Dynamics 365 Business Central’. As a Business Central partner, this engagement should be listed and all you do is hit the ‘Join’ button and you should get access within a couple of days.
Access to the insider builds is buried a little bit. Select the Ready! engagement and click the ‘Packages’ button. The one you need is the document called “Working with Business Central Insider Builds”. The thing that you need to get the actual build is the $sasToken. This value is needed to be able to download the artifacts for the insider build. It’s the password to validate that you are allowed to use those artifacts. By the way, don’t forget to take the time to read the material in there, it’s important information.
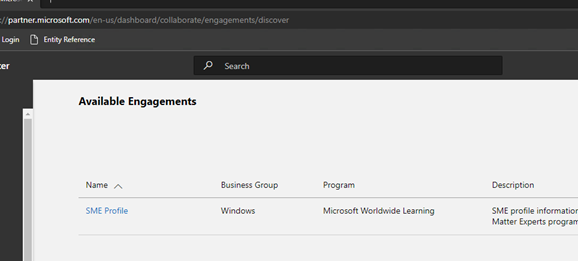
What if I don’t see the engagement
Normally, when you register as a development partner for Business Central, you are supposed to see the “Ready to go” program in the available engagements, and getting access is as easy as clicking the ‘Join’ button. This does not always happen for some reason. The screenshot below shows the available engagements for one of my clients, and as you can see the program did not show up, so we could not click the join button.
If for whatever reason you do not see the engagement, do not submit a support ticket from Partner Center. These tickets go to a central support group that does not know about program-specific issues, and you’ll spend weeks going back and forth. You’ll ask for access, and they will tell you to click the Join button. You’ll tell them there IS no join button to click and they’ll say click the button anyway. This is not a knock on them, they just don’t seem to know the details.
Access to the BC programs is handled by the product team themselves, and their email is Dyn365BEP@microsoft.com. This will get your issue directly with the BC team, and they will know exactly what to do. Just provide your publisher name, your MPN ID, and first name, last name and email for the person that needs access. Once I did this, the issue was solved within a few days.
In this post I’ll show you how to disable autoplay in the new Edge browser. Normally I would just link to the post that helped me, but ironically that one is riddled with autoplaying videos. For that reason I decided to just copy the information in here and spare you the crap popping up by linking to the post.
Step One
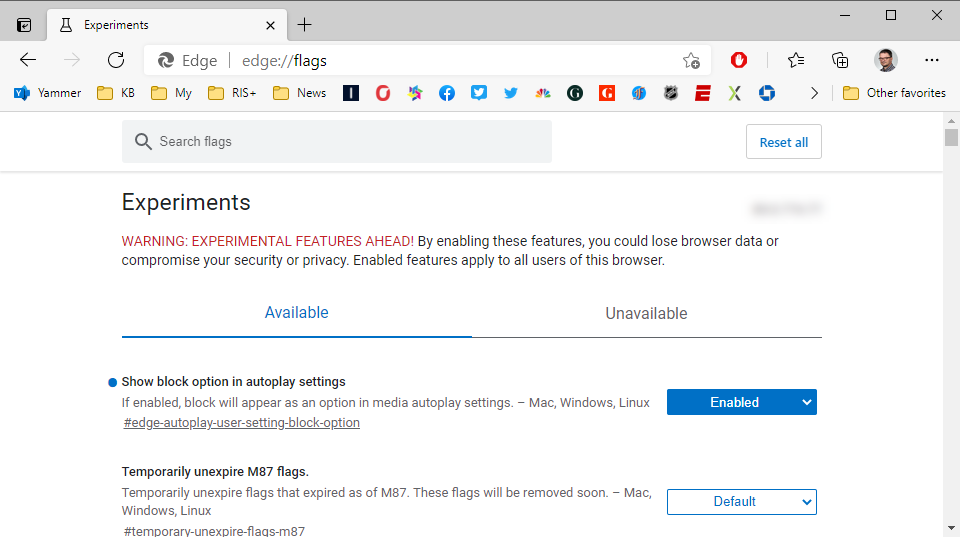
For the first step, enter “edge://flags/” into the address bar, find the setting for ‘Show block option in autoplay settings’, and set this to ‘Enabled’. You’ll get a message that you have to restart Edge for the change to take effect. Don’t worry about any open tabs, it will reload all of them.
Step Two
When the browser reloads, enter “edge://settings/content/mediaAutoplay” into the address bar, and set that to ‘Block’.
Done
You’re all set. I tested it in two of the worst offenders (CNN and YouTube) and nothing autoplays for me. I wonder how long it will take before they figure out how to bypass these settings. The annoying part is that you have to go to internal settings. This should really be a simple setting.
One of the programs on my computer creates a shortcut on my desktop every time I restart my computer. As people who know me can attest, I am a little compulsive about certain things, and having anything on my computer’s desktop is one of them. The program in question does not have an option to disable this thing, so someone suggested to me to use Task Scheduler to remove the shortcut. Since I’ve been using PowerShell a lot, I thought I’d try that.
The PowerShell Script
First, you need a script to execute the task at hand. In my case I needed to remove the shortcut from my desktop. After searching for a while, I found it in the Users folder. Create a new PowerShell file in the ISE and write this script:
Obviously, you replace <UserName> with your user name, and the name for the shortcut. I’m sure you can even replace the folder with an environment variable. Save this script as a .ps1 file and put it in a folder, like your documents folder. I called mine RemoveShortcut.ps1 and put it in the folder “C:\Users\DENSTER\Documents\”.
For me, this was a need of the moment, because this program was stubbornly creating this shortcut. You can use PowerShell for a million different things, so anything you can do with PowerShell you can put in the Task Scheduler.
Update July 24, 2020 – Based on a conversation with @steveendow on Twitter the other day, automatically updating NavContainerHelper would be a good example. I had already written most of this post (started it back in June) and was about to add the update as a second example before publishing it when Steve created his version of this same post himself. I actually gave him the update script that he used, and I suggested using the Task Scheduler, so I don’t feel too bad for this redundant post, and it saves me from having to test the NavContainerHelper update script in the scheduler :).
Task Scheduler
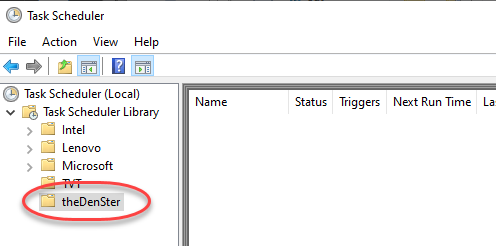
Next, you need to create a task in the Windows Task Scheduler. Hit the Start button and type ‘task scheduler’, and the app will come up. When the Task Scheduler opens, you’ll see the “Task Scheduler Library”. To make it easier on yourself, create a new folder by right clicking on the Library node and then clicking “New Folder”. Enter a name and hit Enter. This creates a folder where you can save your own tasks. Trust me, it is VERY easy to lose tasks in the standard folders. Having your own folder is going to save you a ton of time.
My new folder “theDenSter”
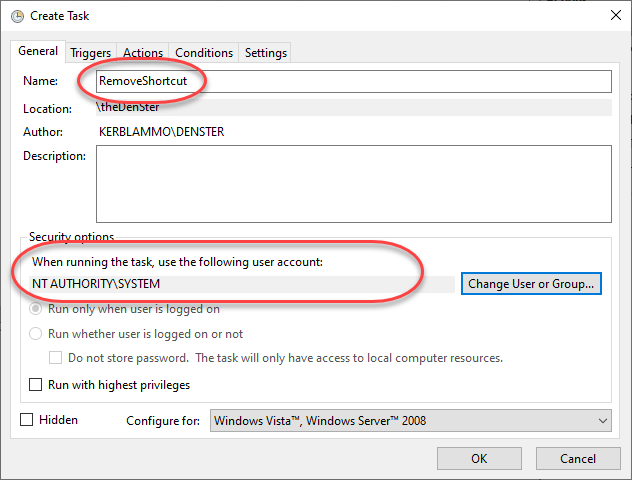
To create a new task, right click your new folder and select ‘Create Task’. Give it a name and then select the SYSTEM account under security options. You can leave it under your own account, but then you will see PowerShell pop up and run as you are using the computer. Selecting the SYSTEM account makes it so that it happens in the background.
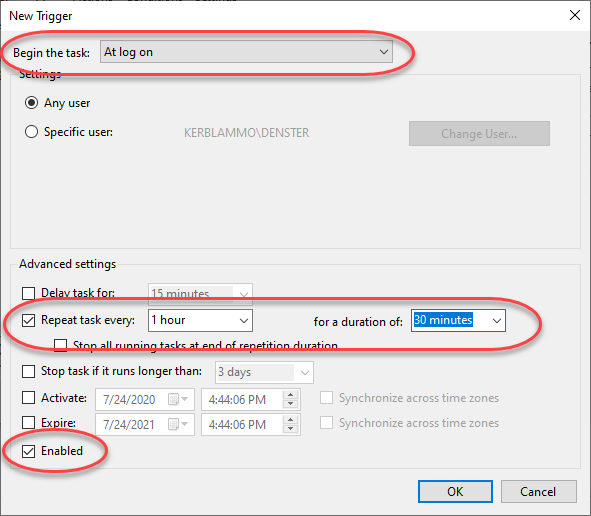
You need a trigger to execute the task. I chose to run it at log on, and I set the task to repeat every 5 minutes for 30 minutes. The reason I did that is because the program that created the shortcut sometimes took a while to create the shortcut, and running my script just once did not always remove it right away, so I had to repeat it a few times. Take a look at all the available triggers and select the one that makes sense to you. Make sure that the trigger is enabled.
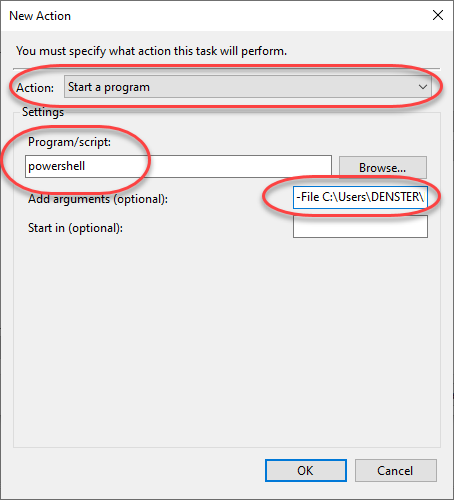
Now the meat of the task: the action. We are going to run the PowerShell script, so select ‘Start a program’ and enter ‘powershell’ in the “Program/script” box. The file name goes into the “Add arguments” box:
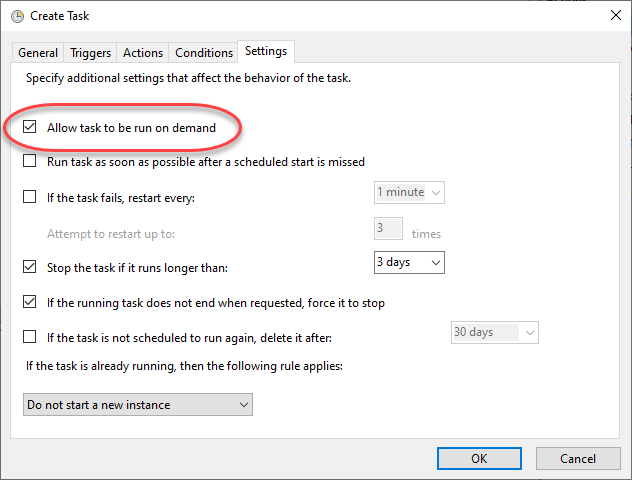
If you want to be able to manually execute the task, you have to check the box for “Allow task to be run on demand” on the Settings tab. This way you can run the task at any time right from the Task Scheduler.
That’s it. Hope this is useful for you. I had not thought of using the Task Scheduler, but it feels like I could automate a bunch of things. It’s nice to have the ability, let me know if you use the Task Scheduler, and what you use it for.
If you use multiple monitors, and you would love to span your RDP session or your Hyper-V session across some, but not all, monitors, then this is the post for you. Say you have three monitors, I will tell explain how you can span your RDP/VM across two of those monitors, while still using the software that runs on the host on the remaining monitor.
Why I Wanted to Know This
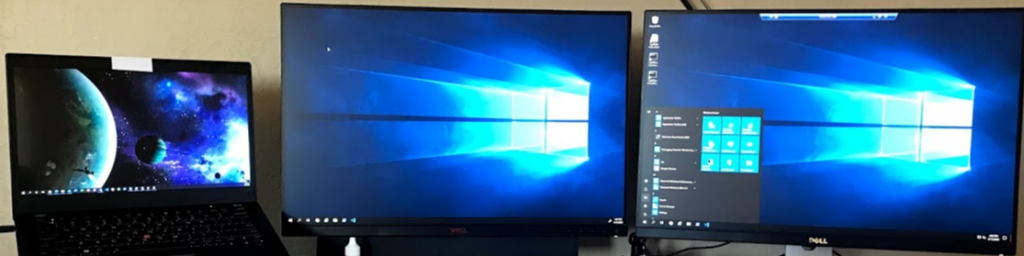
My desk has my laptop on a stand on the left side, plus two external monitors to the right of the laptop. The first external monitor is my primary work screen, so it is positioned right in the middle of my desk. I think of the middle screen as “screen 1” and the one on the right as “screen 2”. My laptop screen is just ‘my laptop screen’ :).
My screen setup. Note that the laptop screen shows a third of a fantastic looking multi-screen spacescape, mostly hidden by my 2 screen spanning RDP session into my VM on the two external monitors ‘screen 1’ and ‘screen 2’
For my daily development work, I use Hyper-V virtual machines, and I used to full screen it either on screen 1 or 2, depending on what I was doing. Doing development I’d have my VM full on screen 1, and other supporting programs on the host on screen 2. Writing documentation, I’d have the VM full on screen 2 and Word on screen 1, and then I’d use Snagit for taking screenshots.
When I started including documentation (in markdown files) into my source code, it became difficult to work on documentation, because I would want to take screenshots of the app, and then incorporate it into the markdown file. I would have to switch between VSCode and the app inside the VM, switch to the host to activate Snagit, and then switch back to the VM to process the screenshot in the documentation. Very tedious situation with lots of clicks. I did try to use ‘all monitors’ in the Hyper-V connector, but then it would be difficult to take proper screenshots because I only had Snagit installed on the host. I’d have to minimize the VM, start the Snagit screenshot with delay, re-activate the VM and hope that it would be back up in time for me to take the screenshot.
So, then I thought it would be nice if I could span my VM across just 2 of my 3 screens. I could have VSCode on screen 1, the app on screen 2 (both inside the VM), and Snagit on the host on the laptop. Kudos go to Martin, one of the IT leaders at one of my clients, for teaching me how to do this for RDP. Although the Hyper-V connection uses RDP technology, there does not seem to be a way to do the same thing for Hyper-V – it’s either only 1 monitor, or all monitors. “No problem”, Martin said, “you can use RDP to connect to your VM”, and he showed me how to make that work as well. Let me share this useful nugget with you.
RDP Into your VM
First you need to make sure that your VM is set up to accept remote connections. This section explains how to do that for Windows Server 2019, which is what I use in my VMs.
Inside the VM:
Click Start and open Settings
Go to the “Remote Desktop” page, and turn on Enable Remote Desktop
While you are in this settings screen, note the name of your VM. You’ll use this to create an rdp file for each of your VMs
Back on the host – open Hyper-V Manager and select your VM. At the bottom, you will see a screen part with three tabs. In the Networking tab, it shows the IP address of your VM. Be aware that this IP address can change without any clear indication when or why. Hyper-V Manager will go long times using the same IP address when restarting the same VM, and all of a sudden it will change it.
Now open Remote Desktop Connection, and expand the options. I used to use the VM’s IP address as the name, but because Hyper-V changes the IP pretty much every time that the host computer reboots, I was constantly updating the rdp file. Then I discovered that you can also enter the VM’s computer name into the name box. Now click on ‘Save As’ and save the rdp file with the VM name in a folder that is convenient for you; mine are in ‘My Documents’.
Very cool, congratulations, you are now using RDP to connect to your VM.
X of Y Monitors in RDP
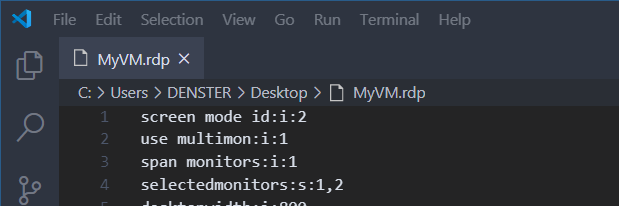
The rdp file is nothing more than a text file with key-value pairs. We are going to edit this file using notepad, and add some screen properties. Feel free to use any other text editor. You can even open it with VSCode if you want.
You need the following settings in the rdp file:
screen mode id:i:2 – Determines whether the session is opened in full screen, and the value 2 stands for ‘full screen’. I tried leaving this out and for fun tried to use the laptop monitor and screen 1 at the same time, and that did not work well for me. It seems that this only works when the screens have the same resolution capabilities.
span monitors:i:1 – I think this is a boolean parameter – 1 means on
use multimon:i:1 – Same here, I think this is a boolean so 1 for on
selectedmonitors:s:1,2 – The monitor index is specific to the hardware. To get the numbers, run “mstsc.exe /l” from a command prompt. On one computer, this was 1 and 2 for me. My monitors are connected through a USB-C dock, and when I connected a new computer to the same dock, this no longer worked for me. Same monitors, same dock, different computer gave me screen indexes 3 and 4.
The ‘MyVM.rdp’ file in Visual Studio Code, showing the relevant screen properties
Now, instead of opening the VM through the Hyper-V Connection Manager, just double click the rdp file and it will connect. You should now see the desktop across the monitors that you defined in your rdp file. If you take a closer look at the image above, you can see that it shows an RDP session spanning my ‘screen 1’ and ‘screen 2’ monitors, with my laptop showing the host.
One other thing that is very convenient is that RDP remembers all the connections you make. If you pin RDP to the taskbar, you can right-click it and select which connection you want to use. I have rdp files for each of my VM’s. All I have to do is start the VM, select the right one in RDP, and it connects on two of my three screens.
Great Improvement
For me this was a really big improvement for my workflow. I used to have to maximize, minimize, switch between VM and host, and it was just distracting to me. Now I can have Outlook, Spotify, and Snagit all visible to my left, and have the real estate of two full monitors to work on whatever I want to run inside the VM, all at the same. The most I need to do is click on my host desktop to make my Snagit keyboard shortcut work.
Personally I do most of my development work in my local VMs, but this would also work for regular RDP sessions. This gives you total control over the screens that you want to use.
Hope this helps you, let me know in the comments or send me a message on Twitter.