Import Media Files for SaaS

One of the standard ‘Problems’ when you’re in an AL workspace in VSCode is a warning that you are no longer allowed to use BLOB as a datatype for images. This has been at the bottom of my priorities list until I had a request to create a new image for a standard field. With this post I’ll show you how easy it is.

Media Field

The first element that you need is a field in the table. Instead of a BLOB field with subtype Bitmap, you now need a field of type ‘Media’. There is also a data type called ‘MediaSet’ but that’s not what we are going to use. Go to Docs to read about the difference between Media and MediaSets. The field is not editable directly because we will be importing the image through a function.

In addition to the field itself, you need a function to import an image file into the field. In the object below I have a simple table called ‘Book’ with a number, a title and a cover. We use the ImportCover function to do the import, and implement that as an internal procedure, so it can only be used internal to the app. You can of course set the scope as you see fit.

table 50100 BookDnStr
{
    Caption = 'Book';
    DataClassification = CustomerContent;

    fields
    {
        field(10; "No."; Code[20])
        {
            Caption = 'No.';
            DataClassification = CustomerContent;
        }
        field(20; "Title"; Text[100])
        {
            Caption = 'Title';
            DataClassification = CustomerContent;
        }
        field(30; Cover; Media)
        {
            Caption = 'Cover';
            Editable = false;
        }
    }

    keys
    {
        key(PK; "No.")
        {
            Clustered = true;
        }
    }

    internal procedure ImportCover()
    var
        CoverInStream: InStream;
        FileName: Text;
        ReplaceCoverQst: Label 'The existing Cover will be replaced. Do you want to continue?';
    begin
        Rec.TestField("No.");
        if Rec.Cover.HasValue then
            if not Confirm(ReplaceCoverQst, true) then exit;
        if UploadIntoStream('Import', '', 'All Files (*.*)|*.*', FileName, CoverInStream) then begin
            Rec.Cover.ImportStream(CoverInStream, FileName);
            Rec.Modify(true);
        end;
    end;
}

Factbox for the image

Similar to how Item images have been implemented, you can create a factbox to show the book cover and add that to the Book Card. Using a factbox also makes it easy to keep the related actions close to the control.

page 50100 BookCoverDnStr
{
    Caption = 'Book Cover';
    DeleteAllowed = false;
    InsertAllowed = false;
    LinksAllowed = false;
    PageType = CardPart;
    SourceTable = BookDnStr;

    layout
    {
        area(content)
        {
            field(Cover; Rec.Cover)
            {
                ApplicationArea = All;
                ShowCaption = false;
                ToolTip = 'Specifies the cover art for the current book';
            }
        }
    }
    actions
    {
        area(processing)
        {
            action(ImportCoverDnStr)
            {
                ApplicationArea = All;
                Caption = 'Import';
                Image = Import;
                ToolTip = 'Import a picture file for the Book''s cover art.';

                trigger OnAction()
                begin
                    Rec.ImportCover();
                end;
            }
            action(DeleteCoverDnStr)
            {
                ApplicationArea = All;
                Caption = 'Delete';
                Enabled = DeleteEnabled;
                Image = Delete;
                ToolTip = 'Delete the cover.';

                trigger OnAction()
                begin
                    if not Confirm(DeleteImageQst) then
                        exit;
                    Clear(Rec.Cover);
                    Rec.Modify(true);
                end;
            }
        }
    }
    trigger OnAfterGetCurrRecord()
    begin
        SetEditableOnPictureActions();
    end;

    var
        DeleteImageQst: Label 'Are you sure you want to delete the cover art?';
        DeleteEnabled: Boolean;

    local procedure SetEditableOnPictureActions()
    begin
        DeleteEnabled := Rec.Cover.HasValue;
    end;
}

Add to the Page

All that is left is to add the factbox to the page where you have the import action. In this case I have a very simple Card page for the book, and the factbox is show to the side.

page 50101 BookCardDnStr
{
    Caption = 'Book Card';
    PageType = Card;
    ApplicationArea = All;
    UsageCategory = Administration;
    SourceTable = BookDnStr;

    layout
    {
        area(Content)
        {
            group(General)
            {
                field("No."; Rec."No.")
                {
                    ToolTip = 'Specifies the value of the No. field.';
                    ApplicationArea = All;
                }
                field(Title; Rec.Title)
                {
                    ToolTip = 'Specifies the value of the Title field.';
                    ApplicationArea = All;
                }
            }
        }
        area(FactBoxes)
        {
            part(BookCover; BookCoverDnStr)
            {
                ApplicationArea = All;
                SubPageLink = "No." = field("No.");
            }
        }
    }
    actions
    {
        area(Processing)
        {
            group(Book)
            {
                action(ImportCover)
                {
                    Caption = 'Import Cover Art';
                    ApplicationArea = All;
                    ToolTip = 'Executes the Import Cover action';
                    Image = Import;
                    Promoted = true;
                    PromotedCategory = Process;
                    PromotedOnly = true;

                    trigger OnAction()
                    begin
                        Rec.ImportCover();
                    end;
                }
            }
        }
    }
}

This was a fun one to figure out. Let me know in the comments if it was useful to you
How to Populate a Test Suite

You’ve spent a bunch of time developing test codeunits, and you’ve figured out how to manually pull those into a Test Suite in the Business Central test toolkit. In this post, I will show you how you can automatically populate the test suite, which is especially useful for automatically testing your app in a build pipeline.

What Are We Talking About?

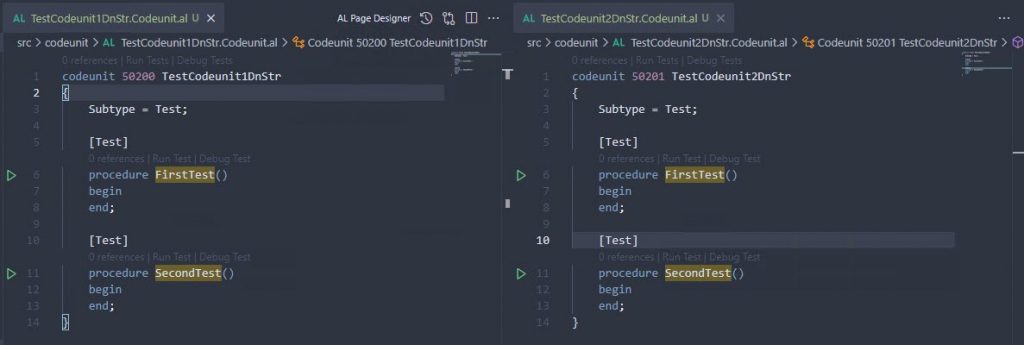
To keep the sample as simple as possible, I started with a Hello World app that I created with the “AL: Go!” command, plus a test app that has a dependency on it. In this test app, I have two test codeunits that don’t do anything. They are completely useless, just meant to show you how to get them into the test tool.

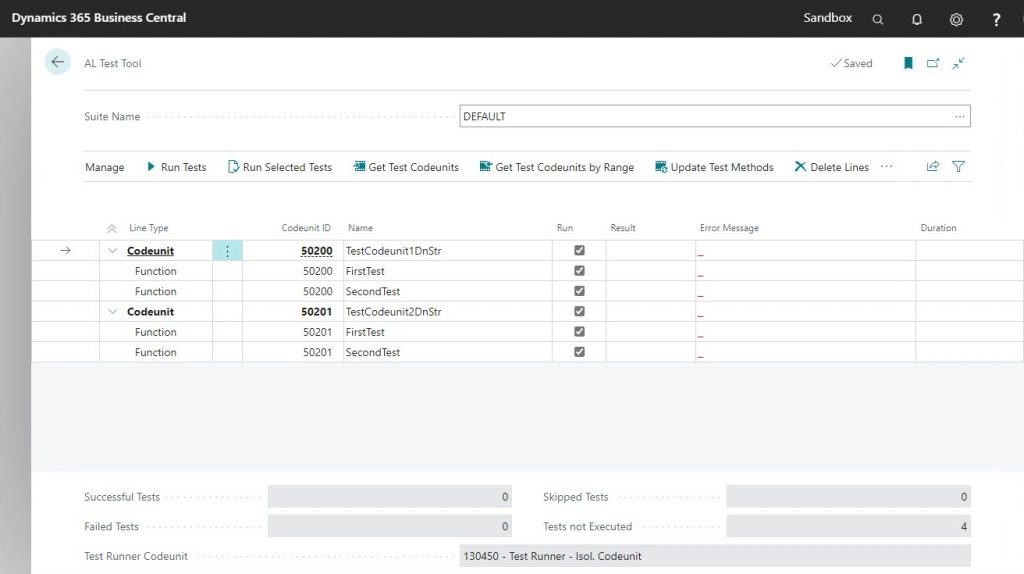
Those test codeunits are deployed into a BC container that has the test toolkit installed. This test toolkit (search for the ‘AL Test Tool’ in Alt+Q) is a UI that allows you to manually run these tests. Just like a standard BC journal page, when you first open the tool, it will create an empty record called ‘DEFAULT’ into which you must then get the test codeunits. Click on the “Get Test Codeunits” action, and only select the two useless codeunits. You should now see the codeunits and their functions in the Test Tool.

It’s kind of a drag to have to manually import the test codeunits into a Test Suite every time you modify something. To make it much easier on you, you can actually write code to do it for you. Put that code into an Install codeunit, and you never have to worry about manually creating a test suite again.

Show Me The Code!!

First we need an Install codeunit with an OnInstallAppPerCompany trigger, which is executed when the app is installed, both during an initial installation and also when performing an update or re-installation. You could probably create a separate “Initialize Test Suite” codeunit so you can run this logic in other places as well, but we are going to just write the code in our trigger directly.

The code below speaks mostly for itself. I like completely recreating the whole suite, but you can of course modify to your requirements. The important part of this example is a codeunit that Microsoft has given to us for this purpose called “Test Suite Mgt.”. This codeunit gives you several functions that you can use to make this possible.

codeunit 50202 InstallDnStr
{
    Subtype = Install;

    trigger OnInstallAppPerCompany()
    var
        TestSuite: Record "AL Test Suite";
        TestMethodLine: Record "Test Method Line";
        MyObject: Record AllObjWithCaption;
        TestSuiteMgt: Codeunit "Test Suite Mgt.";
        TestSuiteName: Code[10];
    begin
        TestSuiteName := 'SOME-NAME';

        // First, create a new Test Suite
        if TestSuite.Get(TestSuiteName) then begin
            TestSuiteMgt.DeleteAllMethods(TestSuite);
        end else begin
            TestSuiteMgt.CreateTestSuite(TestSuiteName);
            TestSuite.Get(TestSuiteName);
        end;

        // Second, pull in the test codeunits
        MyObject.SetRange("Object Type", MyObject."Object Type"::Codeunit);
        MyObject.SetFilter("Object ID", '50200..50249');
        MyObject.SetRange("Object Subtype", 'Test');
        if MyObject.FindSet() then begin
            repeat
                TestSuiteMgt.GetTestMethods(TestSuite, MyObject);
            until MyObject.Next() = 0;
        end;

        // Third, run the tests. This is of course an optional step
        TestMethodLine.SetRange("Test Suite", TestSuiteName);
        TestSuiteMgt.RunSelectedTests(TestMethodLine);
    end;
}

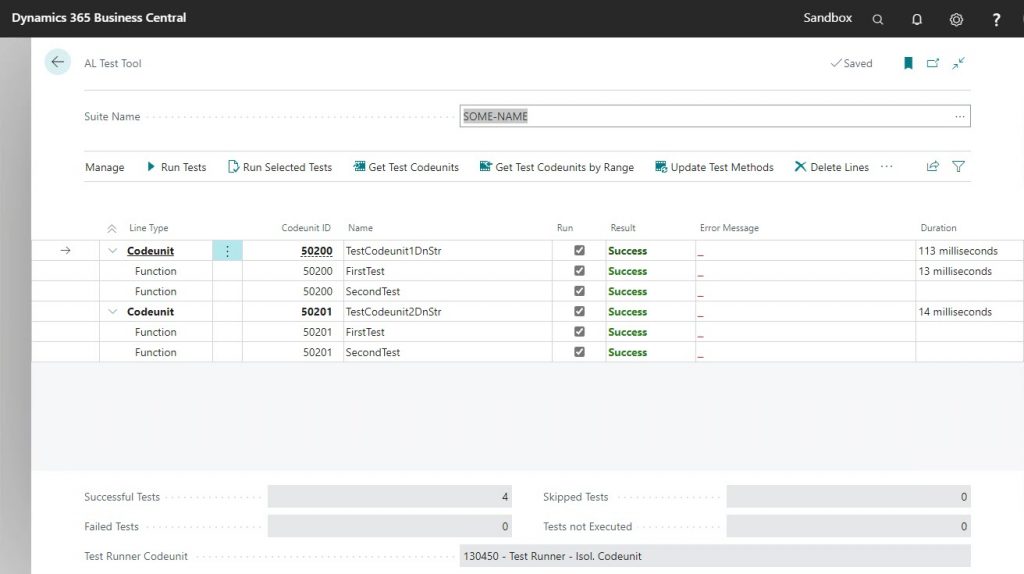
When you deploy your test app, it will now create a new Test Suite called ‘SOME-NAME’, it will pull your test codeunits with their test functions into the Test Suite, and it will execute all tests as part of the installation.

This code is very useful when you are developing the test code, because you won’t ever have to pull in any test codeunits into your test suite manually. Not only that, it will prove very useful when you start using pipelines, and you will be able to have precise control over which codeunits run at what point.

Dependencies

Here are the dependencies that I’m using :

  "dependencies": [
    {
      "id": "23de40a6-dfe8-4f80-80db-d70f83ce8caf",
      "name": "Test Runner",
      "publisher": "Microsoft",
      "version": "18.0.0.0"
    },
    {
      "id":  "5d86850b-0d76-4eca-bd7b-951ad998e997",
      "name":  "Tests-TestLibraries",
      "publisher":  "Microsoft",
      "version": "18.0.0.0"
    }
  ]

Credits

This post has been in my drafts for a while now, based on a question I posted to my Twitter, click on the Twee below to see the replies. The code in this post was copied almost verbatim from Krzysztof’s repo, he has a link in one of the replies. I had worked out my own example based on his code but I lost that when I had to clean up my VM’s.