PowerShell in Task Scheduler

One of the programs on my computer creates a shortcut on my desktop every time I restart my computer. As people who know me can attest, I am a little compulsive about certain things, and having anything on my computer’s desktop is one of them. The program in question does not have an option to disable this thing, so someone suggested to me to use Task Scheduler to remove the shortcut. Since I’ve been using PowerShell a lot, I thought I’d try that.

The PowerShell Script

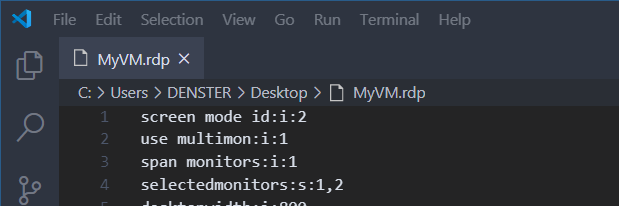
First, you need a script to execute the task at hand. In my case I needed to remove the shortcut from my desktop. After searching for a while, I found it in the Users folder. Create a new PowerShell file in the ISE and write this script:

$MyFile = "C:\Users\<UserName>\Desktop\<TheShortCutYouMustDelete>.lnk"

if (Test-Path $MyFile) 
    {
        Remove-Item $MyFile -Force
    } 

Obviously, you replace <UserName> with your user name, and the name for the shortcut. I’m sure you can even replace the folder with an environment variable. Save this script as a .ps1 file and put it in a folder, like your documents folder. I called mine RemoveShortcut.ps1 and put it in the folder “C:\Users\DENSTER\Documents\”.

For me, this was a need of the moment, because this program was stubbornly creating this shortcut. You can use PowerShell for a million different things, so anything you can do with PowerShell you can put in the Task Scheduler.

Update July 24, 2020 – Based on a conversation with @steveendow on Twitter the other day, automatically updating NavContainerHelper would be a good example. I had already written most of this post (started it back in June) and was about to add the update as a second example before publishing it when Steve created his version of this same post himself. I actually gave him the update script that he used, and I suggested using the Task Scheduler, so I don’t feel too bad for this redundant post, and it saves me from having to test the NavContainerHelper update script in the scheduler :).

Task Scheduler

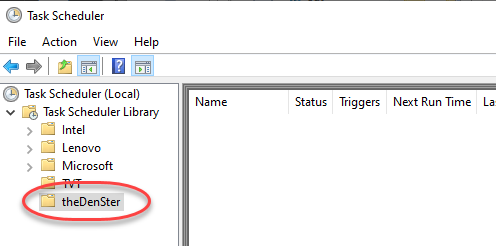
Next, you need to create a task in the Windows Task Scheduler. Hit the Start button and type ‘task scheduler’, and the app will come up. When the Task Scheduler opens, you’ll see the “Task Scheduler Library”. To make it easier on yourself, create a new folder by right clicking on the Library node and then clicking “New Folder”. Enter a name and hit Enter. This creates a folder where you can save your own tasks. Trust me, it is VERY easy to lose tasks in the standard folders. Having your own folder is going to save you a ton of time.

My new folder “theDenSter”

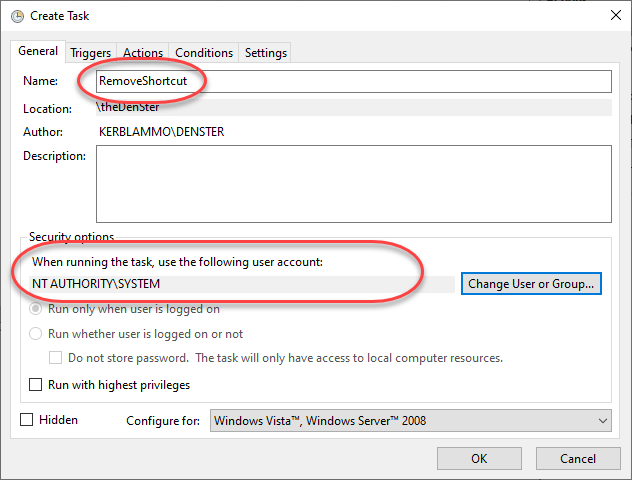
To create a new task, right click your new folder and select ‘Create Task’. Give it a name and then select the SYSTEM account under security options. You can leave it under your own account, but then you will see PowerShell pop up and run as you are using the computer. Selecting the SYSTEM account makes it so that it happens in the background.

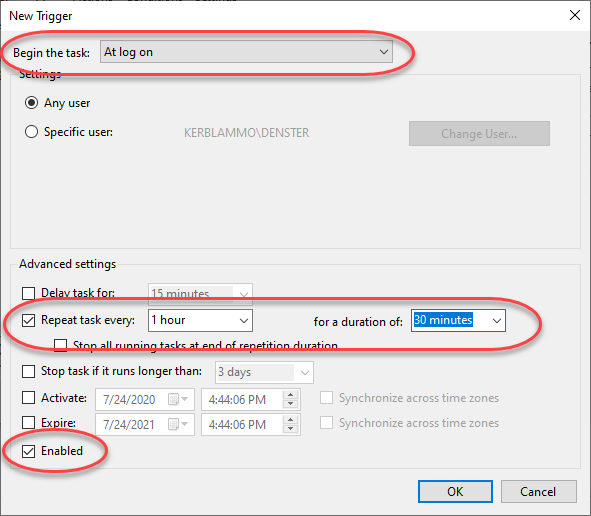
You need a trigger to execute the task. I chose to run it at log on, and I set the task to repeat every 5 minutes for 30 minutes. The reason I did that is because the program that created the shortcut sometimes took a while to create the shortcut, and running my script just once did not always remove it right away, so I had to repeat it a few times. Take a look at all the available triggers and select the one that makes sense to you. Make sure that the trigger is enabled.

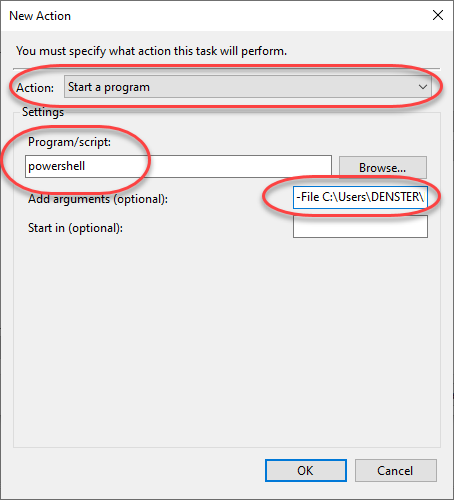
Now the meat of the task: the action. We are going to run the PowerShell script, so select ‘Start a program’ and enter ‘powershell’ in the “Program/script” box. The file name goes into the “Add arguments” box:

-File "C:\Users\DENSTER\Documents\RemoveShortcut.ps1"

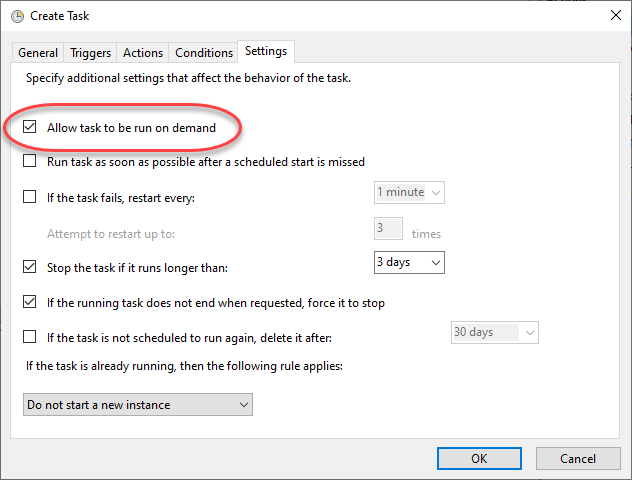
If you want to be able to manually execute the task, you have to check the box for “Allow task to be run on demand” on the Settings tab. This way you can run the task at any time right from the Task Scheduler.

That’s it. Hope this is useful for you. I had not thought of using the Task Scheduler, but it feels like I could automate a bunch of things. It’s nice to have the ability, let me know if you use the Task Scheduler, and what you use it for.

Span Some (but not all) Monitors

If you use multiple monitors, and you would love to span your RDP session or your Hyper-V session across some, but not all, monitors, then this is the post for you. Say you have three monitors, I will tell explain how you can span your RDP/VM across two of those monitors, while still using the software that runs on the host on the remaining monitor.

Why I Wanted to Know This

My desk has my laptop on a stand on the left side, plus two external monitors to the right of the laptop. The first external monitor is my primary work screen, so it is positioned right in the middle of my desk. I think of the middle screen as “screen 1” and the one on the right as “screen 2”. My laptop screen is just ‘my laptop screen’ :).

My screen setup. Note that the laptop screen shows a third of a fantastic looking multi-screen spacescape, mostly hidden by my 2 screen spanning RDP session into my VM on the two external monitors ‘screen 1’ and ‘screen 2’

For my daily development work, I use Hyper-V virtual machines, and I used to full screen it either on screen 1 or 2, depending on what I was doing. Doing development I’d have my VM full on screen 1, and other supporting programs on the host on screen 2. Writing documentation, I’d have the VM full on screen 2 and Word on screen 1, and then I’d use Snagit for taking screenshots.

When I started including documentation (in markdown files) into my source code, it became difficult to work on documentation, because I would want to take screenshots of the app, and then incorporate it into the markdown file. I would have to switch between VSCode and the app inside the VM, switch to the host to activate Snagit, and then switch back to the VM to process the screenshot in the documentation. Very tedious situation with lots of clicks. I did try to use ‘all monitors’ in the Hyper-V connector, but then it would be difficult to take proper screenshots because I only had Snagit installed on the host. I’d have to minimize the VM, start the Snagit screenshot with delay, re-activate the VM and hope that it would be back up in time for me to take the screenshot.

So, then I thought it would be nice if I could span my VM across just 2 of my 3 screens. I could have VSCode on screen 1, the app on screen 2 (both inside the VM), and Snagit on the host on the laptop. Kudos go to Martin, one of the IT leaders at one of my clients, for teaching me how to do this for RDP. Although the Hyper-V connection uses RDP technology, there does not seem to be a way to do the same thing for Hyper-V – it’s either only 1 monitor, or all monitors. “No problem”, Martin said, “you can use RDP to connect to your VM”, and he showed me how to make that work as well. Let me share this useful nugget with you.

RDP Into your VM

First you need to make sure that your VM is set up to accept remote connections. This section explains how to do that for Windows Server 2019, which is what I use in my VMs.

Inside the VM:

  • Click Start and open Settings
  • Go to the “Remote Desktop” page, and turn on Enable Remote Desktop
  • While you are in this settings screen, note the name of your VM. You’ll use this to create an rdp file for each of your VMs

Back on the host – open Hyper-V Manager and select your VM. At the bottom, you will see a screen part with three tabs. In the Networking tab, it shows the IP address of your VM. Be aware that this IP address can change without any clear indication when or why. Hyper-V Manager will go long times using the same IP address when restarting the same VM, and all of a sudden it will change it.

Now open Remote Desktop Connection, and expand the options. I used to use the VM’s IP address as the name, but because Hyper-V changes the IP pretty much every time that the host computer reboots, I was constantly updating the rdp file. Then I discovered that you can also enter the VM’s computer name into the name box. Now click on ‘Save As’ and save the rdp file with the VM name in a folder that is convenient for you; mine are in ‘My Documents’.

Very cool, congratulations, you are now using RDP to connect to your VM.

X of Y Monitors in RDP

The rdp file is nothing more than a text file with key-value pairs. We are going to edit this file using notepad, and add some screen properties. Feel free to use any other text editor. You can even open it with VSCode if you want.

You need the following settings in the rdp file:

  • screen mode id:i:2 – Determines whether the session is opened in full screen, and the value 2 stands for ‘full screen’. I tried leaving this out and for fun tried to use the laptop monitor and screen 1 at the same time, and that did not work well for me. It seems that this only works when the screens have the same resolution capabilities.
  • span monitors:i:1 – I think this is a boolean parameter – 1 means on
  • use multimon:i:1 – Same here, I think this is a boolean so 1 for on
  • selectedmonitors:s:1,2 – The monitor index is specific to the hardware. To get the numbers, run “mstsc.exe /l” from a command prompt. On one computer, this was 1 and 2 for me. My monitors are connected through a USB-C dock, and when I connected a new computer to the same dock, this no longer worked for me. Same monitors, same dock, different computer gave me screen indexes 3 and 4.
The ‘MyVM.rdp’ file in Visual Studio Code, showing the relevant screen properties

If you’re interested, here is where you can read more about rdp properties.

Now, instead of opening the VM through the Hyper-V Connection Manager, just double click the rdp file and it will connect. You should now see the desktop across the monitors that you defined in your rdp file. If you take a closer look at the image above, you can see that it shows an RDP session spanning my ‘screen 1’ and ‘screen 2’ monitors, with my laptop showing the host.

One other thing that is very convenient is that RDP remembers all the connections you make. If you pin RDP to the taskbar, you can right-click it and select which connection you want to use. I have rdp files for each of my VM’s. All I have to do is start the VM, select the right one in RDP, and it connects on two of my three screens.

Great Improvement

For me this was a really big improvement for my workflow. I used to have to maximize, minimize, switch between VM and host, and it was just distracting to me. Now I can have Outlook, Spotify, and Snagit all visible to my left, and have the real estate of two full monitors to work on whatever I want to run inside the VM, all at the same. The most I need to do is click on my host desktop to make my Snagit keyboard shortcut work.

Personally I do most of my development work in my local VMs, but this would also work for regular RDP sessions. This gives you total control over the screens that you want to use.

Hope this helps you, let me know in the comments or send me a message on Twitter.

Bye Bye WITH

This past week there was a PGI for the MVP’s about something that the Business Central team is preparing for, and they were asking the MVP’s for their feedback. The topic was their plan to discontinue the WITH statement from the AL language. For me personally this is not a big deal, because I’ve always hated using WITH, especially when it spans more than a page of code. I get distracted very easily, and I lose track of which variable these fields apply to. As a result, I’ve always tried to write code and mention variable names explicitly.

As you can imagine, emotions run high about this one, especially with people who like to get upset about stuff. I won’t point to specific instances of this because I don’t like to call people out and get them even more upset. I just want to share some details with you.

There is no ‘official announcement’ but Esben replied to an issue in the AL repo on github here. Microsoft put together a virtual event and created a bunch of videos where they present a lot of content about Business Central here: https://aka.ms/virtual/businesscentral/2020RW1. The details about why they are getting rid of WITH are in the “Interfaces and extensibility” video, which you can find under the Developer track in the Library.

Good Reason

Microsoft is not just implementing this change because they like making our lives difficult. There are some very serious problems related to the WITH statement, especially surrounding dependencies between apps. There are two types of WITH statements:

  • Explicit WITH – this is when you see the keyword ‘with’ in your AL code, and it is meant to make it so that you don’t have to repeat the variable name. Very handy if you want to set a bunch of field values, let’s say in a Customer record variable, you can type ‘with Customer do begin’ and now you can access fields directly without having to type the variable name for each one of them
  • Implicit WITH – this is when a record is implied, like on page objects or in a report dataitem. You can simply type field names, and its record is implied because of where the code is written. By the way, it looks like for now they are letting us keep the implicit WITH (meaning we won’t have to type out ‘Rec’) in table and tableextension objects.

Let’s say you add a procedure called ‘IsImportant’ to a codeunit in which you have a WITH statement, or to a page (doesn’t matter which table the page shows). You call the IsImportant procedure to run some business logic. Everything works great.

The problem occurs when Microsoft then adds a field or a procedure with the same name. Let’s say your IsImportant function does something in some logic about the Vendor table. If Microsoft now adds a field called IsImportant, there is an ambiguity about what this refers to. In your code, it will never reach the Vendor table, because it will find the function in your object before it gets to the Vendor table. Or vice versa, depending on how the code is written and what the scope is at that time. The presentation that I mentioned before will have a bunch of examples to explain, so come back in a few days and I will add a link to the recording to this post.

Not leaving us hanging

One thing to remember is that Microsoft is NOT going to just throw this out at us and leave us high and dry, without any help in fixing this. One of the people on the call had already done some investigating, and figured out that he will have to fix this in 21,000 places in a variety of apps for his customers. This is a LOT of work, and we all need some time to process this.

Some things to remember:

  • This is currently in preview in the AL insider build, and the target is the next major version of the AL language
  • At that time, these will still not be errors, but warnings. The statement will not actually go away until 2021. I can’t find in my notes if it will be wave 1 or 2, but at the earliest this will be spring 2021
  • You will not have to go searching for them yourself, the code analyzer will show you exactly where they are
  • Microsoft is working on tools to help us. The proof of concept that was shown to us was a first version where you have to open each page object and click on the tool and it will fix the implicit WITH on the whole page for you
  • There was also a tool to fix an explicit WITH in code. Both of these tools were still first versions, but they worked and looked like they were easy to use
  • There were already some discussions about options on maybe creating some external tools that utilize these tools. We have a wonderful community of people that are creating AL tools, and I am pretty sure that by the time this becomes really important (meaning by the time you can’t postpone this any longer) we will have really handy tools that will make this a piece of cake

Start NOW

You could include the rule in your ruleset.json file (it’s rule AL0606 for explicit WITH and AL0604 for implicit WITH) and completely ignore the issue. You would be doing yourself a disservice though. I would recommend that you stop using WITH immediately, and start fixing it in every object that you touch from now on, at the very least the explicit WITH. I might wait fixing implicit WITH statements on page objects until there is a more user friendly version of the tool, but I am absolutely going to try and see how much work it actually is.

If it’s one of those point/click fixes and it takes no effort at all, I can totally see myself just whip out 4-5 pages at a time while a container is rebuilding. If you have a ton of customers with a ton of customizations then yes it could be a big task, and you might want to wait until there is a better tool to help you through.

This is one of those things that you can’t postpone forever, you will have to address it at some point. I don’t like having to “fix” something like this either, but there are more important things in this world right now, I just can’t get upset about it.