If you use multiple monitors, and you would love to span your RDP session or your Hyper-V session across some, but not all, monitors, then this is the post for you. Say you have three monitors, I will tell explain how you can span your RDP/VM across two of those monitors, while still using the software that runs on the host on the remaining monitor.
Why I Wanted to Know This
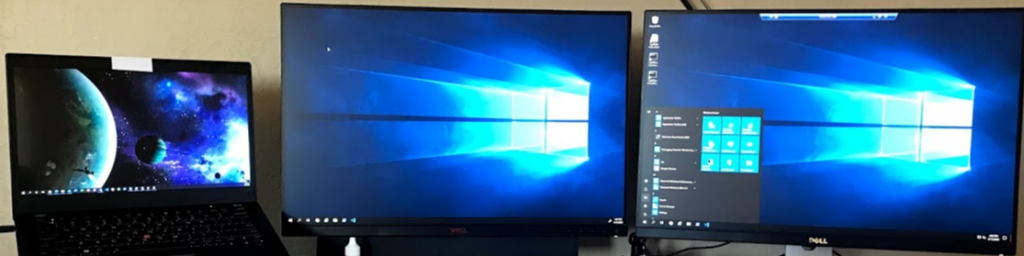
My desk has my laptop on a stand on the left side, plus two external monitors to the right of the laptop. The first external monitor is my primary work screen, so it is positioned right in the middle of my desk. I think of the middle screen as “screen 1” and the one on the right as “screen 2”. My laptop screen is just ‘my laptop screen’ :).
For my daily development work, I use Hyper-V virtual machines, and I used to full screen it either on screen 1 or 2, depending on what I was doing. Doing development I’d have my VM full on screen 1, and other supporting programs on the host on screen 2. Writing documentation, I’d have the VM full on screen 2 and Word on screen 1, and then I’d use Snagit for taking screenshots.
When I started including documentation (in markdown files) into my source code, it became difficult to work on documentation, because I would want to take screenshots of the app, and then incorporate it into the markdown file. I would have to switch between VSCode and the app inside the VM, switch to the host to activate Snagit, and then switch back to the VM to process the screenshot in the documentation. Very tedious situation with lots of clicks. I did try to use ‘all monitors’ in the Hyper-V connector, but then it would be difficult to take proper screenshots because I only had Snagit installed on the host. I’d have to minimize the VM, start the Snagit screenshot with delay, re-activate the VM and hope that it would be back up in time for me to take the screenshot.
So, then I thought it would be nice if I could span my VM across just 2 of my 3 screens. I could have VSCode on screen 1, the app on screen 2 (both inside the VM), and Snagit on the host on the laptop. Kudos go to Martin, one of the IT leaders at one of my clients, for teaching me how to do this for RDP. Although the Hyper-V connection uses RDP technology, there does not seem to be a way to do the same thing for Hyper-V – it’s either only 1 monitor, or all monitors. “No problem”, Martin said, “you can use RDP to connect to your VM”, and he showed me how to make that work as well. Let me share this useful nugget with you.
RDP Into your VM
First you need to make sure that your VM is set up to accept remote connections. This section explains how to do that for Windows Server 2019, which is what I use in my VMs.
Inside the VM:
- Click Start and open Settings
- Go to the “Remote Desktop” page, and turn on Enable Remote Desktop
- While you are in this settings screen, note the name of your VM. You’ll use this to create an rdp file for each of your VMs
Back on the host – open Hyper-V Manager and select your VM. At the bottom, you will see a screen part with three tabs. In the Networking tab, it shows the IP address of your VM. Be aware that this IP address can change without any clear indication when or why. Hyper-V Manager will go long times using the same IP address when restarting the same VM, and all of a sudden it will change it.
Now open Remote Desktop Connection, and expand the options. I used to use the VM’s IP address as the name, but because Hyper-V changes the IP pretty much every time that the host computer reboots, I was constantly updating the rdp file. Then I discovered that you can also enter the VM’s computer name into the name box. Now click on ‘Save As’ and save the rdp file with the VM name in a folder that is convenient for you; mine are in ‘My Documents’.
Very cool, congratulations, you are now using RDP to connect to your VM.
X of Y Monitors in RDP
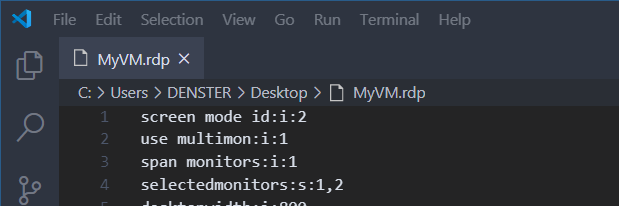
The rdp file is nothing more than a text file with key-value pairs. We are going to edit this file using notepad, and add some screen properties. Feel free to use any other text editor. You can even open it with VSCode if you want.
You need the following settings in the rdp file:
- screen mode id:i:2 – Determines whether the session is opened in full screen, and the value 2 stands for ‘full screen’. I tried leaving this out and for fun tried to use the laptop monitor and screen 1 at the same time, and that did not work well for me. It seems that this only works when the screens have the same resolution capabilities.
- span monitors:i:1 – I think this is a boolean parameter – 1 means on
- use multimon:i:1 – Same here, I think this is a boolean so 1 for on
- selectedmonitors:s:1,2 – The monitor index is specific to the hardware. To get the numbers, run “mstsc.exe /l” from a command prompt. On one computer, this was 1 and 2 for me. My monitors are connected through a USB-C dock, and when I connected a new computer to the same dock, this no longer worked for me. Same monitors, same dock, different computer gave me screen indexes 3 and 4.
If you’re interested, here is where you can read more about rdp properties.
Now, instead of opening the VM through the Hyper-V Connection Manager, just double click the rdp file and it will connect. You should now see the desktop across the monitors that you defined in your rdp file. If you take a closer look at the image above, you can see that it shows an RDP session spanning my ‘screen 1’ and ‘screen 2’ monitors, with my laptop showing the host.
One other thing that is very convenient is that RDP remembers all the connections you make. If you pin RDP to the taskbar, you can right-click it and select which connection you want to use. I have rdp files for each of my VM’s. All I have to do is start the VM, select the right one in RDP, and it connects on two of my three screens.
Great Improvement
For me this was a really big improvement for my workflow. I used to have to maximize, minimize, switch between VM and host, and it was just distracting to me. Now I can have Outlook, Spotify, and Snagit all visible to my left, and have the real estate of two full monitors to work on whatever I want to run inside the VM, all at the same. The most I need to do is click on my host desktop to make my Snagit keyboard shortcut work.
Personally I do most of my development work in my local VMs, but this would also work for regular RDP sessions. This gives you total control over the screens that you want to use.
Hope this helps you, let me know in the comments or send me a message on Twitter.