One of my clients asked me if I would be able to help them with an ‘upgrade’ of an add-on for Dynamics NAV for one of their customers. For this task I would have to get a working C/SIDE in a number of versions. It’s been years since I’ve done any C/AL development, and I thought this would be a cool task to work on. This post describes what I found is what does and does not work if you want to do this using Docker containers.
Background
Just to paint a picture… First of all, the end user is on NAV2017. They had an older version of this add-on, which was developed on NAV2013. The task at hand was to implement a newer version of the add-on, which was developed in NAV2018. Technically, this was a downgrade of the add-on objects so I had to be careful to avoid any incompatible object attributes. I won’t bore you with the details of the actual ‘upgrade’, nobody wants to read about those.
The Environments
To be able to identify the mods of the original add-on, I needed a C/SIDE environment for NAV2013R2. Since this version is not available in containers, I had to actually install this version.
The end user is on NAV2017, and the ‘new’ version of the add-on is in NAV2018. Both of these versions are available in containers, and supposedly all you need to do is put together the correct artifact URL. You can find this information on Freddy’s blog. Mind you though, the localization for the US is called ‘na’ in NAV, not ‘us’ like in BC.
How about Docker?
what does and does not work? This, to me, is a pragmatic problem. I spent quite some time trying to make NAV2017 and 2018 work in containers, because I have used them successfully in the past. I have a terrible memory though, so I always start from scratch, and what I could find was outdated. At some point I just started the NAV2017 DVD download as I was researching a problem. The d/l completed before I found the answer so I abandoned the container idea for NAV2017 and just installed it. I have plenty of VMs available to do this so one way or another, I’ll get a working instance.
After going through a bunch of troubleshooting and following obsolete download links, I was able to make the NAV 2018 container work. Freddy wrote about troubleshooting here, but not all links still work. You have to enable .NET framework 3.5 and 4 in the Windows features, you need Visual C++ redistributable for Visual Studio 2015 (“The program can’t start because MSVCP120.dll is missing”), and you have to get working SQL bits (weird – the Windows client did work but C/SIDE did not until I installed those). What made the ODBC errors go away for me is the SQL Server 2012 Native Client. The SQL link in Freddy’s blog did not work for me.
I could not get NAV2017 to work at all, it would not even start. As I said I got the DVD to download before figuring out the problem and I installed it from there. It’s not like I have NAV2017 clients lining up, so I did not want to spend a second more than I had to on this.
Lesson Learned
So in the end I ended up installing NAV2013R2 and NAV2017, and was able to get a NAV2018 container up and running. The lesson learned though? I bet it is still possible to get the NAV2017 container to run right, but just as a safety I have downloaded all versions of the DVD going back to NAV 5.0. To Microsoft’s credit, they still have most of those as downloads, but you never know when they will remove them.
This post is mostly for my own benefit, but I wanted to share it if anyone out there also needs these. Let me know in the comments how you’ve made NAV and C/SIDE work in containers.
Use the Docker VSCode extension to browse files in your container
If you struggle using the command prompt to figure out where the files are in your Docker container, this post is for you. I will show you how easy it is to actually browse around the files inside your container.
The Struggle is Real
The first time that I sat behind a PC was in high school in the early 80s. At the time, the only way to ‘communicate’ with your computer was through a DOS prompt. If you were REALLY fancy, you had a .bat file that provided a menu, and you had to type the number and then hit enter to execute what was behind the number. We read how to do the cool things in paper magazines, because the only other resource was books at the library.
The command prompt was not my favorite, and I never really got into computers as much as you’d expect. Not until years later did I find myself working ‘in computers’, and at that time I tried to stick to GUI based tools. For some reason, CLE based tools are back in vogue (or I’m just recently discovering that this is where it’s at) and I find myself struggling to navigate. I kind of know how it works, but it’s difficult for me to keep straight where I am and where the connections are.
Finding Files in my Container
Up until now, the only way that I know of to find files inside a Docker container is to use the command prompt. Using the BCContainerHelper module, you can connect to the container by using the Enter-BCContainer <ContainerName> command. You can tell by the prompt when you are in the container.
The container has its own file system, with folders, just like your host computer. To make things easy, there are two Very Important Folders:
The ‘C:\run\my’ folder in the container is mapped to the ‘C:\ProgramData\BcContainerHelper\Extensions\<ContainerName>\my’ folder. This means that the files in those folders are shared by the host and the container, but the path in the container is NOT the same as the path on the host
NOTE: this is a container specific folder, so anything that you put into this folder will be deleted when you destroy the container
The ‘C:\programdata\bccontainerhelper’ folder is mapped to the same folder on the host. This means that the folder is also shared between the host and the container, PLUS the path is the same in both contexts
NOTE: As long as you have BcContainerHelper installed, any files (and additional folders) that you put into this folder will remain there, even when you remove containers. This is a perfect folder for sharing purposes.
This is important to understand, because you will probably use PowerShell scripts to do all sorts of things with containers, and you will need to read and/or write files to folders within the proper context.
A Better Way
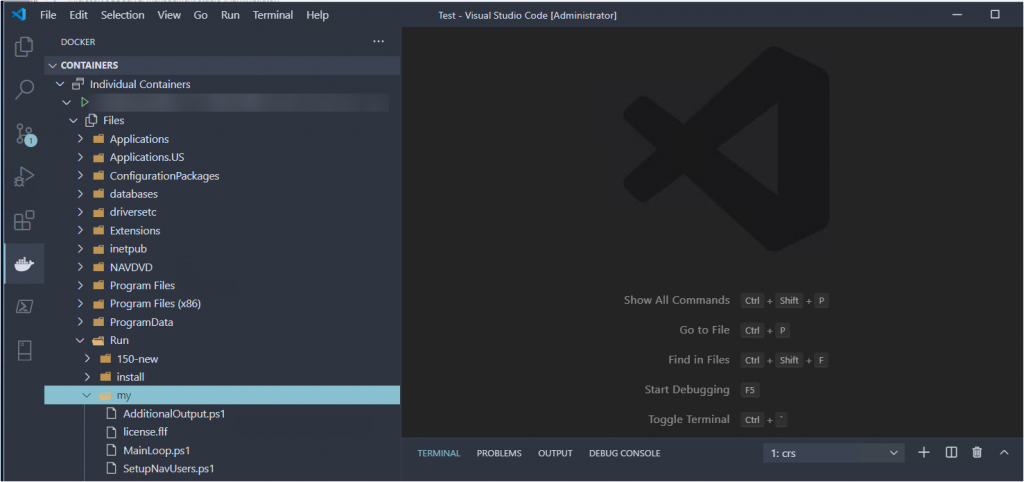
The Docker extension for VSCode was updated this week, and it has a new feature that enables you to browse the files from inside VSCode.
This shot shows the folder structure inside my container
For me, this is a MUCH better way, because I find it very hard to keep track of where I am in the folder structure, and this gives me a bit more context. What I am missing is an easy way to tell which folders are shared, and what the path on the host is.
If you don’t have the Docker extension for VSCode yet, you can find it here. You can also search for it in the VSCode marketplace.
Learn how to use SQL Server to access the databases in your Docker container
This post is for you if you want to be able to access the SQL Server database inside your Docker container, without having to write the query.
For one of my projects, I needed to be able to see the apps that were uninstalled but still had their schema in the tenant database. That information is in the $ndo$navappuninstalledapp table, and with SQL Server Management Studio (SSMS) it is super easy to look at table data. In my container I assumed that I would have to figure out a way to write the actual query (something I am not very good at). As it turns out, I was wrong. In this post I will explain two very easy ways to access the SQL Server database inside your Docker container.
SQL Server Management Studio
The first, most obvious, option is to do a complete install of SQL Server in whatever edition you have access to. If you want to keep things lean though, you can also install a standalone SSMS. You can download SQL Server Management Studio here.
Connecting to a Docker container could not be easier. In the connection dialog, simply enter the name of your container as the server name, and SSMS will connect to it for you. I always use NavUserPassword authentication in my containers, and by default your container password will also work as the sa password inside the container.
My container is called ‘densterdev’, and you can see the default app and tenant databases inside the container.
All I needed to do was look at some table data, and that works just fine. I did not try to do anything more advanced than that.
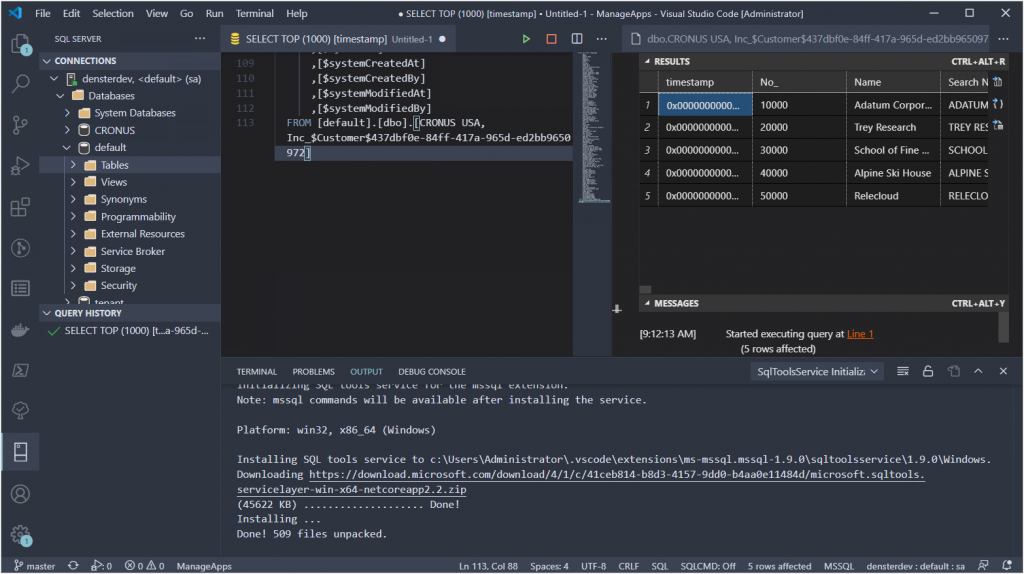
SQL Server Extension in VSCode
The second option is even easier than installing SSMS, because you are already using VSCode to do your AL development. Microsoft has created a ‘SQL Server’ extension, which works very similar to SSMS. In the extensions search box in VSCode, type ‘SQL’ and select the one made by Microsoft.
After installing you may need to reload VSCode to enable the extension. You will see a new tab on the left navigation pane that will show you the tooltip ‘SQL Server’ when you hover over it. When you click this tab, you will see a heading that says ‘Connections’ at the top, with a + sign next to it. Click this + and follow the prompts. Just like SSMS, you enter the container name as the server name, and it should connect to it with no problem.
The same app and tenant databases are shown inside VSCode
I still did not need to do anything more complex than looking at some data, so I really can’t say what features are available beyond that. My guess is that it is less capable than SSMS, so this may not be an option if you need more advanced capabilities.
Containers are now multi-tenant by default. The New-NavContainer Cmdlet has had a “-multitenant” parameter for a while now, it’s just that not specifying a value for this parameter now means that you get a multi-tenant container. Presumably this is because multi-tenancy is the default for SaaS, and should be for everything. Maybe this was implemented with the switch from NavContainerHelper to BcContainerHelper and I just didn’t pay attention to the details.
The way that I discovered this was that I was working on a training about the BC API, and I had learned that to get to the tenant, you specify it by its ID in the endpoint, like this: https://container:7048/BC/v2.0/[tenant]/[environment]/api/v1.0
Adding “?tenant=default” worked but I was curious whether including the tenantId in the URL was supposed to work in containers. Hint: it is NOT supposed to work that way, at least not based on the replies that I got from Twitter
As I was working through these issues I had created a new container, and instead of removing it, I had set the -multitenant parameter to true and didn’t think of it again until I was working on another project. New container, different script, this time without the -multitenant parameter.
To make a long story short…. I was expecting my container NOT to be multi-tenant, and was annoyed to see that my Postman scripts (the version without specifying the tenant) did not work anymore. It took me WAY too long to discover what the issue was, but there you have it 🙂
Quick post today to point out some new posts by Freddy about a change that he’s made to the container logic in his PowerShell module to switch from downloading images to getting the artifacts and assemble images on the fly. I’ll just link to his blog and kind of summarize. The implications for us Docker consumers, as it turned out, was so small that it was almost uneventful.
Background
Until recently, the process to create a container involved downloading a fully prepared image of that container. This was very easy: download the image, create the container. The problem lies with the sheer number of images that had to be prepared for each situation. Are you on Windows Server 2016? 2019? Which build? Which version of NAV? Which localization? Business Central OnPrem or Sandbox? All in all, to accommodate the entire community, there were hundreds if not thousands of images just to create these containers.
So, to cut down on the sheer volume of those images, we now have what is called Artifacts. Instead of a full image, you download a set of instructions to fetch and build a local image yourself, which is layered with a bunch of components. There are a few common building blocks for the generic image and SQL Server and other such components, and then there are the pieces that we need to prepare the NST, the database, the localization, etcetera.
Instead of having hundreds of images with the same common elements, each common element is a separate download that can be re-used for all images that need it. I’ll leave it to Freddy to explain the details.
What Changes For You?
When I first became aware of this change, I was very skeptical and concerned. I’ve been having some pretty persistent and annoying issues with Docker, and I had visions of it all crapping out on me with this change.
The actual change itself is not very big. Instead of specifying the image name, you specify an artifact URL (the ImageName parameter still exists, and it serves a very useful purpose, but it’s no longer necessary to create a new container). The script then does its work, just like it has before. I made the change, ran the script, and it just created the container without any problem. My containers are usually very straightforward (most of the time I just need the latest US sandbox) and I have had a grand total of zero problems with this particular change.
Posts on the Artifacts
So far, Freddy wrote 5 posts about this change:
The first hint was in this post, in which he announces the move from preparing full images to artifacts
The 5th one explains how to customize the generic image, pretty advanced stuff that I don’t see myself using any time soon, but with artifacts this is possible
Just today, the last full image for OnPrem was uploaded. As it seems, artifacts are here to stay. Lucky for us, this particular change to NavContainerHelper has been seamless, at least for me. My New-NavContainer scripts still work, and I’ve had zero problems with the resulting containers, at least none that are related to Artifacts.
How to get started with modifying the Base Application using Docker
Many partners are still focused on doing custom development for their customers with their one-off implementations. MANY of those customers are existing customers with existing NAV systems with existing customized objects. As much as everyone wants to go to extensions only, and most partners see the need and are more than willing to make the necessary changes, the reality is that many of these existing customers do not want to pay for migrating all of their custom modifications. This reality comes with the need to modify the base app. Since C/SIDE is no longer available, the only way to do this is to use VSCode. This post will explain how you can create a Docker container, and use that container to do modifications on the Base Application.
To get started, click here to read the article on docs.microsoft.com. I say ‘get started’ because it was not enough to get me all the way there, which is the reason why I wrote this post. This article seems to have been written for an actual installation from the product DVD, and there were some additional things you need to know to make it all work if you want to use Docker. At least, that is per the date of this post, because things may change :). I’ll try to revisit this post if it does change.
Alright, so to make this work, you need a few things:
A Docker container that is based on the latest Business Central Docker image.
Configure the Service Tier in the container
Extract the objects from the container into a new AL workspace
Uninstall and Unpublish the Base Application and its dependencies
Create a new Container
For Business Central development I always use the NavContainerHelper module, so before you use any of the commands in this post, update your module:
Update-Module navcontainerhelper
To get the latest Docker image for Business Central I will be using the ‘mcr.microsoft.com/businesscentral/onprem:na-ltsc2019’ image. You can leave the ‘ltsc2019’ part out if you are not sure about the host OS or if you are on Windows Server 2016. You can substitute ‘na’ for your own localization, or leave that tag out altogether if you want to be on the W1 version. To read about which image to use, visit Freddy’s blog here and follow the links to what you need to know. Here is the script that I used to create my container:
I use the ‘-alwaysPull’ switch to make sure that I always have the latest version of the Docker image. The ‘-includeAL’ switch is necessary to include references to the DotNet assemblies in the Docker container. The ‘-additionalParameters’ switch (h/t @tobiasfenster) is used to set the ExtensionAllowedTargetLevel property to ‘OnPrem’. I’ll explain how to set this with a simple PowerShell Cmdlet in a minute.
One more important switch is the ‘-useCleanDatabase’ switch, which can be used to uninstall and unpublish the Base Application and its dependencies, as I will discuss in a little bit. At this point, you have a vanilla Docker container with the latest on premises version of Business Central.
Configure the Service Tier
As the Doc states, there are three things you need to set. It is not very clear exactly how to do that, and not at all how that works on Docker, so let me just explain from scratch.
First, you need to know how to look at, and modify, the Service Tier settings inside the container. Some of these types of commands are available in the navcontainerhelper module, but some of them are not. I did find a Cmdlet to see the settings, but I could not find one to actually modify them. So, to cover all of it, I will show you how you can connect to the container and run regular BC PowerShell Cmdlets from inside the container.
Open a PowerShell ISE window as administrator, and run the commands in the screenshot
Our container name is ‘mysandbox’, and you connect to it by using the ‘Enter-BCContainer’ Cmdlet. You can see how the prompt changes to show you that you are inside the container. At this stage, the navcontainerhelper does not work, so you will have to use the regular BC PowerShell Cmdlets. The next Cmdlet shows you all the properties of the Service Tier that runs inside your container, which in this version of Business Central is called ‘BC’.
According to the Doc, the following settings are important. I am using the names that are used in PowerShell rather than the names in the Doc.
ExtensionAllowedTargetLevel should be set to ‘OnPrem’, although it seems that the value ‘Internal’ also works.
DeveloperServicesEnabled should be set to true. This should be the default value of this particular setting
There is also a mention of the EnableSymbolLoadingAtServerStartup property in the Doc, but I’ve received confirmation (h/t @freddydk) that this property was meant for hybrid C/AL and AL environments, so that is not needed anymore for BC 2019 wave 2
To modify these settings, use the following PowerShell command
Set-NAVServerConfiguration `
      -ServerInstance BC `
      -KeyName ExtensionAllowedTargetLevel `
      -KeyValue OnPrem
After modifying those settings, restart the service tier using the ‘Restart-NAVServerInstance -ServerInstance BC’ command. At that point, the service tier in your container should be configured for doing on premises development. The next thing you need to do is get the application objects out of the container.
Create AL Workspace from Base App
This step is easy, using a navcontainerhelper Cmdlet, so you need to first exit the container (type ‘exit’ and then enter). Then, run this Cmdlet:
One thing to note here is that the ‘-useBaseAppProperties’ switch uses the properties from the container. You will end up with a fully functioning AL workspace, with an app.json and launch.json that is configured to look inside the container for the objects and the DotNet probing path. You will need to configure this yourself if your configuration needs to be different. But, since we’re making this work for a standard container, we’re going to use the standard configuration as well.
One other important thing to note…. As I am writing this post, I’ve had a persistent error message that prevented me from compiling the app, which I narrowed down to having to remove the translation files. The annoying part is that the error message itself does not mention the translation files, but it started working again after I removed them. In your new BaseApp folder, there is a folder called ‘Translations’. Remove all files from that folder, except the ‘*.g.xlf’ file.
One final thing to note is that this is just a simple AL workspace. In a real life situation, you are doing this for a particular customer, so you need to think about source control, workspace settings, things like that. There are some capabilities in the Cmdlet, so take a look here to see all the available parameters of the Cmdlet.
The last thing you will need is to download the symbols for the system apps from the container. The Doc also mentions adding the assemblyProbingPaths to the workspace settings, but if you used the ‘-useBaseAppProperties’ switch, that is already taken care of for you and the setting will point to one of the container’s shared folders.
Uninstall / Unpublish Base App
In the previous step, you’ve created an AL workspace with all of the objects from the Base Application. Now, your container already has a Base App, so in order to create a modified Base App, you will have to get rid of the standard one first. You can be a PowerShell warrior and run the Cmdlets in this section, or you can also use the ‘-useCleanDatabase’ switch in the New-BCContainer Cmdlet in the first section. This will remove the Base App and all its dependencies from your container right away.
On to the PowerShell… In the Doc, under bullet 11, you will find the functions to accomplish this. These are regular NAV PowerShell Cmdlets, so you will need to enter the container first:
function UnpublishAppAndDependencies($ServerInstance, $ApplicationName)
{
     Get-NAVAppInfo -ServerInstance $ServerInstance | Where-Object {
    # If the dependencies of this extension include the application that we want to unpublish, it means we have to unpublish this application first.
    (Get-NavAppInfo -ServerInstance $ServerInstance -Name $_.Name).Dependencies | Where-Object {$_.Name -eq $ApplicationName}
 } | ForEach-Object {
    UnpublishAppAndDependencies $ServerInstance $_.Name
 }

 Unpublish-NavApp -ServerInstance $ServerInstance -Name $ApplicationName
}

function UninstallAndUnpublish($ServerInstance, $ApplicationName)
{
    Uninstall-NavApp -ServerInstance $ServerInstance -Name $ApplicationName -Force
    UnpublishAppAndDependencies $ServerInstance  $ApplicationName

}
This loads the functions into memory, and then you can run the script:
UninstallAndUnpublish -ServerInstance BC -ApplicationName "Base Application"
This will completely remove the Base App and its dependencies.
Ready to Start Developing
That’s it, you should now be ready to start your development. See how that works. Add a field to a table, add that field to its Card page and hit Ctrl+F5. It will probably take a while to compile, but you should see your new field on the page.
Now I do need to say that I completely and wholeheartedly agree with the entire community, and code customizations should really not be done anymore. All development should be done using extensions instead of change the Base App itself. It makes everyone’s life a lot easier if you minimize the amount of development done to the Base App, so even if you have no other choice, try to design the development in such a way that most of it is in an extension, and only modify the Base App for the parts that you can’t figure out how to do in an extension.
This past week, there was another post by my good friend Arend-Jan Kauffmann about using Docker directly on Windows 10 (what are you still doing here? Go read AJ’s post!). He had previously written about using Docker in a Hyper-V VM, and he has helped me understand how this all works a number of times. Just to be sure I mention this here, you can read all about the technical details on Tobias Fenster’s blog but that goes over my head very quickly.
The reason why I am writing this is because I am very reluctant to make the step to install Docker directly on my laptop. What works for me at the moment is where I have Hyper-V enabled on my laptop, and I have a VM with just Windows Server 2016 (creating one with Windows Server 2019 is very high on the todo list). My Docker is installed in a snapshot of that VM, and that is where I do all of my development work. I wrote about this before, read it here.
See… I am the king of screwing up my computer. If there is anything, ANYTHING, that will mess up my computer and render it absolutely useless, I WILL find it, and I will kill my computer (I am hearing that in Liam Neeson’s voice by the way). I have had to re-install my laptop so many times because of things that went wrong. When I have a problem like this in my VM, I don’t even spend any time trying to figure out what went wrong (that gives me a headache just thinking about it). All I need to do is delete the snapshot, create a new one, and I’m back up in a matter of minutes. All my dev work is in repos that I sync regularly, so I never have to worry about losing any work.
I’ve read about Docker straight on Windows 10, and it sounds very nice and easy to use. At the same time, I read blog posts and even Tweets that mention damage to the host OS from normal Docker operations, and I just KNOW that if I try it will happen to me. My reluctance to use Docker on Windows 10 directly does not come from wanting to stay in the past, but it is more from the knowledge that I’m going to screw up my computer.
Maybe I’m too cautious, but for now I will stick to my setup and continue to use Docker inside a VM. It works for me, and for now that’s good enough.
Do you want to have a local development environment for Dynamics NAV and Dynamics 365 Business Central, where it is easy to spin up and remove new databases, in whatever version you need? Docker makes it all possible, and this post explains how I was able to get my environment ready for prime time.
One of the most common things that happens in my blogging life is that I will be working on a post about a certain topic, and then as I come near a state where I feel like I can publish, someone else comes along and steals my thunder, and what often happens is that those other people write something much better than what I was working on. It’s demoralizing on one hand, but at the same time great to see so much quality content. Especially when a ton of it comes out on the same day, (as it did today), you ask yourself why am I even trying….
So, having just deleted the content of my attempt at some original Docker content, here are some of the most useful resources for this topic:
You can’t start this with anything other than a vast amount of material by Freddy Kristiansen, who has been working tirelessly on improving this area. He came out with a truckload of material today. You can just go to his blog and look for it yourself, but let me give you links to the most useful ones:
Here’s a new ‘end to end’ document about NAV on Docker. It’s a PDF that tells you everything you need to know, including how to convert your C/AL objects to AL
My journey to finally get Docker to work on my local Hyper-V virtual machine was biased, because I am fortunate enough to work with Arend-Jan Kauffmann. Back in December, he wrote an excellent blog about setting up networking into a local VM and to set up Docker access, where the container runs in the VM, and you can do development directly on the host machine. Thank you AJ for taking some time to look at my computer and helping me set this up.
I now have Docker containers run in multiple versions of Dynamics 365 and NAV, and it is all working seamlessly.
I’m still figuring out how to utilize Hyper-V most efficiently. For instance, I’m not sure yet if I should have multiple VM’s for multiple projects, or just keep it at a single VM with all of my projects. Especially when the version of the VSCode AL Language extension is important I might need to modify my setup. I will be experimenting with this and I’ll share that as I go along.
One thing’s for sure though: with my current working Docker container, this is about as efficient as I’ve ever been in my entire history as a developer.