Install from .vsix

This is a quick blog about installing the AL language for Visual Studio Code from a .vsix file.

When you create a developer preview Azure VM for AL development, you get a landing page to access this VM. The script that creates this VM will put all the components on the VM that you need to do your development, including the correct version of the AL Language extension for VS Code.

If you want to do your development locally, you will need to put the right version of the AL Language extension on your local installation of VS Code. Lucky for you, there is a link on the landing page for your VM that will download the installation package into your downloads folder. The file has the extension .vsix, which is what VS Code needs.

All you need to do is press Ctrl+Shift+P and type ‘vsix’ in the command palette, and VS Code will suggest ‘Extensions: Install from vsix…’. When you select this, you need to browse to the file, and hit the ‘Install’ button. If you already have another version of the AL Language installed, you’ll need to disable that, so that there is no confusion about which one VSCode uses.

NAV Techdays 2017 Recap

My favorite week of the year has just ended. I’m in the high speed train from Antwerpen back to Amsterdam, which is over just like that so I don’t have much time to make this anything elaborate.

As per usual, the organization was superb. The venue is fantastic, with a great expo area, lots of good food and drink choices, and the seats in the great rooms are just about the most comfortable seats you can imagine. The Kinepolis is a movie theater that you can also rent for events. I think I speak for everyone when I say this is one of the most important features, and I hope we will never have to move to a different location.

My week started with a full day pre-conference workshop about automated testing in NAV. This workshop was hosted by none other than Luc van Vugt, who, as per usual, delivered a solid day of learning. I had misread the workshop description and the correspondence that we had prior to the workshop, so I did not get everything out of it that I could have, but Luc was so kind to offer assistance to me so that I could do the exercises at home. Any time you have an opportunity to train under Luc, you should take it.

My company was a sponsor, so we had a booth to staff. It was a pleasure to be there and talk to anyone who had any questions about what we can offer.

As per usual, the two conference days were stuffed with 90 minute deep-dive sessions on any topic you can think of. My favorite ones were Waldo’s “Rock ‘n Roll with VS Code”Anders and Nikola’s “Creating great APIs”, and the Docker session by Freddy, Tobias and Jakub. Fortunately for you, you can watch all of the sessions on YouTube, Luc had all of them uploaded within a week of the conference.

I can’t say enough about this conference. For any technical resource in the NAV channel (and I include Dynamics 365 for Finance and Operations in that category), NAV Techdays is a must to attend, every single year. This is the second time that I’ve gone, and I am still kicking myself for not going the first few years. If I can help it, I will not make that mistake again.

See you next year in Antwerpen!

Extensions V1 vs V2

You might have heard people talk about “Extensions v2”, and maybe that doesn’t make a whole lot of sense. Let me take a few minutes and try to explain the concept to you.

Back in 2015, Microsoft announced the concept of extensions to us, in this blog post. I remember reading this article, and being thoroughly confused. At the time I was not in a technical role, and I had let my technical knowledge slip for just a minute it seems.

Extensions v1

For extensions v1, development is done in good old C/SIDE. There are severe limitations as to what you are allowed to do. For instance, you cannot add values to option strings in table fields, and you cannot add code to actions on pages. I won’t get into the details of those limitations, but you must be aware of what you can and cannot do for extensions, because in C/SIDE you can do a LOT more than what you are allowed to do.

The extension itself is compiled in a so-called .NAVX file, also know as a NAV App file. To get to this package file, you must use PowerShell Cmdlets to export the original and modified objects, calculate the delta files, and then build the .NAVX file. To deploy this .NAVX file, you then must use another set of PowerShell Cmdlets.

Especially the development part can be cumbersome. There are many things you are not allowed to do, and as you build the .NAVX file, the system will yell at you when you did something wrong. There are many moving parts, and it takes a lot of discipline to get it right

Extensions v2

For extensions v2, development is done in Visual Studio Code (also known as VSCode), using the AL Language extension. Since you are no longer working in C/SIDE, only the allowable things are allowed. You simply cannot do anything that the tool is not capable of doing. You no longer have to export original objects and compare them to modified objects. Essentially, you are programming the delta files directly in VSCode.

Deploying the solution works simply by building the project from VSCode. You hit F5 and VSCode will build the package and deploys it to the service tier that you specify in the launch file. Deploying the app to a test system still happens with PowerShell Cmdlets.

Hopefully this clears it up a little bit. Once you understand the differences, it’s not so intimidating any longer.

Registered for NAV Techdays 2017

It’s that time of the year. The official announcement came in on Twitter that registration is open for NAV Techdays 2017, which is again held in Antwerp of course. The official two day conference is 16 and 17 November, but I consider the pre-conference workshops to be part of the event, so a full 4 days of deep technical knowledge sharing.

The session schedule has not been published, but we do know the pre-conference content, go take a look at the Sessions page to check out what is available to you. The familiar sessions will cover PowerShell by Waldo, JavaScript by Vjeko, automated testing by Luc van Vugt, SQL Server performance by Jörg, and of course the 2 day design patterns class by Mark. The new topics include how to SaaSify your software architecture, how to use Visual Studio Code (it is very important to learn about this one) and how to develop extensions with it by Arend-Jan. Another exciting one is the SCM workshop by Sören, he will show you how to make it work directly in VSCode.

Only a few regular sessions have been announced (some fantastic content by our friends at Microsoft), but I have a feeling that we will see a super deep dive into all things related to Dynamics 365. I cannot wait to go to Antwerp, and I hope to see you there.

Localize Objects with PowerShell and VSCode

In this article I will explain how you can use PowerShell to extract the right objects and merge those objects, and how to use Visual Studio Code to resolve most of the conflicts in the merged objects.

In a previous article, I explained how you can use PowerShell to create the environments. The script in this article actually use the variables that are assigned in the other one. What I should really do is create a configuration file and load that from both scripts. I wanted to share what I have so far though, without a handy configuration file but hopefully helpful nonetheless.

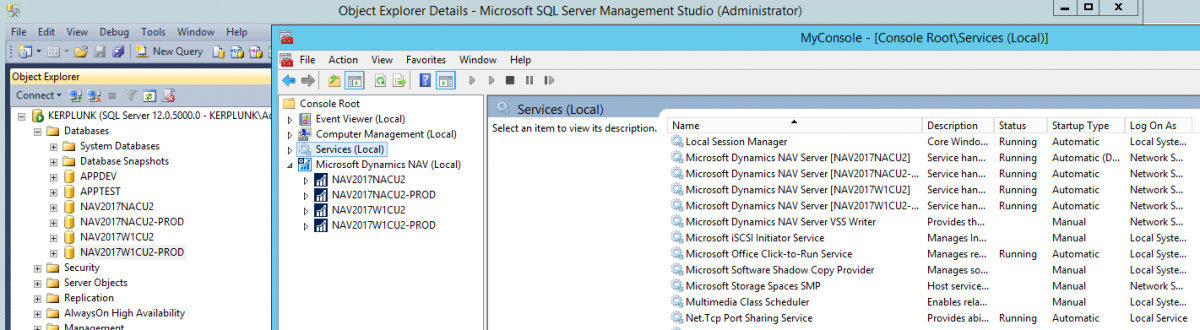
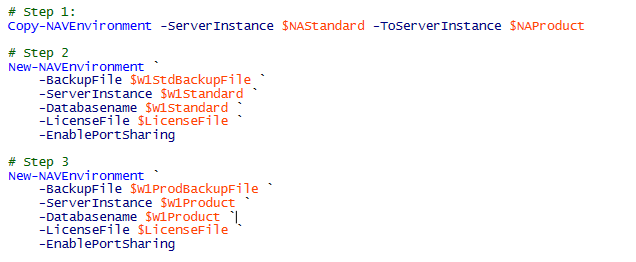
We start off with the 4 environments that were created in our last article: ORIGINAL, MODIFIED, TARGET, and RESULT. The first two environments contain the standard W1 and the ISV product. Target and RESULT are identical at this point, and they both contain the standard NA localization. All environments are in the same build number (NAV 2017 CU2 in this case). Because I have a developer license that has insert rights in the ISV number range, my strategy is to merge the product modifications into the NA database. If you do not have those insert rights, then a better strategy would be to merge the NA localization into the product environment instead. Microsoft has recently added insert capabilities for the standard object ranges to regular developer licenses, for this particular purpose. As I was working through the conflict objects of this assignment, I was thinking that this may even be the best default strategy anyway.

Due to a limited amount of time, and a limited amount of PowerShell skill, I decided to approach this task pragmatically:

  • Manually move the ISV specific objects to the RESULT environment
  • Use PowerShell to export all the objects
  • Manually eliminate the unmodified objects
    • NOTE: as I learned later, Waldo’s PowerShell modules actually have logic to remove these after the merge, so this can be scripted as well
  • Use PowerShell to merge the objects
  • Use Visual Studio Code (AKA VSCode) to resolve the conflicts as much as possible
  • Use PowerShell to join the objects
  • Use C/SIDE to resolve any remaining conflicts

The conflict resolution is something that has to be done manually. Everything else can be scripted in PowerShell. During this process I’ve asked Waldo for some help, and he explained that most of what I am doing here is already part of the merge sample scripts. In the Cloud Ready Software PowerShell module, there is a folder called “PSScripts”, and in that folder you will find a large number of scripts that you can use as an example to get started on your task. As you gain experience in using PowerShell, you will recognize a lot of useful features in those scripts, and you can modify them to your specific needs.

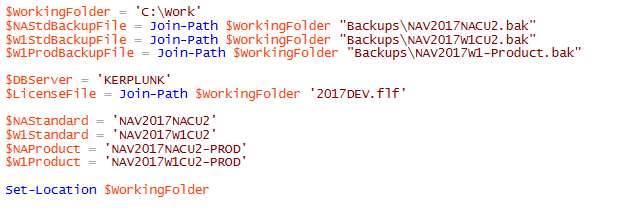
Alright, on to the details. The first part is to use PowerShell to extract the objects into their own folders. I also added commands to create the folder structure itself:

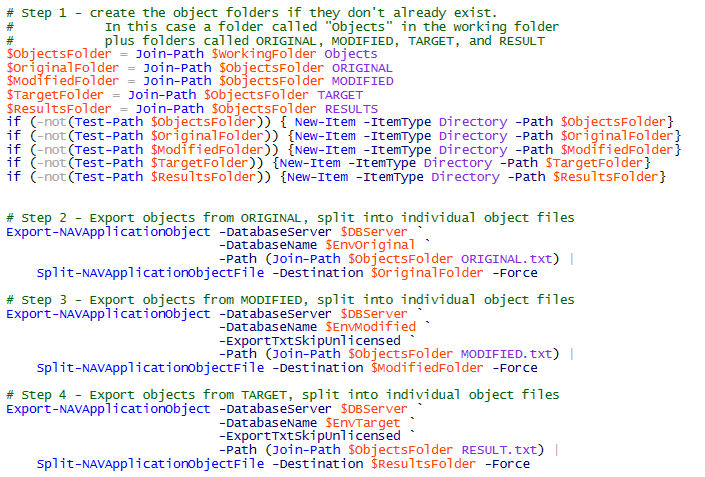
At this point, you will have an “Objects” folder in your working folder, with full object files for ORIGINAL, MODIFIED, and TARGET. Those object files have then been split into individual object files in the ORIGINAL, MODIFIED, and TARGET folders. Before using PowerShell to merge those objects, I used a text compare tool (I like Scooter Software’s Beyond Compare) to eliminate unmodified objects. Remember, I only want to work on the modified objects, so I don’t have to worry about getting confused by objects that were not changed for the ISV product.

Now that we only have modified objects in all three object folders, we’ll use the merge Cmdlet to do the actual merging of the objects.

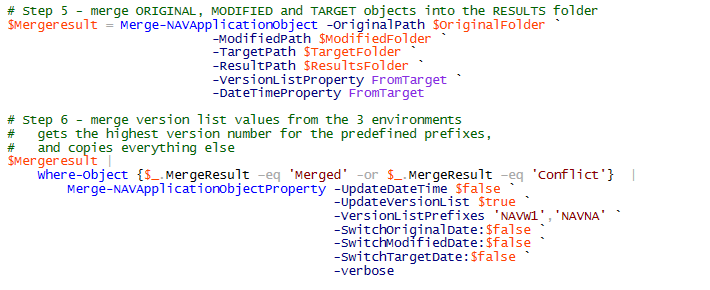
If you notice, the output of the “Merge-NAVApplicationObject” Cmdlet is loaded into the variable “$MergeResult”. This object is then piped into the “Merge-NAVApplicationObjectProperty” Cmdlet. The first Cmdlet is a standard NAV PowerShell Cmdlet, and the second one comes with the Cloud Ready Software modules. The standard merge Cmdlet does not merge the Version List property, it simply takes the Version List from one of the three environments. We can have a discussion about whether the Version List is even important anymore, especially if you use Source Code Management. The reality is that most NAV developers depend on proper tags in the Version List, so it is useful to merge those as well. All you need to do is specify the prefixes that you want to merge (In my case NAVW1 and NAVNA) and it will find the highest value for those prefixes. All other prefixes will be simply copied into the RESULT objects.

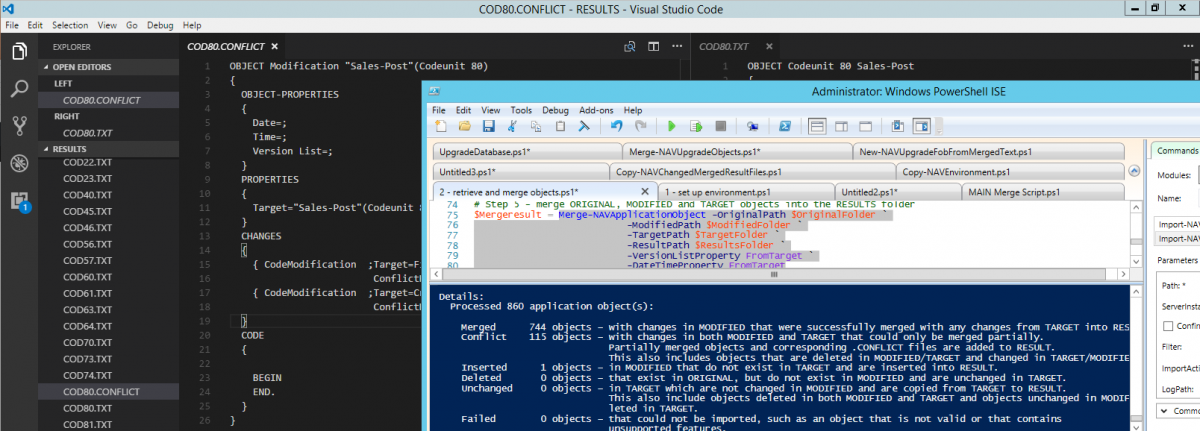
At this point, we have all merged files in the RESULT folder. This includes the objects that were merged successfully, but also the objects that the merge Cmdlet could not resolve, for instance when code was added at the same position in MODIFIED and in TARGET. Since we are going to have to learn how to use VSCode, I decided to use that to resolve the conflicts.

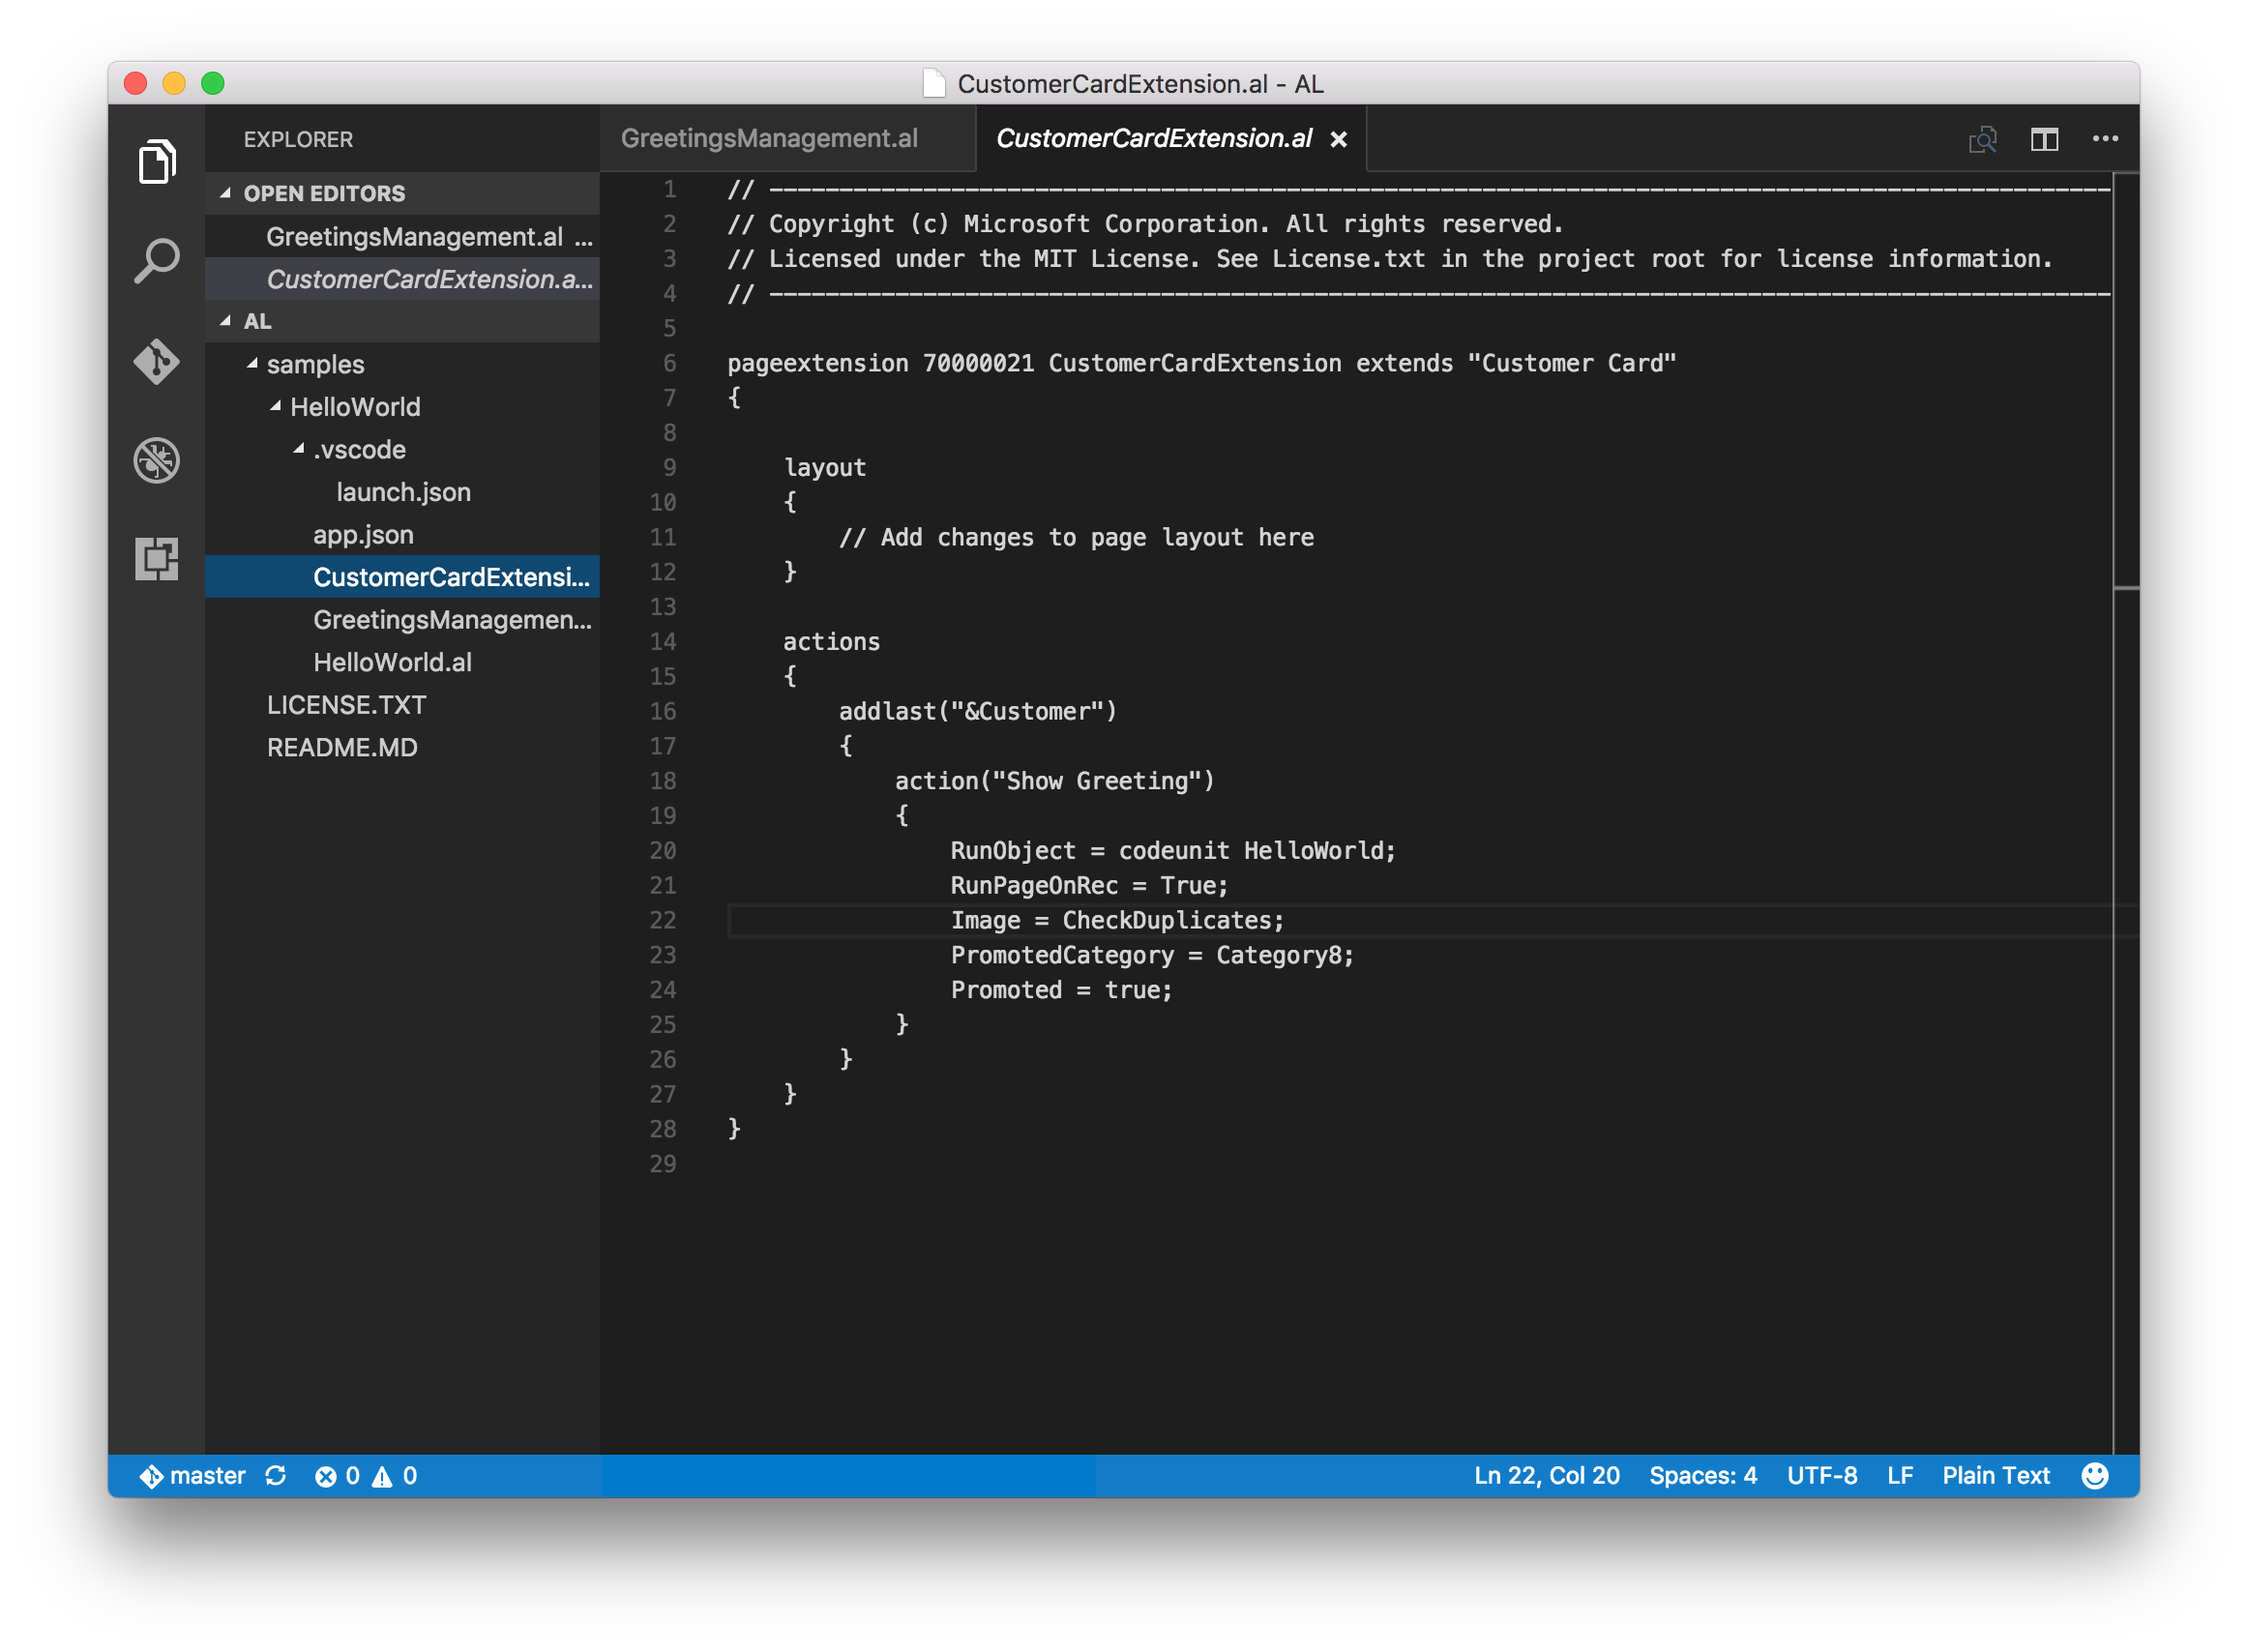
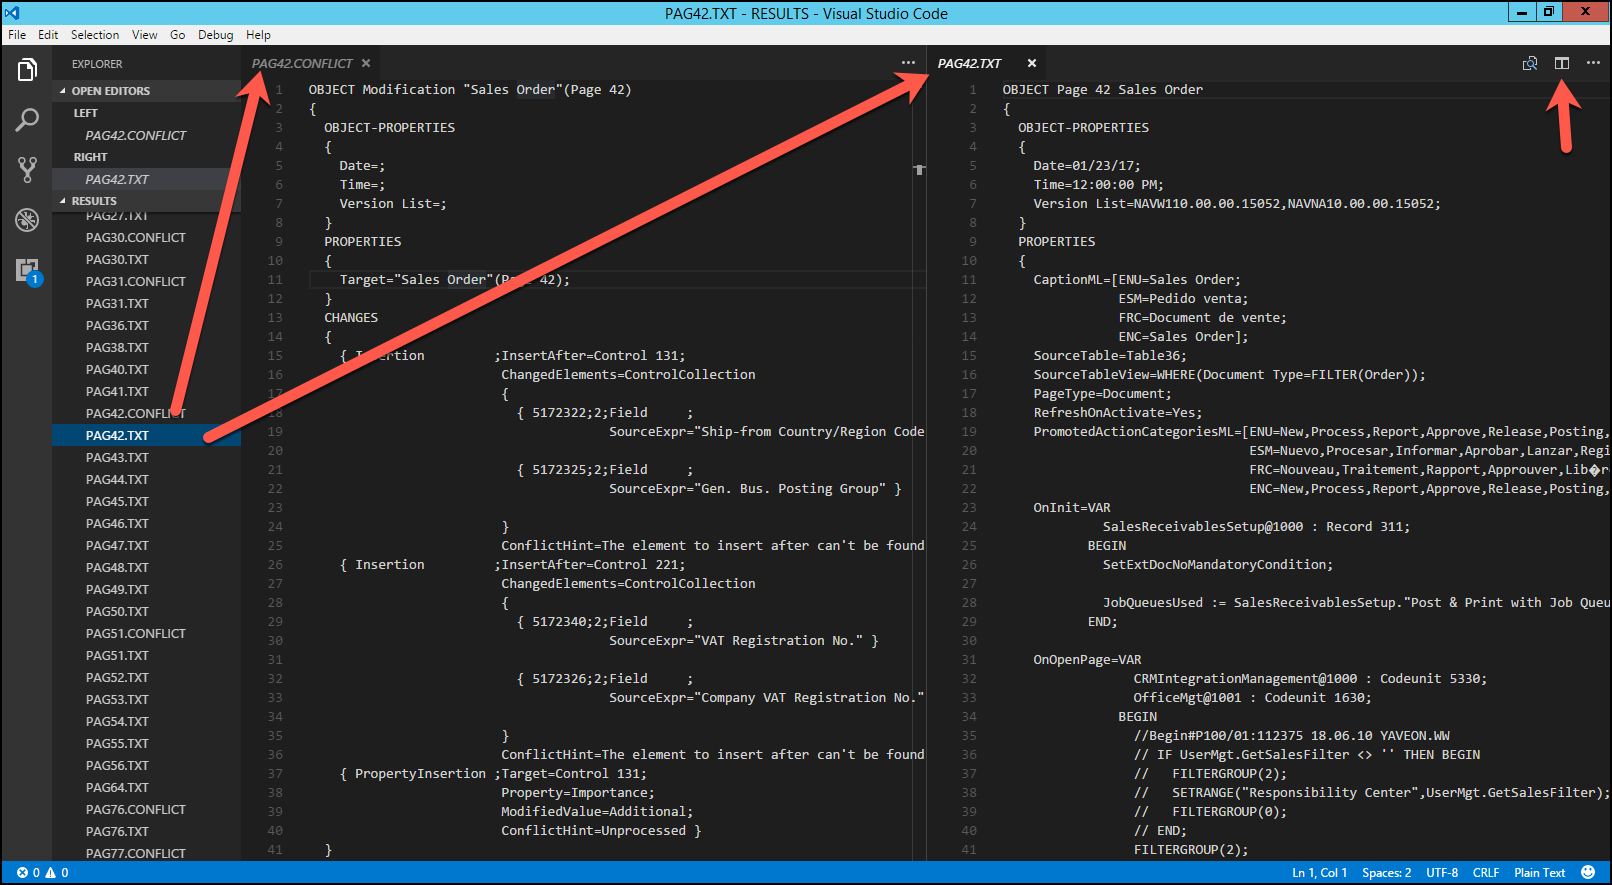
With VSCode installed, you can open the RESULT folder and see the content of this folder inside the file browser at the left hand side. In the upper right hand corner is a button that you can use to split the screen into two (and even three) editor windows. This is very useful for resolving merge conflicts, because you can open the conflict file in one side, and the object file in the other side. You are editing the actual object file here, so you may want to take a backup copy of the folder before you get started.

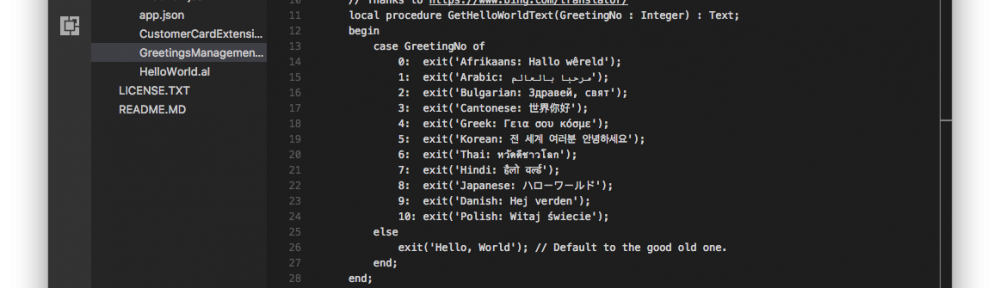
Now what you must understand is that the conflict files only contains the pieces that the merge Cmdlet could not figure out. In a total of 860 objects, with 6956 individual changes, it was able to merge 96.4% of those changes. An object that may have 4 conflicts can also have a ton of other changes that the merge Cmdlet merged successfully. All YOU have to do is focus on the ones that need manual attention. For instance, codeunits 80 and 90 had a TON of modifications, but it only needed help with 3 of them.

I had a total of 115 conflict files, and I could completely resolve 112 of them in VSCode. I made a note of the few that remained, and decided to import those unchanged into C/SIDE, so I can finish those off in the proper IDE.

The last PowerShell command that I used is to create a single object file, which can then be imported into C/SIDE. Then I finished the last few remaining object files, and was able to compile all objects from there.

I’ve done many of these merges completely manually. To say that I was skeptical that PowerShell would do a good job is putting it mildly. I flat out did not trust the merge Cmdlet, surely they could not do as good a job as I could do. I was wrong. I checked a bunch of objects to see if I could find any mistakes and I could not find any. Not only did the merge Cmdlet do a fine job at merging the objects, it did so in about 5 minutes flat.

You can download the scripts here.

Instead of having to manually merge almost 900 objects, all I had to do was focus on the conflicts. Usually, a vertical merge like this would take me anywhere from 2 to 4 weeks, and I was able to finish this one in less than two days. Figuring out the PowerShell scripts took me much longer, but I will be able to use those for the next merge task.

Create NAV Environment with PowerShell

If you kind of know about PowerShell, and you want to use it more, but you don’t really know where to start, then you should read on. I am going to explain to you how you can use PowerShell to create the environments that you need to localize a product.

One of the things that always seem to fall on my plate at my job is to take an ISV product and merge that into the North American localization. I call it ‘localizing a product’. It is not, because localizing a product is much more than simply merging the objects, but it’s what you have to do first. I’ve done a bunch of these manually, and I kind of enjoy the almost mindless nature of the task of working my way through hundreds of objects (sometimes even thousands, I once ‘localized’ a product that had more objects than standard NAV itself).

This time around, I wanted to use PowerShell to automate as much as I could. Lucky for me, I attended Waldo’s “PowerShell Black Belt” workshop at NAV Techdays (read my review of this fantastic event here) and I should have all the tools to get this started.

The first thing you need is to install Waldo’s PowerShell modules, I will be using those for just about everything. I could figure out how to script all of this stuff myself, but why would I if Waldo already did that for us, and he is sharing his scripts. For instructions read Waldo’s blog here.

This post focuses on creating the environments themselves, and for this task you really need just a few things:

  • A SQL backup for the product in the W1 version of NAV, and make sure that you know exactly which build this was developed in. For instance, the product that I am working with was provided as a SQL Backup, and it was developed in NAV 2017 CU2.
  • The DVD’s for standard W1 and NA for the same NAV build.
  • A Development license that has insert rights for the product’s number range. If you only have a regular developer license, or if the ISV refuses to provide you with a license (this happens more often than not) then you will have to merge NA into the product database. This works exactly the same, you just have to figure out which environments are your ORIGINAL, MODIFIED and TARGET.

Use the NA DVD that you just downloaded and install the NA Version with a demo database. I like to give the database a meaningful name, so I called it ‘NAV2017NACU2’. This is all the manual installing that we will do, everything else is PowerShell baby! Actually, you could even use Waldo’s PowerShell modules to do the install as well. You could even write a script that downloads the DVD for you as well, all using Waldo’s PowerShell modules.

If you understand the mechanics of localizing a solution, you will know that we need 4 databases in total: standard W1, Product database in W1, standard NA, and a copy of the standard NA database that will become the product database. In this case, standard W1 is ORIGINAL; product W1 is MODIFIED; standard NA is TARGET and product NA is RESULT. This will become important when we do the merge, which will be another blog post.

Now the goal is to have a re-usable script, so we’ll use variables instead of having to re-type values multiple times, as you can see in the picture.

Remember, I installed standard NA. I created the working folder and placed the three backup files into the ‘Backups’ folder. I like to keep things together, but I can imagine having a network location for the standard backup files. The nice thing about using these variables is you can set them however you need them :). My database server is called KERPLUNK, which is just a regular unnamed instance on my VM called KERPLUNK. You could also use a demo installation and then you’d have to set it to ‘KERPLUNK\NAVDEMO’. I will use the 4 names for the database names as well as the service tier names.

The rest of the script is surprisingly simple to put together, here it is:

The reason why I start with the ‘Copy-NAVEnvironment’ step is because this script turns on port sharing for both server instances, so I don’t have to take care of that step myself. This is one of Waldo’s script that looks at the first server instance and creates a new one just like it. It creates a SQL Backup from the service instance, restores that into a new database, and finally it creates a new server instance for that new database, and it enables port sharing by default. The ‘New-NAVEnvironment’ is also one of Waldo’s scripts, and it does all the heavy lifting of restoring the database, creating the service tier and setting up port sharing. The full script took maybe 2-3 minutes to run for me, not bad for something that used to take all morning.

This same script could also be used to create your environments for developing extensions. For that you only need a standard database for ORIGINAL and a development database for MODIFIED, both of which will then be used to create the DELTA files for the extension package. If you look at the screenshot of my environment you’ll see an APPDEV and an APPTEST database. Both of these were originally created as copies of the standard database, also using PowerShell.

I’m planning to also put this into a video but I actually have this work to deliver so I’ll focus on that first. Up next is getting the objects out and comparing them to create a set of merged objects. Stay tuned!

Update 4/22/2017: added link to the new article about localizing the objects, and you can download the scripts here.

Get Started with Dynamics 365 Apps

Dynamics 365 for Financials has been out for a while, and by now you have probably learned about how the functionality can be extended rather than modified. Instead of modifying the application objects directly, development is done using “extensions”, which are published as an “App” in AppSource.

What is unclear to a lot of partners is how this works exactly. What do you need to know? What do you need to do? Where do you get the help that you need? Microsoft has put together a few resources to get you started and to get you the help that you need.

You may need a partner source login and/or an Azure account to be able to access these pages. These links won’t answer all your questions, but you should find enough information to get started. Good luck!

Webinar – Dynamics NAV Dev Tools Preview

This morning I was part of a panel to host a webinar to show the development tools preview. It was my pleasure to provide the demo part and show the attendees a taste of what is to come in the new development tools for Dynamics NAV. The demo part was just about 25 minutes, and then we opened up the floor for questions. We had some good questions, and it was a lot of fun to be able to share that with everyone.

The webinar was recorded and uploaded to YouTube, and you can watch it here. Oh, my name is not Erik Ernst, not sure how that happened 🙂

Early Christmas Present – NAV Developer Tools Preview

At Directions in the US this year, Microsoft announced that they would release a preview of the new development tools for Dynamics NAV. Today, they have delivered on that promise, and you can try them out in your Azure subscription. Head on over to the Development Tools Preview for Dynamics NAV to read all about it. You will find instructions on how to get started there. Go to the New NAV Development Environment on MSDN to read more about the details.

If you decide to take the tools for a test run, and you find any issues with them, you can report on those issues in the AL Github issue tracker. Go to The Microsoft/AL Github page, click on the ‘Issues’ tab and create a new issue there. Microsoft is monitoring the issues there.

The important part to keep in mind about this preview is that it gives us a preview of how development for extensions is evolving. The goal is to simplify the process to where all we need to do is write the code and hit a build button, and all internals are taken care of by the environment.

Remember, this is just a preview of the tools. It is not supposed to be flawless. Microsoft is also working on many other tools to complement VSCode and provide a development experience that will meet the NAV developer’s needs.

NAV in VSCode – Hello World

Today marks something quite unique, at least for the NAV world. Microsoft is actually giving us a preview of a preview product that they have announced for Christmas.

During this year’s conference season, Microsoft has shown their vision of the future development tools for Dynamics NAV. We’ve seen various demonstrations of how we will be doing development for NAV in Visual Studio Code, a lightweight development tool. Today they have put some sample files on GitHub (Check it out here) for all of us to look at and to critique.

Visual Studio Code (VSCode for short) is available on Windows, but also on MacOS. Since my main computer is a MacBook, I wanted to see if it really does work. To be modifying NAV objects within VSCode on a MacBook is an almost surreal experience, but here’s proof:

screen-shot-2016-11-29-at-4-22-41-pm

The sample is a simple “Hello World” application, with a couple of codeunits and a so-called ‘page extension’ object. Part of the vision for future development is to make building extensions easier. Without going into any detail of why that is important, this will make extension and app development a LOT easier to do.

Some of my thoughts:

  • Microsoft is finally taking NAV development into a professional development tool. Hopefully this will inspire (or at least not deter) a new generation of NAV developers
  • json files for configuration and for the app signature will make automating deployment much easier
  • No more control ID’s, which means those will no longer cause upgrade headaches
  • I would like to also get rid of object ID’s, which they have said that they are looking into. Current licensing is based on object ID’s though, so I’m not holding my breath
  • It will be interesting to see if there is any automatic sorting by control type. For instance will you be able to mix fields and functions in a table object, or will the compiler automatically sort this for you. There’s potential to really mess up the object’s readability
  • This is Visual Studio Code, not Visual Studio. It is still to be seen whether C/AL will be a fully functioning .NET language, and it is still unknown whether we’ll have access to other .NET goodies from this editor
  • Lastly – we are getting just a preview of the tool. Nothing was said with certainty about when this is ready for prime time. What is REALLY cool though is that Microsoft is inviting everyone to participate in the process

Go check out the files for yourself, and if you’d like you can even contribute to the GitHub project. For me, this is a very exciting prospect, and I can’t wait to see what happens next.