Import Media Files for SaaS

One of the standard ‘Problems’ when you’re in an AL workspace in VSCode is a warning that you are no longer allowed to use BLOB as a datatype for images. This has been at the bottom of my priorities list until I had a request to create a new image for a standard field. With this post I’ll show you how easy it is.

Media Field

The first element that you need is a field in the table. Instead of a BLOB field with subtype Bitmap, you now need a field of type ‘Media’. There is also a data type called ‘MediaSet’ but that’s not what we are going to use. Go to Docs to read about the difference between Media and MediaSets. The field is not editable directly because we will be importing the image through a function.

In addition to the field itself, you need a function to import an image file into the field. In the object below I have a simple table called ‘Book’ with a number, a title and a cover. We use the ImportCover function to do the import, and implement that as an internal procedure, so it can only be used internal to the app. You can of course set the scope as you see fit.

table 50100 BookDnStr
{
    Caption = 'Book';
    DataClassification = CustomerContent;

    fields
    {
        field(10; "No."; Code[20])
        {
            Caption = 'No.';
            DataClassification = CustomerContent;
        }
        field(20; "Title"; Text[100])
        {
            Caption = 'Title';
            DataClassification = CustomerContent;
        }
        field(30; Cover; Media)
        {
            Caption = 'Cover';
            Editable = false;
        }
    }

    keys
    {
        key(PK; "No.")
        {
            Clustered = true;
        }
    }

    internal procedure ImportCover()
    var
        CoverInStream: InStream;
        FileName: Text;
        ReplaceCoverQst: Label 'The existing Cover will be replaced. Do you want to continue?';
    begin
        Rec.TestField("No.");
        if Rec.Cover.HasValue then
            if not Confirm(ReplaceCoverQst, true) then exit;
        if UploadIntoStream('Import', '', 'All Files (*.*)|*.*', FileName, CoverInStream) then begin
            Rec.Cover.ImportStream(CoverInStream, FileName);
            Rec.Modify(true);
        end;
    end;
}

Factbox for the image

Similar to how Item images have been implemented, you can create a factbox to show the book cover and add that to the Book Card. Using a factbox also makes it easy to keep the related actions close to the control.

page 50100 BookCoverDnStr
{
    Caption = 'Book Cover';
    DeleteAllowed = false;
    InsertAllowed = false;
    LinksAllowed = false;
    PageType = CardPart;
    SourceTable = BookDnStr;

    layout
    {
        area(content)
        {
            field(Cover; Rec.Cover)
            {
                ApplicationArea = All;
                ShowCaption = false;
                ToolTip = 'Specifies the cover art for the current book';
            }
        }
    }
    actions
    {
        area(processing)
        {
            action(ImportCoverDnStr)
            {
                ApplicationArea = All;
                Caption = 'Import';
                Image = Import;
                ToolTip = 'Import a picture file for the Book''s cover art.';

                trigger OnAction()
                begin
                    Rec.ImportCover();
                end;
            }
            action(DeleteCoverDnStr)
            {
                ApplicationArea = All;
                Caption = 'Delete';
                Enabled = DeleteEnabled;
                Image = Delete;
                ToolTip = 'Delete the cover.';

                trigger OnAction()
                begin
                    if not Confirm(DeleteImageQst) then
                        exit;
                    Clear(Rec.Cover);
                    Rec.Modify(true);
                end;
            }
        }
    }
    trigger OnAfterGetCurrRecord()
    begin
        SetEditableOnPictureActions();
    end;

    var
        DeleteImageQst: Label 'Are you sure you want to delete the cover art?';
        DeleteEnabled: Boolean;

    local procedure SetEditableOnPictureActions()
    begin
        DeleteEnabled := Rec.Cover.HasValue;
    end;
}

Add to the Page

All that is left is to add the factbox to the page where you have the import action. In this case I have a very simple Card page for the book, and the factbox is show to the side.

page 50101 BookCardDnStr
{
    Caption = 'Book Card';
    PageType = Card;
    ApplicationArea = All;
    UsageCategory = Administration;
    SourceTable = BookDnStr;

    layout
    {
        area(Content)
        {
            group(General)
            {
                field("No."; Rec."No.")
                {
                    ToolTip = 'Specifies the value of the No. field.';
                    ApplicationArea = All;
                }
                field(Title; Rec.Title)
                {
                    ToolTip = 'Specifies the value of the Title field.';
                    ApplicationArea = All;
                }
            }
        }
        area(FactBoxes)
        {
            part(BookCover; BookCoverDnStr)
            {
                ApplicationArea = All;
                SubPageLink = "No." = field("No.");
            }
        }
    }
    actions
    {
        area(Processing)
        {
            group(Book)
            {
                action(ImportCover)
                {
                    Caption = 'Import Cover Art';
                    ApplicationArea = All;
                    ToolTip = 'Executes the Import Cover action';
                    Image = Import;
                    Promoted = true;
                    PromotedCategory = Process;
                    PromotedOnly = true;

                    trigger OnAction()
                    begin
                        Rec.ImportCover();
                    end;
                }
            }
        }
    }
}

This was a fun one to figure out. Let me know in the comments if it was useful to you
Commitment Issues

So you’re evolving your source control practice. You have created a ‘dev’ branch to keep work in progress away from the ‘main’ branch, and maybe you are even using feature branches or branches per developer. As you are putting in place branch policies to prevent just anybody from committing changes, you notice a pattern of commits being created just by merging a change into ‘main’. In this post I will show you how to limit the number of commits.

The Setup

I have a simple project in Azure DevOps, with a repo that has a default branch called ‘main’ and a ‘dev’ branch. The main branch requires a reviewer, which in Azure DevOps means that changes can only be made through pull requests. I’ve committed a couple of changes in dev and I have created a pull request to move that change into the main branch to be released. The PR has been approved and I have clicked the ‘Complete’ button on the PR. The Azure DevOps default Merge Type is set to ‘Merge’ and all looks well, so then I click the ‘Complete Merge’ button.

The Issue

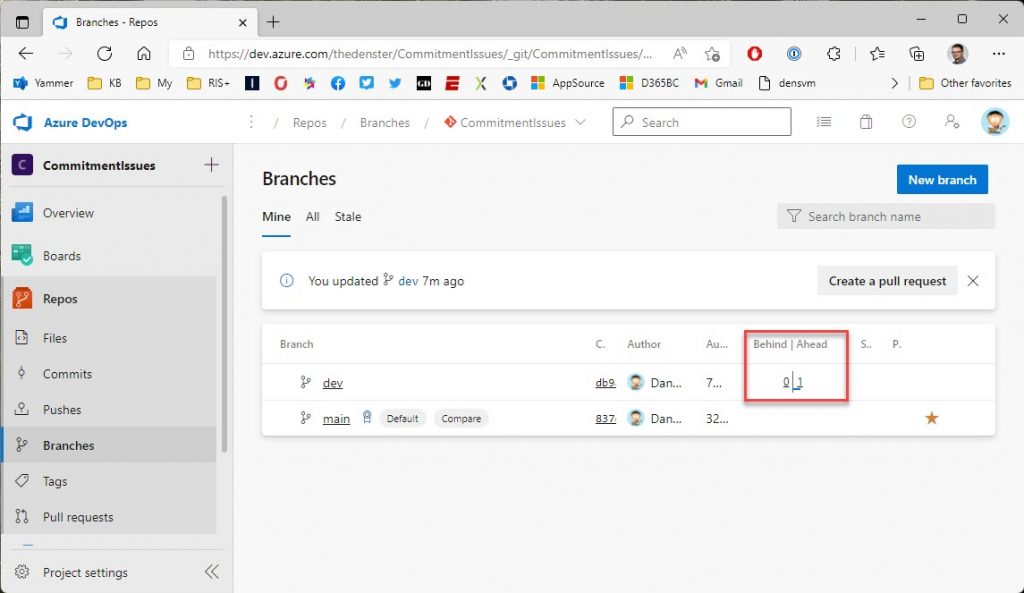
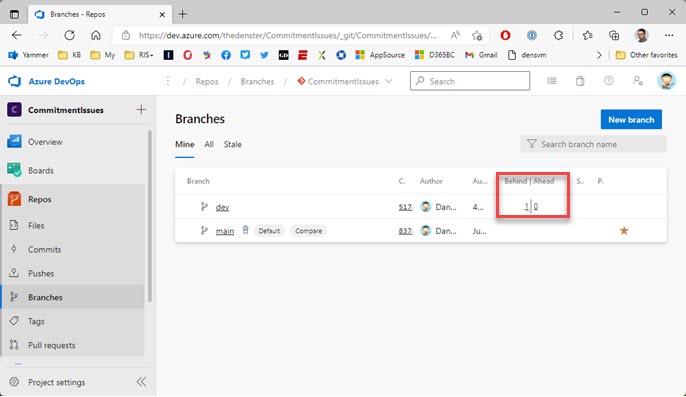
When the PR completes, you go back to the Branches view in Azure DevOps, and you notice that the dev branch is 1 commit behind on Main….

Wait, what? Didn’t I just merge 2 commits from dev into Main? The purpose of the PR was to synchronize the branches, but it appears that dev now a commit behind main. The Merge Type of ‘Merge’ created its own commit in the target branch, main in this case. When you go back to VSCode and merge main back into dev, you would notice that the source files themselves have not changed, even though Git has created two extra commits just from the Merge actions. You see, any time that you do a Merge in Git, it will generate a new commit.

If you were to do a file compare between the two branches, there would be no differences in the source files. The not so good part of using the Merge Type ‘Merge’ is that you will have to refresh your local main branch and merge that into your dev branch BEFORE you can continue developing. In itself maybe this works for many people but I prefer it if I can push out my dev work and continue developing without having to worry about being in synch with main.

A Better Way

There is another (I would argue a ‘better’) way to complete PRs. Another setup: I’ve updated my local main and merged that into my local dev branch; I have made another code change, which I have pushed that to the remote from my VSCode. The Branches view in Azure DevOps now shows dev is one commit ahead of main.

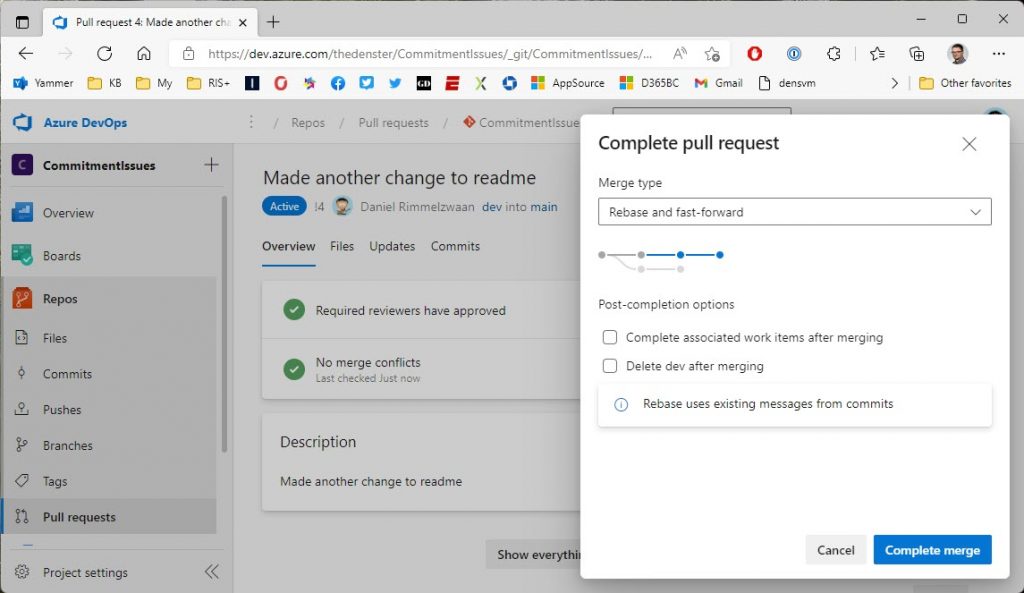
This time when you complete the PR, you select ‘Rebase and fast-forward’ as the Merge Type.

Because we are not merging, Git will not create a new commit. The result of this Merge Type is that the branches are in synch after completing the PR. There is no need for me to go back to VSCode and update my main branch.

So What is the Difference?

I’ll be totally honest here and tell you that I don’t really understand the difference between ‘Merge’ and ‘Rebase’. Something about where in the first the differences are actually merged and the changes are preserved in a new commit, and in the second the branch is rebased and the incoming changes are applied to that new base. I am sure that there is a distinct difference, and that this has an impact on the way you manage branches. I’ve looked for but could not find any posts that clearly explain the two with proper examples. I’m still looking, and I still want to know, but I have other more important things to worry about right now. Maybe a good topic to write about in the future :).

For practical purposes though, for the type of projects that I am involved in, I prefer the Rebase option. Personally, I prefer the branches to be synchronized when a PR is completed. Having to go back and pull the merge commit back into my local dev branch feels like a redundant step.

Use SystemId

If you’re like me, and you use the ‘Page Inspector’ a lot, you have undoubtedly scrolled all the way down, and noticed this group of fields at the bottom. One of those fields is called ‘SystemId’. Today’s post describes some of the important things that you need to know about this field.

The Basics

Toward the end of the ‘NAV’ era, you may have noticed a field called ‘id’ in a lot of tables. This field was meant to have a single-field unique attribute for each record in the database. The original purpose was to provide a more industry standard way to get to records from a webservice, and it was implemented as an actual field of each table for which such functionality was provided.

In BC, the ‘id’ field has been obsoleted and replaced by a new system field called “$systemId”, an attribute that is assigned at the system level. The logic that assigns the values is not accessible to us, it all happens behind the scenes. You can read more about the field itself in Docs.

Some important things to remember:

  • Each SystemId value is unique, you will never see any SystemId value repeat across any table. You could cheat the system and manually assign a value to the field, but if you let BC assign its value it will always be unique
  • Its value cannot be renamed. Unlike PK fields in the database, the SystemId is not editable

So How Does It Work?

You will not see the SystemId as a field anywhere. Drill down into a table’s design and it is not there as a field. You can see the value when using the Page Inspector, but none of the pages have the field visible to the user. That would be pointless, because the SystemId does not have a functional purpose. It’s just a random GUID value that holds no meaning. However, EVERY table has a SystemId field, and since its value is always unique, you could theoretically use the field as its primary key.

You can leave the field alone altogether and just continue using the regular PK fields, and BC will automatically take care of the SystemId. If you are just using or developing ‘normal’ functionality, you will probably never even be aware of the presence of the SystemId.

One really handy thing though is that this is a single field unique value! You could capture a tablerelationship in a single field regardless of the target table’s primary key! You could link to the Sales Line’s SystemId field with a single field foreign key, and not have to worry about document type or line number. All you need to do is store the SystemId as a GUID field, with a tablerelationship to the target table’s SystemId field.

To retrieve a record using its SystemId, you use the GetBySystemId method instead of the regular Get method that you are used to.

How Is It Used?

The main purpose of the SystemId is to facilitate the API. The BC API endpoints are formatted in such a way that you specify the systemId as the unique value for the record that you want to retrieve. Yes you can still do a filter on the PK fields, but the standard way to get a particular record from an API endpoint is to provide its SystemId field value. When posting a new record, the response will return the new record’s SystemId.

You can look at a bunch of tables that are part of the API and see that a lot of tables have new fields for these SystemId fields. Take for instance the Customer table. You can see a bunch of new fields like “Currency Id” and “Payment Terms Id” with logic in OnValidate to update the ‘normal’ fields that are all still there. The new SystemId fields do not replace the existing related fields, they live side by side.

Still Confused

Yes it is still confusing, well maybe ‘cumbersome’ is a better word. The mechanism is fairly straightforward , but it has not made our job easier. Not every tablerelationship has been updated with the SystemId, and where you do see those ‘new’ ones, there is a double field relationship that has to be maintained with validation code. Especially when you need to expand standard APIs, you will have to create those additional SystemId fields on top of existing foreign key fields to ensure data integrity.

Containers And Bacpacs

A while ago an ISV client of mine was working on getting their app into the Embed program. Part of this process was to upload a bacpac with certain characteristics. The characteristics themselves are not relevant for this post but as I was helping them, but I thought I’d write this quick post to share how you can extract your bacpac files from a container, and how to use those bacpac files to create another one.

The setup

I’m starting out with a standard BC container, which was created using BcContainerHelper, and it is called DenSterDev. Coincidentally, I am also using BcContainerHelper to extract the bacpacs and to create the new container. I am using the “C:\ProgramData\BcContainerHelper folder to store the bacpacs, because that folder is recognized both inside and outside of the container.

Extract Bacpac Files

The container is multi-tenant, so there are two databases that we care about: one is the app database, and the other is the tenant database. Both of those are necessary to create the new container. If you have any apps installed on top of the standard container, those will be included in the bacpac file for the app database, and the bacpac for the tenant database contains the data itself.

The benefit of using BcContainerHelper is that we have very handy Cmdlets to get all this stuff in and out of containers, and the bacpacs is no exception. The command is very easy:

Export-BcContainerDatabasesAsBacpac `
    -containerName 'DenSterDev' `
    -tenant default `
    -sqlCredential $Credential `
    -bacpacFolder C:\ProgramData\BcContainerHelper `
    -doNotCheckEntitlements

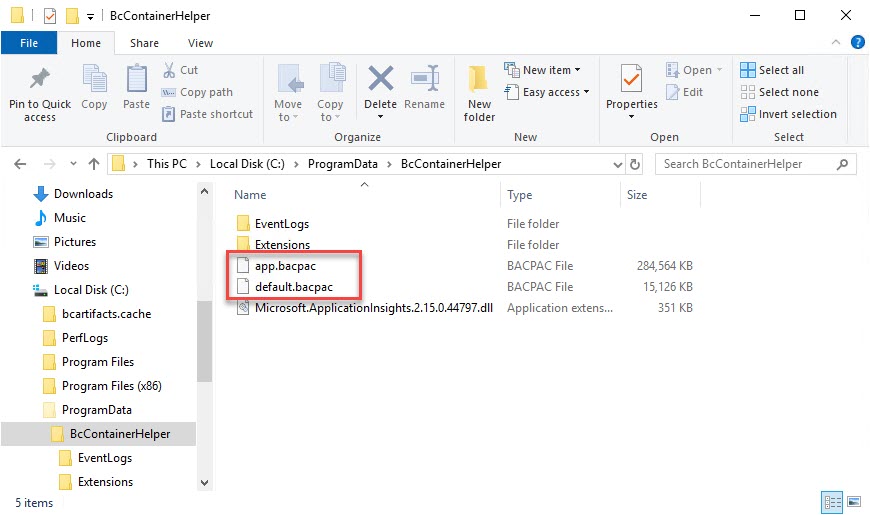
The tenant name is the default name of ‘default’ that is created in each standard BC container. The sqlCredential is a PSCredential object that was created during the container generation, using a username and a secure string password. As stated above, the bacpacFolder is a folder that can be accessed both in and out of the container. The entitlement flag is to bypass the check and prevent an error. When you execute this script, the bacpac files will show up in the bacpacFolder:

Create New Container from Bacpac

We are going to use these same bacpac files to create a new container. I’ll use the same container name:

New-BCContainer `
    -accept_eula `
    -containerName 'DenSterDev' `
    -artifactUrl '<ProperArtifactURL>' `
    -auth NavUserPassword `
    -assignPremiumPlan `
    -updateHosts `
    -accept_outdated `
    -Credential $Credential `
    -additionalParameters @('--env appbacpac=C:\ProgramData\BcContainerHelper\app.bacpac','--env tenantbacpac=C:\ProgramData\BcContainerHelper\default.bacpac')

Same as before, the -Credential parameter contains a PSCredential object. Note that the -additionalParameters spans across multiple lines here, but that should go on the same line in your PowerShell editor.

This command will download all the necessary artifacts and create the same container as the standard. The only difference will be that the app and tenant databases will be created from the bacpac files in your folder, instead of the standard database from the artifact. You can follow along with the script in the terminal window.

Nothing earth shattering, and made super easy by BcContainerHelper, but it took me a while to find the information and make this work. Hat’s off to Dmitry in the BC team, he was very patient with me as I got familiar with this process. Let me know in the comments if this was helpful or if you want to add anything.

Sign App File – part 2

Quite a while ago I wrote about signing your app file, which is a requirement for AppSource. It’s been a while since I had to do this, so I went back to my blog and found the article quite lacking. This post is an attempt to fill in the blanks and give you all the information that you need to sign your app, all in one place.

Your first stop to read about this is right here, the Learn page about signing the app file specifically for Business Central. Most of what I’m about to tell you is in there, I’ll just elaborate a little bit more.

Basically, signing an app file, or an executable file, is a way to tag that file with an attribute that certifies where the file came from. If Acme Rockets signs their rocket skate app, the file has an attribute that shows Acme indeed digitally signed it. Take a look at the properties for ‘explorer.exe’, the executable for Windows Explorer. You can check out the digital signature that verifies that this file was signed by Microsoft.

In a nutshell, you need the following:

  • A Code Signing Certificate, in ‘pfx’ format
  • A code signing tool (I’m using ‘signtool’ here)
  • The SIP from your BC container (don’t ask, I still don’t really know)
  • A script to actually sign

Code Signing Certificate

The first thing that you need is the Code Signing certificate. This is a particular type of certificate (NOT the same as an SSL certificate) that you must get from an Authenticode licensed certificate authority (there’s a link in the Docs article mentioned above) such as this one or this one or this one or this one. I’m not affiliated with either one, and GoDaddy doesn’t seem to provide code signing certificates anymore, but I’ve worked with certs from two of those companies and they both worked as advertised. For AppSource submissions, you need the regular “Code Signing”, not the extended one or the one for drivers. Go shopping, because I’ve seen prices range between $199 and $499 per year for the same thing.

In order for the signtool to be able to use the certificate, it must be in ‘pfx’ format. One of the providers that I mentioned has a page here that explains how you can create this file format. The actual file will have a password on it, and you can save it on the computer where you have NAV/BC installed, or where your container lives. I usually have a working folder right in the C root where I do this kind of thing.

The Signing Tool

You’ll need a tool to sign the app file – Microsoft recommends SignTool or SignCode. Since their sample script is for SignTool, that’s the one that I used. Now, the text in Docs describes that SignTool is automatically installed with Visual Studio, but that is only partially true. I actually downloaded Visual Studio to see if that works, but the installation configuration that I chose did not include SignTool.

Signtool is part of the Windows SDK, which probably comes in one of the standard Visual Studio configurations. I don’t know which one, so you’ll have to make sure that it is selected when you are installing it. Another way to get it installed is to install the Windows SDK directly, which you can download here. I installed the one for Windows 7 on a Windows Server 2019 Hyper-V VM, and it worked for me. I know, I should have looked a little longer and used the Windows 10 one, but by that time my app file was already signed and dinner smells were filling my office.

The SIP

If you try to sign your app file now, you will probably get an error message that the app file is not recognized. The SignTool program needs to be able to recognize the app file, and for that purpose it needs to have something called ‘the SIP’ registered on the machine where you run the SignTool command. Apparently this is some sort of hash/validation calculation package that is used to create digital signatures. Each program on your computer apparently has one of these.

One way to get ‘the SIP’ is to install NAV/BC on the computer. If you’re like me, and you use containers exclusively, you won’t want to do this. Luckily, the NavContainerHelper module has a Cmdlet to retrieve ‘the SIP’ out of the container.

 Install-NAVSipCryptoProviderFromBCContainer YourContainerName 

This Cmdlet gets ‘the SIP’ out of the container and registers it on the host. At this point, you should be all set to sign your app file.

Script to Sign

The last element is the command to actually create the digital signature. Not much to say about that, so here it is:

"C:\Program Files\Microsoft SDKs\Windows\v7.1\Bin\signtool.exe" sign 
    /f "C:\WorkFolder\CodeSignCert.pfx" 
    /p "Your Password" 
    /t http://timestamp.verisign.com/scripts/timestamp.dll "C:\YourRepo\Publisher_AppName_1.0.0.0.app"

As you can see, my SignTool is in the Windows 7 SDK folder, you may need to search around for it. Installing the SDK is supposed to register SignTool and you should be able to just use ‘signtool’ as a command. For some reason that did not work for me, which is why I specified the entire path. I split this up to make it look better in this post, the command needs to all be on one line.

One more thing – the timestamp specifies that the file was signed using a certificate that was valid at the time of signing, and the file itself will never expire. Of course if you want to submit a new file after the certificate has expires, you will need to get a new one. If you don’t specify the timestamp, your app file will expire on the same date as your certificate.

Update March 26, 2020 – The timestamping service was provided by Symantec and it looks like they are rebranding that to ‘digicert’. Here is an article that explains the situation. You will need to change the timestamp part in your script:

Replace:
/t http://timestamp.verisign.com/scripts/timestamp.dll 
With this:
/t http://timestamp.digicert.com?alg=sha1

All Set

That’s it, you should be all set to sign your app file. I have to be honest and confess that I wrote this mainly for myself, because I spent WAY too much time trying to re-trace my steps and figure out how this works again. It’s now in a single post, hope it helps you as much as it helped me.

Update – March 18, 2020

Turns out, there is a simple command for this….

$MyAppFile = "C:\ProgramData\NavContainerHelper\Extensions\Publisher_AppName_1.0.0.0.app"
$MyPfx = "C:\ProgramData\NavContainerHelper\Extensions\CodeSignCert.pfx"
$MyPassword = ConvertTo-SecureString "Your password" -AsPlainText -Force
$MyContainerName = "YourContainer"

Sign-NavContainerApp -appFile $MyAppFile -pfxFile $MyPfx -pfxPassword $MyPassword -containerName $MyContainerName

No need to install anything. All you need is the app file and your pfx file with a password, and everything else happens in the container (as Freddy puts it “without contaminating the host”). Just copy both files into a shared folder where NavContainerHelper can read the files.

NAV Techdays 2018 Recap

I started to write this post while flying across the Atlantic Ocean on the second of a three leg journey home, a BA flight from London to Phoenix. It has been a very long trip that started when I traveled to Holland for Directions EMEA in Den Haag at the end of October. Since Directions and NAV Techdays were relatively close together, I decided to just stay with my family in Holland for those 4 weeks rather than fly back and forth twice in less than a month. This has been the longest that I’ve ever been away from home, and I was SO ready to be back in my own house.

NAV Techdays ended last Friday, and it’s been another fantastic week, as we’ve come to expect. As far as I can tell, the attendees in my pre-conference workshop were happy with the content, I can’t wait to get the feedback and see what I can improve for next time.

As per usual, Luc has posted the videos in record time, less than a week after the event. The whole playlist can be found here, and I wanted to highlight some of my favorite sessions. One of the most important developments in current technology is machine learning and AI. Dmitry Katson and Steven Renders put together an awesome session to introduce machine learning to us. The award for most entertaining session goes to Waldo and Vjeko, who put on a concert and wowed the audience with some really cool content. I also want to point out the session about CI/CD, which is going to be one of the most important things for everyone that is serious about implementing a professional development practice. Of course, I have to also mention the Docker session, which is the technology that makes it all possible.

Furtunately, next year’s event is not scheduled on Thanksgiving, which is a national holiday here in the US, one that typically involves lots of friends and family, and lots of food. I’ve had to miss it the past couple of years, and each time I’ve been bummed to hear the stories of all the great meals and gatherings that my family got to have without me. Next year I’ll be home for Turkey Day!

Thanks for another super event, it’s one of my favorite weeks of the year.

Extensible Enums

The AL language has an object type called ‘enum’. This object type defines a list of possible values in the form of a set of key/value pairs, plus captions. You can then create a field in a table or table extension enum as its data type, and the field will provide the user with a drop down list of those values. Just like option fields, the database stores the numerical values of the enum in the field.

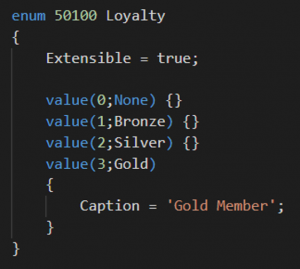
To define a new enum, you create a new .al file in which you define the enum as an object, and you list the options of the enum as follows:

Note that the ‘Extensible’ property is set to true, so it will be possible to extend the enum with additional options when the enum is used in other extensions.

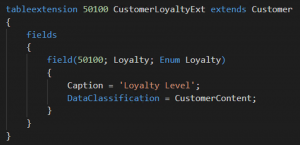
To link a field in a table or a table extension, you define the field as an enum type field, and specify the enum name as part of the field definition. In the following screenshot we’re adding an enum type field to the Customer table in a new tableextension:

Now, in order for this enum to be extended, you would have the app that includes the enum as a dependency (which puts the original enum into the current app’s symbol references), and then you would create a new object called an ‘enumextension’, in which you define additional values.

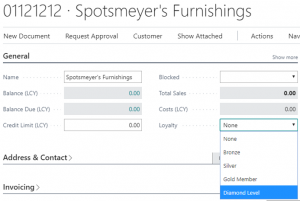
Now when you look at the Customer Card, you can see all the values in the dropdown for the new field:

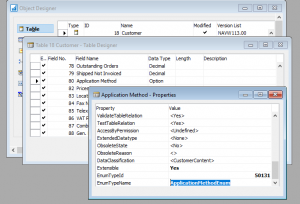
It is also possible to link an option field in C/SIDE to an enum in AL, as shown in the following screenshot:

When I learned about the extensible enum type, I was salivating at the thought that it would be possible to extend the available options in a ton of tables (type in sales/purchase line, account type in journals, entry type in ledgers to name just a few of them). It IS possible to do just that, and eventually the goal is to replace all option type fields in Business Central with enum type fields, it’s just that it comes with a crap ton of refactoring of existing code.

There is a lot of code that checks for all available option values, with an ELSE leg in the CASE statement for ‘other values’. All of that code will need to be refactored to allow for extended enums instead of just raising an error with an unrecognized value.

Now you know about enums, start using them instead of option type fields, and make them as extensible as possible.

AppSource Test Drive

Everybody knows about AppSource by now. Everybody is also struggling how to make AppSource work for them, and especially how to provide customers and prospects a trial of their functionality. You could create a sandbox environment and try things out in there, but that doesn’t have test data that is specific for your product. You could install the product into a production tenant, but then you have an app in there that you might not want after all.

One of the lesser known features of AppSource is the Test Drive. This feature provides an ISV partner a completely isolated trial experience  of their product, in an environment that is completely in their control. What’s even better is that the Test Drive can be done in a number of different ways, so you can tailor it exactly to your requirements.

The Test Drive can be a part of a comprehensive marketing strategy, in which you can implement an environment that can showcase even the most complex features of your software, in a way that provides ample opportunity to your customers to learn how to use your product in a non-production environment that is still in the cloud, without having to get a team of consultants onsite.

The way that it works is essentially that the Test Drive is a standalone tenant that has a template company. This template company has your product already installed, and it has proper test data already populated. You can create all the data that you need for your product to run properly. Then, through the SaaSification techniques, you would implement a path into the features of your product, taking the user into your product one step at a time.

If you are interested in providing a Test Drive, please watch this video, in which I go into some more detail about this feature.

To find out more about the test drive, and other information about apps for Business Central, visit http://aka.ms/ReadyToGo

Business Central on YouTube

Today is a Very Big Day! Allow me to tell you why 🙂

Maybe you remember a few months ago, when I posted some ‘how do I’ videos, I also mentioned that I was working on hours and hours of training material for Business Central. To make a long story short: my company was commissioned to create a long list of technical training videos. Originally, those videos would be published in the Dynamics Learning Portal (DLP). For those of you that don’t know, the DLP is a website where you can find a ton of training resources for a variety of Microsoft Dynamics products, including NAV and Business Central. There are a few caveats about DLP: not only is it inside PartnerPortal, you have to pay extra to get access to it. Partners who don’t pay this extra fee do not get access to DLP.

As soon as I started working on these training videos, I started mentioning how cool it would be to have these videos available for a wider audience, and every chance I got I would repeat that to anybody who would listen. At some point the decision was made to lift these videos from behind the paywall. They would still be inside DLP, but anyone with PartnerSource access would be able to see them. I was still not happy with that, after all PartnerSource is not free.

Now, exactly how much influence I have over these types of decisions is up for debate, but I do know that I recorded these videos, I had daily status calls with people from Microsoft, and I mentioned it to everyone that it would be great to make ALL of these videos available to the public.

So, the reason why I am so excited, is that I am very proud to be able to share that as of today, there is a separate channel for Business Central on YouTube, and the first thing that was published is a playlist with ALL of the technical training videos that are currently available. That’s right, the entire list of videos that are currently in the Business Central YouTube channel are recorded by ME!!

We still have more videos to create, and they should be added to the playlist as I finish them. At some point I’m expecting Microsoft to add more content to this channel, so it won’t be just me on there, but for now I am almost giddy with excitement.

Now like I said I don’t know just how much my insistence has played a part in this, but when I first started with this project the only plan was to publish these videos to DLP. In my mind I single-handedly convinced Microsoft to release all this great content to the public.

NAV Techdays 2018 – I’m Speaking!

Registration for NAV Techdays 2018 is open, and this year is going to be SUPER exciting for me, because I am going to teach an all-day pre-conference workshop! Go to the sessions overview page of the NAV Techdays website to see the details of all of the sessions and the pre-conference workshops. Of course I would LOVE it if you sign up for my workshop, but really you can’t go wrong with any of them.

My workshop is called “A Day in the Life of a Business Central Developer”. I still need to put the material together, but the plan is to cover all aspects of what it means to be a developer for Microsoft Dynamics 365 Business Central. Think about the development environment, how to create an app, how to create multiple apps with dependencies (an extension of another extension), how to connect to web services, how to use source control, and even design patterns and Docker.

I realize that it is a very ambitious agenda, but I am sure that we can fill a whole day with great content. I’m not sure if there will be much time to do any extensive lab work, so I might end up just teaching all day and giving you some things to take home and work on after the workshop is done.

Most importantly – go register for NAV Techdays, it is really THE premium event for our industry. Spend an extra couple of days in Antwerpen for the pre-conference workshops, they are all fantastic and worth every penny.

See you in Antwerpen in November!