Document Attachments

One of my clients had asked me to add Document Attachments to Bank Deposits. Thinking this was a quick and easy one I added the factbox, set the link, and went on with my day. When my client said they see all attachments for all records, I realized it is a little more involved. It took some time to figure out how it actually works, and this post explains the whole thing, including how to get document attachments through the posting process.

How Does it Really Work?

The reason why it’s not so simple is because the Document Attachment works with RecRef instead of a hardcoded table relationship. Take a look at the Document Attachment table (table number 1173 in the base app) for the field definitions. I’ll focus on single field PK records in this post, so tables where a single Code20 field has the unique identifier of the record. The more complex compound PK works the same, you just need to set more fields.

Standard BC has a limited number of tables that have document attachment capabilities. If you want to add another table, whether a custom table or another standard table, you will need to subscribe to some events to make that work. Let’s first look at how standard document attachments work.

Open Document Attachments

Let’s take a look at the Customer Card page in standard BC. The “Attachments” action has the following OnAction trigger code:

trigger OnAction()
var
    DocumentAttachmentDetails: Page "Document Attachment Details";
    RecRef: RecordRef;
begin
    RecRef.GetTable(Rec);
    DocumentAttachmentDetails.OpenForRecRef(RecRef);
    DocumentAttachmentDetails.RunModal();
end;

The “Document Attachment Details” page is where the magic happens. If you drill down into the ‘OpenForRecRef’ function, you will see that it takes a RecRef variable (which in this example is looking at the current Customer record) and sets filter on the table ID of the RecRef and the value of the PK field of the record itself. This is the function that defines all the tables in the standard BC app that have Document Attachments.

The important thing in this function is the call to OnAfterOpenForRecRef, which is an event publisher that we will subscribe to later. This event gives you the capability to set a filter to any table. Note that this is just a filter on a page. All that this does is make sure that you only see the document attachments for this particular record.

The Document Attachments Factbox

Another way to give the user access to the document attachments is the “Document Attachment Factbox” that you can see in the factboxes area. In the standard app on the Customer Card, the SubPageLink property links the “Table ID” field to a hardcoded value 18 (which is Customer table’s object id). If you want to create your own link, you should use the table name instead of its number. So we will be linking to the “Bank Deposit Header” table, so our constant value will be Database::”Bank Deposit Header”.

Take a look at the OnDrillDown trigger of the NumberOfRecords field in the factbox. It first sets up the RecRef, which is again hardcoded for the standard range of tables that have document attachments. Then it executes the same logic on the Document Attachment Details page as the action mentioned above.

Note the OnBeforeDrillDown function call in the ‘else’ leg of the ‘case’ statement. This is the event that you need to subscribe to in order to properly filter the document attachments for non-standard tables.

What is important to understand about this particular factbox is that records are not entered directly into the factbox. You have to click an action that adds the record, and as a result the “No.” field in the factbox is NOT populated by the page link.

Creating New Document Attachments

So far we’ve only looked at how to display the proper document attachments to the user. What’s left is how BC actually stores these records. The part that is tricky is not about getting the file itself, but how BC gets the value from the RecRef. The function that stores the values from the RecRef into the document attachment is called InitFieldsFromRecRef. You can see that this function again goes through all of the same hard coded standard BC tables that we’ve seen before, and it provides an event publisher called OnAfterInitFieldsFromRecRef that you can use for additional tables.

Document Attachments for Additional Tables

Alright, now let’s put it all together for a new table. I recently added this for Bank Deposits for a client of mine, so I’ll use the same table to illustrate. I’ll focus on the new ‘Bank Deposit Header’ and its Posted sibling. The new implementation of bank deposits can be found in the “_Exclude_Bank Deposits” app that is part of standard BC.

To get started, create a page extension for the Bank Deposit and the Posted Bank Deposit pages, and add the Document Attachment factbox. You can copy this from the Customer Card and change the links appropriately. Note that the records that you will see when you drill down into the details are filtered on the table but not by the PK value of the record that you are looking at. In other words, just adding this factbox will only give you a list of all the Document Attachments that are linked to ALL (Posted) Bank Deposits.

Finally, create a new codeunit, I called mine ‘DocAttachmentSubs’.

Filter the Details

First, we need to make sure that the “Document Attachment Details” page is filtered on the correct Bank Deposit number. For this we subscribe to the OnAfterOpenForRecRef event.

[EventSubscriber(ObjectType::Page, Page::"Document Attachment Details", 'OnAfterOpenForRecRef', '', true, true)]
local procedure DocAttDetailsPageOnAfterOpenForRecRef(var DocumentAttachment: Record "Document Attachment"; var RecRef: RecordRef)
var
    MyFieldRef: FieldRef;
    RecNo: Code[20];
begin
    if RecRef.Number in [Database::"Bank Deposit Header", Database::"Posted Bank Deposit Header"] then begin
        MyFieldRef := RecRef.Field(1); // field 1 is the "No." field in both tables
        RecNo := MyFieldRef.Value();
        DocumentAttachment.SetRange("No.", RecNo);
    end;
end;

Filter the Factbox

Next, we need to make sure that the details are filtered properly when the user clicks the DrillDown from the document attachment factbox. For this we subscribe to the OnBeforeDrillDown event in the factbox.

[EventSubscriber(ObjectType::Page, Page::"Document Attachment Factbox", 'OnBeforeDrillDown', '', true, true)]
local procedure DocAttFactboxOnBeforeDrillDown(DocumentAttachment: Record "Document Attachment"; var RecRef: RecordRef)
var
    BankDepositHeader: Record "Bank Deposit Header";
    PostedBankDepositHeader: Record "Posted Bank Deposit Header";
begin
    case DocumentAttachment."Table ID" of
        Database::"Bank Deposit Header":
            begin
                RecRef.Open(Database::"Bank Deposit Header");
                if BankDepositHeader.Get(DocumentAttachment."No.") then
                    RecRef.GetTable(BankDepositHeader);
            end;
        Database::"Posted Bank Deposit Header":
            begin
                RecRef.Open(Database::"Posted Bank Deposit Header");
                if PostedBankDepositHeader.Get(DocumentAttachment."No.") then
                    RecRef.GetTable(PostedBankDepositHeader);
            end;
    end;
end;

So now when the user clicks the drilldown, BC will set the RecRef to look at the (Posted) Bank Deposit, which is then sent into the details page, which then knows how to properly filter.

Set the Right Link

The last thing we need is to make sure that new document attachments have the (Posted) Bank Deposit number, by subscribing to the OnAfterInitFieldsFromRecRef event of the Document Attachment table itself.

[EventSubscriber(ObjectType::Table, Database::"Document Attachment", 'OnAfterInitFieldsFromRecRef', '', true, true)]
local procedure DocAttTableOnAfterInitFieldsFromRecRef(var DocumentAttachment: Record "Document Attachment"; var RecRef: RecordRef)
var
    MyFieldRef: FieldRef;
    RecNo: Code[20];
begin
    if RecRef.Number in [Database::"Bank Deposit Header", Database::"Posted Bank Deposit Header"] then begin
        MyFieldRef := RecRef.Field(1); // field 1 is the "No." field in both tables
        RecNo := MyFieldRef.Value();
        DocumentAttachment.Validate("No.", RecNo);
    end;
end;

You should now be able to create new document attachments for unposted and posted bank deposits. All that’s left is to get document attachments to flow through the posting process.

Posting

Document Attachments are not intrinsically difficult. In the end they are just records in the database. The records are identified by their Table ID and their PK values. For Bank Deposits the PK is a single Code20 field, and there are two versions of the table. All we need to do is write a little loopyloopy that reads the records for the unposted record, copy it into the posted record, and get rid of the old ones. Would be cool to just change the records, but since both the Table ID and the record identifier are all part of the PK, you can’t do a ‘Rename’ because then you’d have to sit there and click confirmations all day long.

For Bank Deposits, you can use the OnAfterBankDepositPost event in the “Bank Deposit-Post” codeunit.

[EventSubscriber(ObjectType::Codeunit, Codeunit::"Bank Deposit-Post", 'OnAfterBankDepositPost', '', true, true)]
local procedure BankDepositPostOnAfterBankDepositPost(BankDepositHeader: Record "Bank Deposit Header"; var PostedBankDepositHeader: Record "Posted Bank Deposit Header")
begin
    MoveAttachmentsToPostedDeposit(Database::"Bank Deposit Header", BankDepositHeader."No.",
                                    Database::"Posted Bank Deposit Header", PostedBankDepositHeader."No.");
end;

local procedure MoveAttachmentsToPostedDeposit(FromTableId: Integer; FromNo: Code[20]; ToTableId: Integer; ToNo: Code[20])
var
    FromDocumentAttachment: Record "Document Attachment";
    ToDocumentAttachment: Record "Document Attachment";
begin
    FromDocumentAttachment.SetRange("Table ID", FromTableId);
    FromDocumentAttachment.SetRange("No.", FromNo);

    if FromDocumentAttachment.FindSet() then begin
        repeat
            Clear(ToDocumentAttachment);
            ToDocumentAttachment.Init();
            ToDocumentAttachment.TransferFields(FromDocumentAttachment);
            ToDocumentAttachment.Validate("Table ID", ToTableId);
            ToDocumentAttachment.Validate("No.", ToNo);
            ToDocumentAttachment.Insert(true);
        until FromDocumentAttachment.Next() = 0;
        FromDocumentAttachment.DeleteAll();
    end;
end;

I have this in a separate function because I also had to make it work for the old Deposit implementation. You could totally combine this into a single event subscriber.

I’m thinking about creating a video about this topic. Let me know if this was useful in the comments and if you’d like to see the video.
Formatting Booleans

As you know, boolean fields are presented as a checkbox in BC. The issue with that is that checkboxes themselves have no formatting properties. There are a couple of different ways to change the appearance of boolean fields, read on if you want to know what they are.

One of the apps I work on has a custom journal, in which we use the StyleExpr to color fields based on a number of checks on the record. Over time, we’ve added this functionality to a bunch of fields. You have to scroll to the right to check all the fields, so we added a field called ‘Has Alerts’ to tell the user that something is up with this record. My client didn’t like the standard checkbox and asked if we can show the field as ‘Yes’ or ‘No’.

I asked Twitter for help and got a few responses:

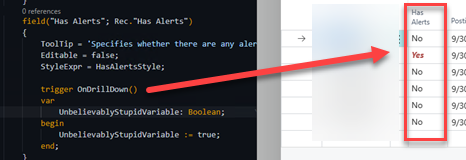
Use the OnDrillDown Trigger

Some of the old quirks of NAV made their way into BC, and one of them is that the simple act of adding a trigger can modify the behavior of page controls.

Image
Using the OnDrillDown trigger

As you can see, the code in the trigger is absolutely meaningless. All we are doing is setting a dummy variable, and the mere presence of this trigger causes the boolean to be presented as a text. The StyleExpr property is tied to a variable that is set in the OnAfterGetCurrentRecord trigger of the page itself. I don’t like this solution because the trigger has no meaning. The field values become clickable, but because the code is bogus, the user will want to click something that does nothing. Of course there could be situations where you actually want to do something in the drilldown, in which case this is perfectly acceptable.

Format the Field

The winning suggestion was to include the Format command in the SourceExpr of the control. So elegant, and makes sense right. The page recognizes that the source is a text, and presents the Yes/No variation of the boolean.

Image
Formatting the SourceExpr

I like this because the field value is not clickable, just a text value. Just a quick tip, nothing earth shattering, but something that I know I’ll want to use some time in the future.

Dynamic Enums

Although enums are static lists of values, there is a way to restrict which values can be used. With this post I will show you how to do that, and how you can dynamically set up how this happens.

Didn’t Think it was Possible

I didn’t think dynamic enums were possible but I asked the question on Twitter anyway. The golden tip was a page property called ‘ValuesAllowed’. As I was figuring out how to use this property I thought I’d write this blog post. When I returned to Twitter to post my findings, there were two more links to some other people’s articles in the replies. I’ve since removed much of the details from this post, since they are essentially the same. Go and follow the links in the Tweet replies to read those details.

Both replies cover an essentially hard coded way to restrict option values. I want to take this one step further, where we provide a setup field that is used to manage the choices that you see. Now… I have to say I do NOT like using a static list of options for this purpose. We are still looking at a static list of values, and we are hardcoding what is visible. In my real-world scenario we had to put something in place quickly, and this was indeed a very quick ‘fix’.

Scenario

My actual scenario involved a rather controversial topic, so let’s use a silly scenario instead. We add a field to the Customer table called ‘Dessert Choice’, with an enum type that has 4 values: <blank>, Icecream, Cookies, and ‘Choice Declined’. You need an enum object, a table extension with a field based on the enum, and a page extension to add the field to the Customer Card. Let’s say you want to restrict the ‘Choice Declined’ option. Easy peasy, lemon squeezy, you add a ‘ValuesAllowed’ property to the field on the page extension, and you specify the values that you do want to allow.

In my real-world scenario, my client needed a way to restrict the available options for one company, and provide all of them in others. What we ended up doing was add a toggle to a setup table to turn this restriction on or off.

Show Me The Code

As per usual I was writing and writing, using SO MANY words to describe the situation, and decided to just give you the page extension itself, assuming that you can figure out the fields that I am using.

pageextension 60000 CustomerCardDnStr extends "Customer Card"
{
    layout
    {
        addafter(Name)
        {
            field(DessertChoice; Rec.DessertChoice)
            {
                ApplicationArea = All;
                ToolTip = 'Specifies...';
                Visible = AllVisible;
            }
            field(RestrictedDessertChoice; Rec.DessertChoice)
            {
                ApplicationArea = All;
                ToolTip = 'Specifies...';
                ValuesAllowed = Blank, Icecream, Cookies;
                Visible = (not AllVisible);
            }
        }
    }

    var
        MySetup: Record MySetupDnStr;
        AllVisible: Boolean;

    trigger OnOpenPage()
    begin
        MySetup.GetRecordOnce();
        AllVisible := MySetup.AllowDecline;
    end;
}

Basically you create multiple controls in the page extension for the same field, and you toggle visibility based on a field in a setup table. You could even do this at a record level in a list, by using an InDataSet variable, and putting the code in the OnAfterGetCurrRecord trigger. Again, I’m thinking this should have been done with a table with actual functionality, but this way uses very little code and we had to put something in very quickly.

That’s it, nothing fancy. Not very clever, but useful in my client’s scenario.

Partial Records with SetLoadFields

Fetching and updating records has historically been the greatest culprit of performance problems. The standard way that BC retrieves records is very expensive, since it will always get ALL the fields of a table (and its brethren companion tables). This post covers a (relatively) new option called SetLoadFields, which is used to specify the fields that you want to retrieve.

So What’s the Problem?

The database engine for BC is SQL Server for OnPrem and Azure SQL for SaaS; the business logic translates database operations into T-SQL statements at run time. By default, it issues a SELECT * and that means that for every standard database call, BC retrieves ALL fields from the table. Good for us developers because we never have to think about which fields to fetch. From a performance point of view though this causes a MASSIVE superfluous overhead in data traffic. Some of the most used tables in BC have bazillions of fields, and in any business logic scenario you never need more than a handful of fields.

The problem is exacerbated by the presence of table extensions. Each table extension is represented in the SQL database by a companion table that shares the primary key with the main table. Every time that you retrieve records from the main table, the system also retrieves the fields from the companion tables by issuing a JOIN on the PK fields. You can imagine a popular table like the Sales Line with a dozen table extensions; a SalesLine.FindSet command generates a SQL statement that includes a dozen JOINs.

The problem is that the number of fields that are included in SQL statements has a disproportionate effect on query performance. Read the post that I link to below for more details, but what you need to know is that the same query with all fields can take hundreds of times more than retrieving just half a dozen fields.

Only Get What you Need

To eliminate this overhead, we now have a SetLoadFields command. Basically, what you can do with this command is to define the fields that are included in the SQL statement. Instead of getting all fields and get data that you will never use, you tell BC that you only want your handful of fields.

Need an address from a Vendor? The external document number from an invoice? An Inventory Posting Group from an Item? You don’t have to read 6 million fields to do that anymore.

procedure ShowSomeCode()
var
    Vendor: Record Vendor;
begin
    Vendor.SetLoadFields(Address,"Address 2",City,"Post Code");
    Vendor.Get('10000');
    // do stuff with the address fields and ignore the rest
end;

This code sample generates a SQL statement with a SELECT on just those few fields that are defined in the SetLoadFields command, and it should ignore the companion tables altogether since these are all main table fields.

Read the documentation here and make sure you read how to use it here. For more technical in-depth information on what to do and what happens under the hood (way above my head there), read Mads’ posts here and here.

New Habits

In my day-to-day life as a BC developer I don’t normally see SetLoadFields commands. I even checked the standard objects and it’s actually quite surprising how little it is used there. In a previous life I did a LOT of performance troubleshooting, and this would have been a tremendous help in solving lots of performance problems. I know I will try to make using this command a habit.

Import Media Files for SaaS

One of the standard ‘Problems’ when you’re in an AL workspace in VSCode is a warning that you are no longer allowed to use BLOB as a datatype for images. This has been at the bottom of my priorities list until I had a request to create a new image for a standard field. With this post I’ll show you how easy it is.

Media Field

The first element that you need is a field in the table. Instead of a BLOB field with subtype Bitmap, you now need a field of type ‘Media’. There is also a data type called ‘MediaSet’ but that’s not what we are going to use. Go to Docs to read about the difference between Media and MediaSets. The field is not editable directly because we will be importing the image through a function.

In addition to the field itself, you need a function to import an image file into the field. In the object below I have a simple table called ‘Book’ with a number, a title and a cover. We use the ImportCover function to do the import, and implement that as an internal procedure, so it can only be used internal to the app. You can of course set the scope as you see fit.

table 50100 BookDnStr
{
    Caption = 'Book';
    DataClassification = CustomerContent;

    fields
    {
        field(10; "No."; Code[20])
        {
            Caption = 'No.';
            DataClassification = CustomerContent;
        }
        field(20; "Title"; Text[100])
        {
            Caption = 'Title';
            DataClassification = CustomerContent;
        }
        field(30; Cover; Media)
        {
            Caption = 'Cover';
            Editable = false;
        }
    }

    keys
    {
        key(PK; "No.")
        {
            Clustered = true;
        }
    }

    internal procedure ImportCover()
    var
        CoverInStream: InStream;
        FileName: Text;
        ReplaceCoverQst: Label 'The existing Cover will be replaced. Do you want to continue?';
    begin
        Rec.TestField("No.");
        if Rec.Cover.HasValue then
            if not Confirm(ReplaceCoverQst, true) then exit;
        if UploadIntoStream('Import', '', 'All Files (*.*)|*.*', FileName, CoverInStream) then begin
            Rec.Cover.ImportStream(CoverInStream, FileName);
            Rec.Modify(true);
        end;
    end;
}

Factbox for the image

Similar to how Item images have been implemented, you can create a factbox to show the book cover and add that to the Book Card. Using a factbox also makes it easy to keep the related actions close to the control.

page 50100 BookCoverDnStr
{
    Caption = 'Book Cover';
    DeleteAllowed = false;
    InsertAllowed = false;
    LinksAllowed = false;
    PageType = CardPart;
    SourceTable = BookDnStr;

    layout
    {
        area(content)
        {
            field(Cover; Rec.Cover)
            {
                ApplicationArea = All;
                ShowCaption = false;
                ToolTip = 'Specifies the cover art for the current book';
            }
        }
    }
    actions
    {
        area(processing)
        {
            action(ImportCoverDnStr)
            {
                ApplicationArea = All;
                Caption = 'Import';
                Image = Import;
                ToolTip = 'Import a picture file for the Book''s cover art.';

                trigger OnAction()
                begin
                    Rec.ImportCover();
                end;
            }
            action(DeleteCoverDnStr)
            {
                ApplicationArea = All;
                Caption = 'Delete';
                Enabled = DeleteEnabled;
                Image = Delete;
                ToolTip = 'Delete the cover.';

                trigger OnAction()
                begin
                    if not Confirm(DeleteImageQst) then
                        exit;
                    Clear(Rec.Cover);
                    Rec.Modify(true);
                end;
            }
        }
    }
    trigger OnAfterGetCurrRecord()
    begin
        SetEditableOnPictureActions();
    end;

    var
        DeleteImageQst: Label 'Are you sure you want to delete the cover art?';
        DeleteEnabled: Boolean;

    local procedure SetEditableOnPictureActions()
    begin
        DeleteEnabled := Rec.Cover.HasValue;
    end;
}

Add to the Page

All that is left is to add the factbox to the page where you have the import action. In this case I have a very simple Card page for the book, and the factbox is show to the side.

page 50101 BookCardDnStr
{
    Caption = 'Book Card';
    PageType = Card;
    ApplicationArea = All;
    UsageCategory = Administration;
    SourceTable = BookDnStr;

    layout
    {
        area(Content)
        {
            group(General)
            {
                field("No."; Rec."No.")
                {
                    ToolTip = 'Specifies the value of the No. field.';
                    ApplicationArea = All;
                }
                field(Title; Rec.Title)
                {
                    ToolTip = 'Specifies the value of the Title field.';
                    ApplicationArea = All;
                }
            }
        }
        area(FactBoxes)
        {
            part(BookCover; BookCoverDnStr)
            {
                ApplicationArea = All;
                SubPageLink = "No." = field("No.");
            }
        }
    }
    actions
    {
        area(Processing)
        {
            group(Book)
            {
                action(ImportCover)
                {
                    Caption = 'Import Cover Art';
                    ApplicationArea = All;
                    ToolTip = 'Executes the Import Cover action';
                    Image = Import;
                    Promoted = true;
                    PromotedCategory = Process;
                    PromotedOnly = true;

                    trigger OnAction()
                    begin
                        Rec.ImportCover();
                    end;
                }
            }
        }
    }
}

This was a fun one to figure out. Let me know in the comments if it was useful to you

Commitment Issues

So you’re evolving your source control practice. You have created a ‘dev’ branch to keep work in progress away from the ‘main’ branch, and maybe you are even using feature branches or branches per developer. As you are putting in place branch policies to prevent just anybody from committing changes, you notice a pattern of commits being created just by merging a change into ‘main’. In this post I will show you how to limit the number of commits.

The Setup

I have a simple project in Azure DevOps, with a repo that has a default branch called ‘main’ and a ‘dev’ branch. The main branch requires a reviewer, which in Azure DevOps means that changes can only be made through pull requests. I’ve committed a couple of changes in dev and I have created a pull request to move that change into the main branch to be released. The PR has been approved and I have clicked the ‘Complete’ button on the PR. The Azure DevOps default Merge Type is set to ‘Merge’ and all looks well, so then I click the ‘Complete Merge’ button.

The Issue

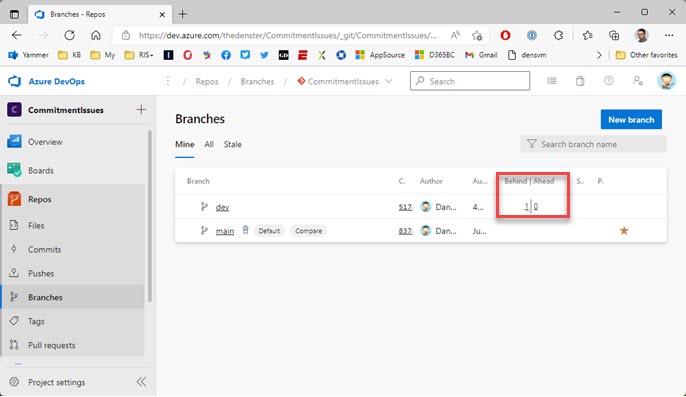
When the PR completes, you go back to the Branches view in Azure DevOps, and you notice that the dev branch is 1 commit behind on Main….

Wait, what? Didn’t I just merge 2 commits from dev into Main? The purpose of the PR was to synchronize the branches, but it appears that dev now a commit behind main. The Merge Type of ‘Merge’ created its own commit in the target branch, main in this case. When you go back to VSCode and merge main back into dev, you would notice that the source files themselves have not changed, even though Git has created two extra commits just from the Merge actions. You see, any time that you do a Merge in Git, it will generate a new commit.

If you were to do a file compare between the two branches, there would be no differences in the source files. The not so good part of using the Merge Type ‘Merge’ is that you will have to refresh your local main branch and merge that into your dev branch BEFORE you can continue developing. In itself maybe this works for many people but I prefer it if I can push out my dev work and continue developing without having to worry about being in synch with main.

A Better Way

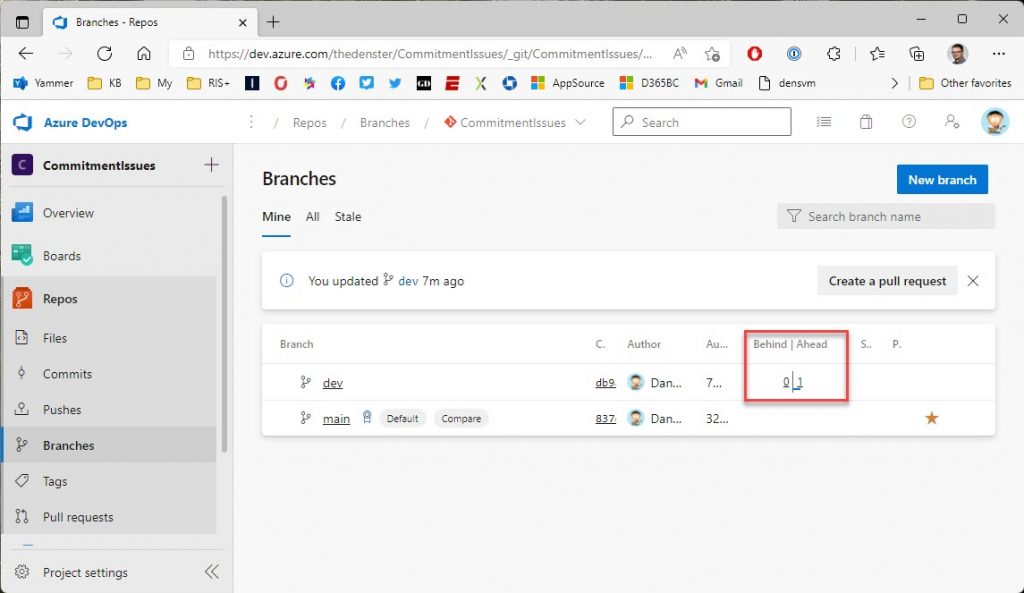
There is another (I would argue a ‘better’) way to complete PRs. Another setup: I’ve updated my local main and merged that into my local dev branch; I have made another code change, which I have pushed that to the remote from my VSCode. The Branches view in Azure DevOps now shows dev is one commit ahead of main.

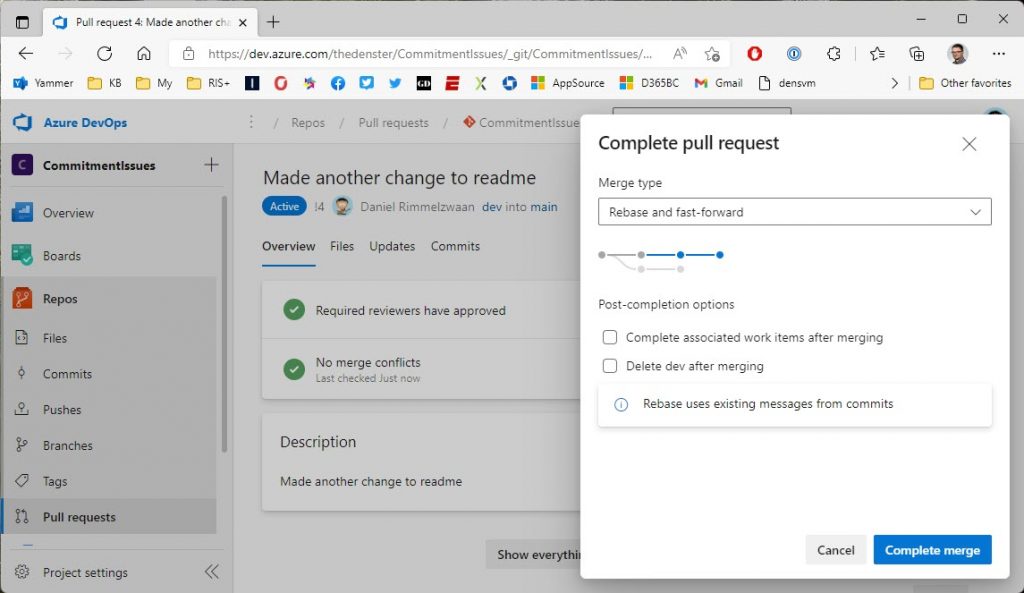
This time when you complete the PR, you select ‘Rebase and fast-forward’ as the Merge Type.

Because we are not merging, Git will not create a new commit. The result of this Merge Type is that the branches are in synch after completing the PR. There is no need for me to go back to VSCode and update my main branch.

So What is the Difference?

I’ll be totally honest here and tell you that I don’t really understand the difference between ‘Merge’ and ‘Rebase’. Something about where in the first the differences are actually merged and the changes are preserved in a new commit, and in the second the branch is rebased and the incoming changes are applied to that new base. I am sure that there is a distinct difference, and that this has an impact on the way you manage branches. I’ve looked for but could not find any posts that clearly explain the two with proper examples. I’m still looking, and I still want to know, but I have other more important things to worry about right now. Maybe a good topic to write about in the future :).

For practical purposes though, for the type of projects that I am involved in, I prefer the Rebase option. Personally, I prefer the branches to be synchronized when a PR is completed. Having to go back and pull the merge commit back into my local dev branch feels like a redundant step.

How to Populate a Test Suite

You’ve spent a bunch of time developing test codeunits, and you’ve figured out how to manually pull those into a Test Suite in the Business Central test toolkit. In this post, I will show you how you can automatically populate the test suite, which is especially useful for automatically testing your app in a build pipeline.

What Are We Talking About?

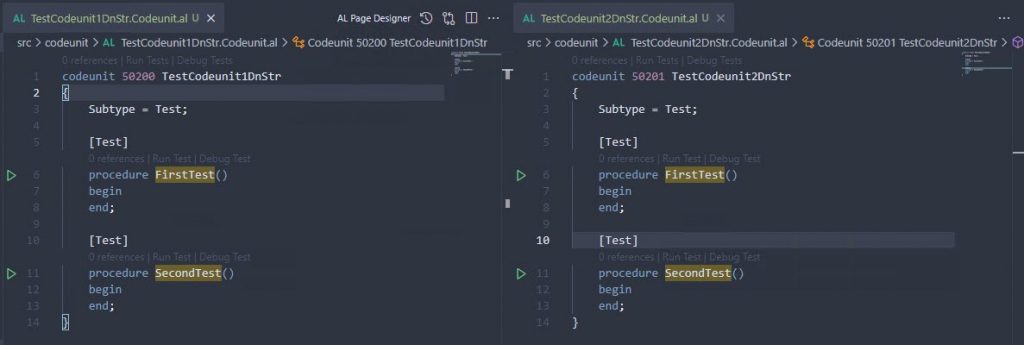
To keep the sample as simple as possible, I started with a Hello World app that I created with the “AL: Go!” command, plus a test app that has a dependency on it. In this test app, I have two test codeunits that don’t do anything. They are completely useless, just meant to show you how to get them into the test tool.

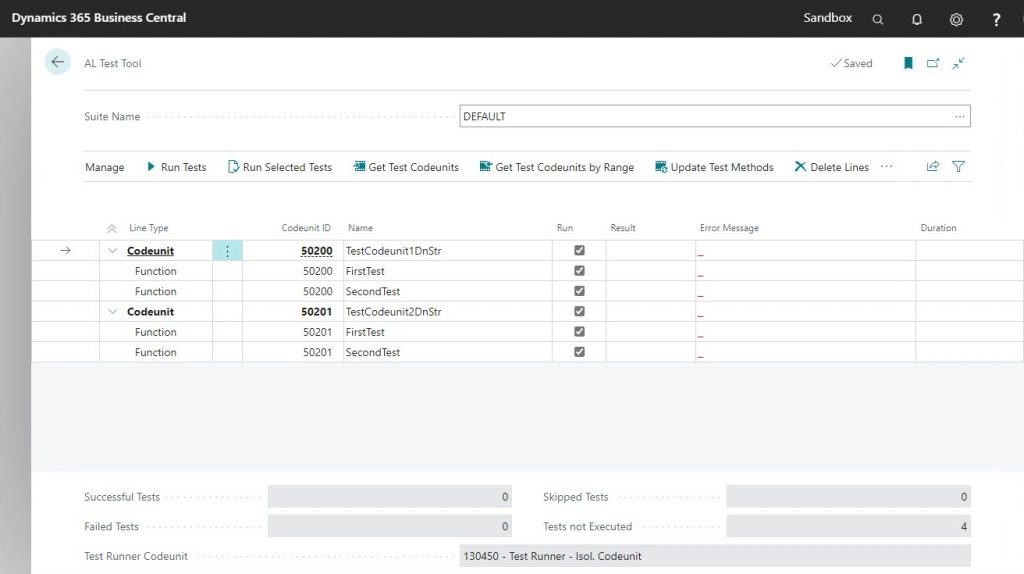
Those test codeunits are deployed into a BC container that has the test toolkit installed. This test toolkit (search for the ‘AL Test Tool’ in Alt+Q) is a UI that allows you to manually run these tests. Just like a standard BC journal page, when you first open the tool, it will create an empty record called ‘DEFAULT’ into which you must then get the test codeunits. Click on the “Get Test Codeunits” action, and only select the two useless codeunits. You should now see the codeunits and their functions in the Test Tool.

It’s kind of a drag to have to manually import the test codeunits into a Test Suite every time you modify something. To make it much easier on you, you can actually write code to do it for you. Put that code into an Install codeunit, and you never have to worry about manually creating a test suite again.

Show Me The Code!!

First we need an Install codeunit with an OnInstallAppPerCompany trigger, which is executed when the app is installed, both during an initial installation and also when performing an update or re-installation. You could probably create a separate “Initialize Test Suite” codeunit so you can run this logic in other places as well, but we are going to just write the code in our trigger directly.

The code below speaks mostly for itself. I like completely recreating the whole suite, but you can of course modify to your requirements. The important part of this example is a codeunit that Microsoft has given to us for this purpose called “Test Suite Mgt.”. This codeunit gives you several functions that you can use to make this possible.

codeunit 50202 InstallDnStr
{
    Subtype = Install;

    trigger OnInstallAppPerCompany()
    var
        TestSuite: Record "AL Test Suite";
        TestMethodLine: Record "Test Method Line";
        MyObject: Record AllObjWithCaption;
        TestSuiteMgt: Codeunit "Test Suite Mgt.";
        TestSuiteName: Code[10];
    begin
        TestSuiteName := 'SOME-NAME';

        // First, create a new Test Suite
        if TestSuite.Get(TestSuiteName) then begin
            TestSuiteMgt.DeleteAllMethods(TestSuite);
        end else begin
            TestSuiteMgt.CreateTestSuite(TestSuiteName);
            TestSuite.Get(TestSuiteName);
        end;

        // Second, pull in the test codeunits
        MyObject.SetRange("Object Type", MyObject."Object Type"::Codeunit);
        MyObject.SetFilter("Object ID", '50200..50249');
        MyObject.SetRange("Object Subtype", 'Test');
        if MyObject.FindSet() then begin
            repeat
                TestSuiteMgt.GetTestMethods(TestSuite, MyObject);
            until MyObject.Next() = 0;
        end;

        // Third, run the tests. This is of course an optional step
        TestMethodLine.SetRange("Test Suite", TestSuiteName);
        TestSuiteMgt.RunSelectedTests(TestMethodLine);
    end;
}

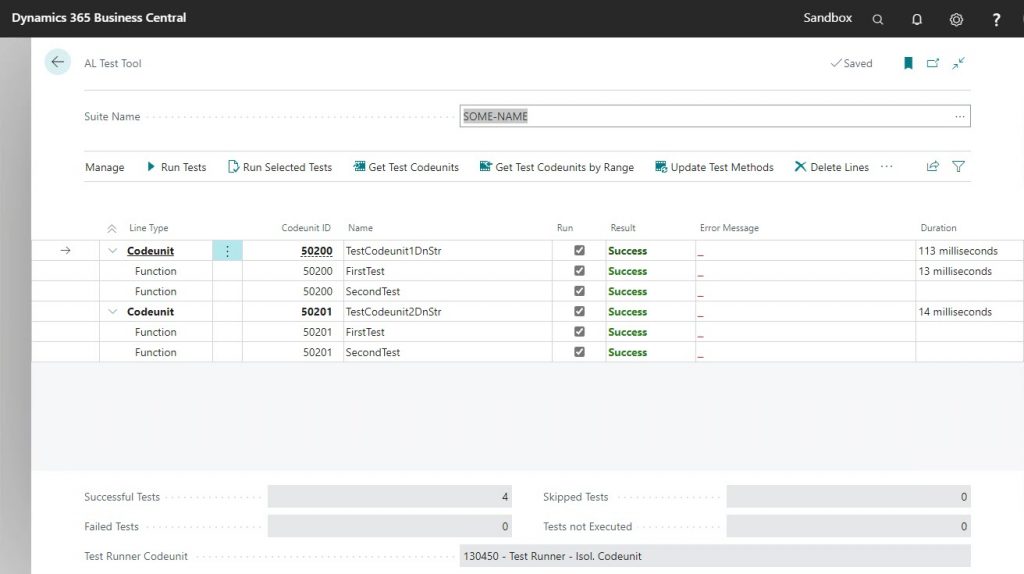
When you deploy your test app, it will now create a new Test Suite called ‘SOME-NAME’, it will pull your test codeunits with their test functions into the Test Suite, and it will execute all tests as part of the installation.

This code is very useful when you are developing the test code, because you won’t ever have to pull in any test codeunits into your test suite manually. Not only that, it will prove very useful when you start using pipelines, and you will be able to have precise control over which codeunits run at what point.

Dependencies

Here are the dependencies that I’m using :

  "dependencies": [
    {
      "id": "23de40a6-dfe8-4f80-80db-d70f83ce8caf",
      "name": "Test Runner",
      "publisher": "Microsoft",
      "version": "18.0.0.0"
    },
    {
      "id":  "5d86850b-0d76-4eca-bd7b-951ad998e997",
      "name":  "Tests-TestLibraries",
      "publisher":  "Microsoft",
      "version": "18.0.0.0"
    }
  ]

Credits

This post has been in my drafts for a while now, based on a question I posted to my Twitter, click on the Twee below to see the replies. The code in this post was copied almost verbatim from Krzysztof’s repo, he has a link in one of the replies. I had worked out my own example based on his code but I lost that when I had to clean up my VM’s.

SQL Server and Docker

Learn how to use SQL Server to access the databases in your Docker container

This post is for you if you want to be able to access the SQL Server database inside your Docker container, without having to write the query.

For one of my projects, I needed to be able to see the apps that were uninstalled but still had their schema in the tenant database. That information is in the $ndo$navappuninstalledapp table, and with SQL Server Management Studio (SSMS) it is super easy to look at table data. In my container I assumed that I would have to figure out a way to write the actual query (something I am not very good at). As it turns out, I was wrong. In this post I will explain two very easy ways to access the SQL Server database inside your Docker container.

SQL Server Management Studio

The first, most obvious, option is to do a complete install of SQL Server in whatever edition you have access to. If you want to keep things lean though, you can also install a standalone SSMS. You can download SQL Server Management Studio here.

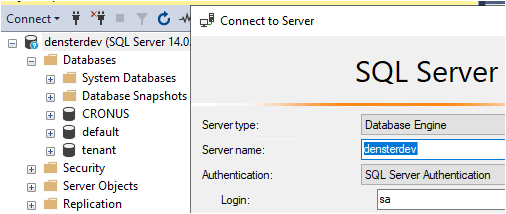
Connecting to a Docker container could not be easier. In the connection dialog, simply enter the name of your container as the server name, and SSMS will connect to it for you. I always use NavUserPassword authentication in my containers, and by default your container password will also work as the sa password inside the container.

My container is called ‘densterdev’, and you can see the default app and tenant databases inside the container.

All I needed to do was look at some table data, and that works just fine. I did not try to do anything more advanced than that.

SQL Server Extension in VSCode

The second option is even easier than installing SSMS, because you are already using VSCode to do your AL development. Microsoft has created a ‘SQL Server’ extension, which works very similar to SSMS. In the extensions search box in VSCode, type ‘SQL’ and select the one made by Microsoft.

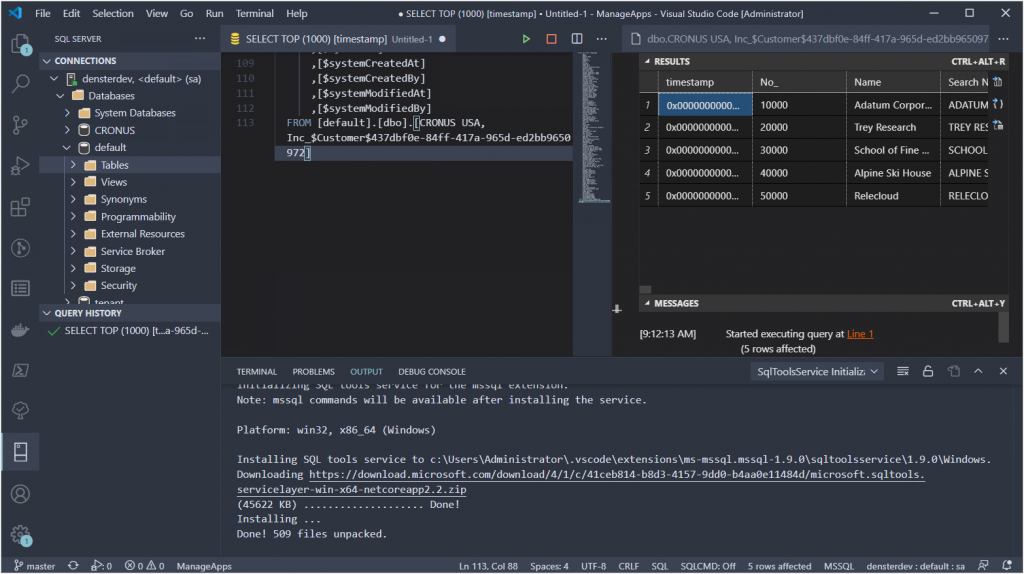
After installing you may need to reload VSCode to enable the extension. You will see a new tab on the left navigation pane that will show you the tooltip ‘SQL Server’ when you hover over it. When you click this tab, you will see a heading that says ‘Connections’ at the top, with a + sign next to it. Click this + and follow the prompts. Just like SSMS, you enter the container name as the server name, and it should connect to it with no problem.

The same app and tenant databases are shown inside VSCode

I still did not need to do anything more complex than looking at some data, so I really can’t say what features are available beyond that. My guess is that it is less capable than SSMS, so this may not be an option if you need more advanced capabilities.

Bye Bye WITH

This past week there was a PGI for the MVP’s about something that the Business Central team is preparing for, and they were asking the MVP’s for their feedback. The topic was their plan to discontinue the WITH statement from the AL language. For me personally this is not a big deal, because I’ve always hated using WITH, especially when it spans more than a page of code. I get distracted very easily, and I lose track of which variable these fields apply to. As a result, I’ve always tried to write code and mention variable names explicitly.

As you can imagine, emotions run high about this one, especially with people who like to get upset about stuff. I won’t point to specific instances of this because I don’t like to call people out and get them even more upset. I just want to share some details with you.

There is no ‘official announcement’ but Esben replied to an issue in the AL repo on github here. Microsoft put together a virtual event and created a bunch of videos where they present a lot of content about Business Central here: https://aka.ms/virtual/businesscentral/2020RW1. The details about why they are getting rid of WITH are in the “Interfaces and extensibility” video, which you can find under the Developer track in the Library.

Good Reason

Microsoft is not just implementing this change because they like making our lives difficult. There are some very serious problems related to the WITH statement, especially surrounding dependencies between apps. There are two types of WITH statements:

  • Explicit WITH – this is when you see the keyword ‘with’ in your AL code, and it is meant to make it so that you don’t have to repeat the variable name. Very handy if you want to set a bunch of field values, let’s say in a Customer record variable, you can type ‘with Customer do begin’ and now you can access fields directly without having to type the variable name for each one of them
  • Implicit WITH – this is when a record is implied, like on page objects or in a report dataitem. You can simply type field names, and its record is implied because of where the code is written. By the way, it looks like for now they are letting us keep the implicit WITH (meaning we won’t have to type out ‘Rec’) in table and tableextension objects.

Let’s say you add a procedure called ‘IsImportant’ to a codeunit in which you have a WITH statement, or to a page (doesn’t matter which table the page shows). You call the IsImportant procedure to run some business logic. Everything works great.

The problem occurs when Microsoft then adds a field or a procedure with the same name. Let’s say your IsImportant function does something in some logic about the Vendor table. If Microsoft now adds a field called IsImportant, there is an ambiguity about what this refers to. In your code, it will never reach the Vendor table, because it will find the function in your object before it gets to the Vendor table. Or vice versa, depending on how the code is written and what the scope is at that time. The presentation that I mentioned before will have a bunch of examples to explain, so come back in a few days and I will add a link to the recording to this post.

Not leaving us hanging

One thing to remember is that Microsoft is NOT going to just throw this out at us and leave us high and dry, without any help in fixing this. One of the people on the call had already done some investigating, and figured out that he will have to fix this in 21,000 places in a variety of apps for his customers. This is a LOT of work, and we all need some time to process this.

Some things to remember:

  • This is currently in preview in the AL insider build, and the target is the next major version of the AL language
  • At that time, these will still not be errors, but warnings. The statement will not actually go away until 2021. I can’t find in my notes if it will be wave 1 or 2, but at the earliest this will be spring 2021
  • You will not have to go searching for them yourself, the code analyzer will show you exactly where they are
  • Microsoft is working on tools to help us. The proof of concept that was shown to us was a first version where you have to open each page object and click on the tool and it will fix the implicit WITH on the whole page for you
  • There was also a tool to fix an explicit WITH in code. Both of these tools were still first versions, but they worked and looked like they were easy to use
  • There were already some discussions about options on maybe creating some external tools that utilize these tools. We have a wonderful community of people that are creating AL tools, and I am pretty sure that by the time this becomes really important (meaning by the time you can’t postpone this any longer) we will have really handy tools that will make this a piece of cake

Start NOW

You could include the rule in your ruleset.json file (it’s rule AL0606 for explicit WITH and AL0604 for implicit WITH) and completely ignore the issue. You would be doing yourself a disservice though. I would recommend that you stop using WITH immediately, and start fixing it in every object that you touch from now on, at the very least the explicit WITH. I might wait fixing implicit WITH statements on page objects until there is a more user friendly version of the tool, but I am absolutely going to try and see how much work it actually is.

If it’s one of those point/click fixes and it takes no effort at all, I can totally see myself just whip out 4-5 pages at a time while a container is rebuilding. If you have a ton of customers with a ton of customizations then yes it could be a big task, and you might want to wait until there is a better tool to help you through.

This is one of those things that you can’t postpone forever, you will have to address it at some point. I don’t like having to “fix” something like this either, but there are more important things in this world right now, I just can’t get upset about it.

Look Out for the Code Police

One of the coolest features in VSCode is the ability to check your code at design time for specific things. This post will explain how you can turn on code analysis, and how to get away with breaking the rules that it tries to enforce.

There are three things you have to know about code analysis: First, it is a feature that can be enabled and disabled at will. Second, there are sets of rules for specific purposes that you can turn on and off. Finally, you can define exceptions to those rules, and what to do when the code analyzer finds a violation of one of the rules. All three items are found in the user settings, and the exceptions are then stored in a separate file called a ‘ruleset.json’ file.

Open the user settings from the Command Palette. You will need to have different levels of scrutiny for different projects, like one client has an on premises implementation, and another is developing an app for AppSource. These must follow different sets of rules, so they get their own codeanalyzers. Since each project is different, I would say that you define the code analysis attributes at the workspace level. You can set these features up in the sort of UI rendering of user settings, but I like to see the json file in the editor and use Intellisense there.

The code analysis feature is turned on by setting “al.enableCodeAnalysis” to “true”. In the “al.codeAnalyzers” property, you can define which set of rules is enabled. The one you should always enable is the ‘CodeCop’, which enforces some basic syntax rules. Then, depending on whether you are doing development for AppSource or for a tenant specific extension you can choose either the ‘AppSourceCop’ or the ‘PerTenantExtensionCop’. You should not have both of those last two enabled at the same time, because some rules for AppSource don’t apply for PerTenant and vice versa.

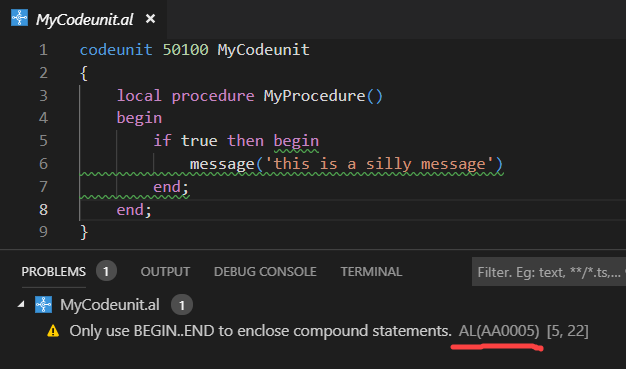
In my settings.json, I’ve turned on code analysis, and I have enabled the CodeCop and the AppSourceCop. To show you what this looks like when code analysis finds a violation in a code editor I’ve created a very simple codeunit:

Code analysis doesn’t like my code, the CodeCop does not approve of using BEGIN..END for a single statement. Personally I don’t agree with that rule, because I always use BEGIN..END in IF statements, I make fewer mistakes that way. The rule is not really a big problem, because the squiggly line under my code is green. If I had violated a really important rule, like missing a prefix in a field name, it would have been red.

Lucky for me, I can define for myself how certain rules are handled. Note that the problems screen shows which rule is broken (number AA0005). Let me show you how you can define what happens.

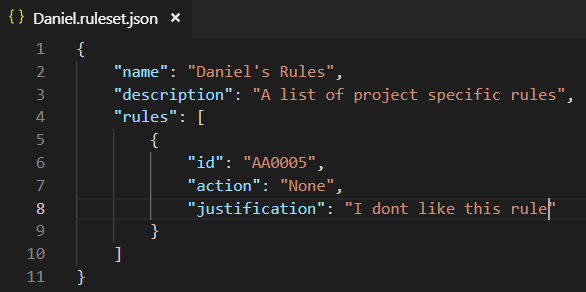
First, you create a new .json file in your workspace, and you set it up to be a ruleset. I am calling mine ‘Daniel.ruleset.json’ and I am putting it in my workspace root. Here’s a screenshot of the ruleset file:

Under the “action” you can set what you want to happen when this rule is broken. I don’t like the rule at all so I want it to ignore this rule altogether so I’ve set it to “None”. All you have to do now is tell settings where to look for additional rulesets, like this:

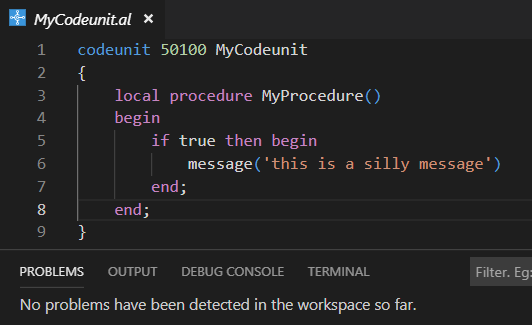
The rule itself still works, I’ve just overridden its behavior to something that I like. Going back to my codeunit, there is no longer the annoying little squiggly line, and this violation is no longer listed in the problems window.

No problem, I’m happy 🙂

One word of warning about using the ruleset to create exceptions on AppSource rules. Some of these rules are there because they are required for acceptance into AppSource. For instance, you MUST give EVERY field name a specific prefix/suffix. You can turn this rule off, but if any of your fields is missing a prefix/suffix, your app will not be accepted. Be aware which rules you break, because the code police WILL find you eventually 🙂